メインコンテンツにスキップ

Canon PowerShot A2200 Lens Assembly Replacement

必要な工具と部品

  1. Canon PowerShot A2200 Lens Assembly Replacement, Back Cover: 手順 1、 1の画像 1
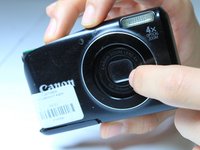
    • First, remove the batteries and memory card.

    • Remove the 5.0 mm black screw with a Phillips #00 screwdriver.

    • Remove the 5.0 mm silver screw with a Phillips #00 screwdriver.

  2. Canon PowerShot A2200 Lens Assembly Replacement: 手順 2、 1の画像 1
    • Remove the 5.0 mm black screw on the right with a Phillips #00 screwdriver.

  3. Canon PowerShot A2200 Lens Assembly Replacement: 手順 3、 1の画像 1
    • Remove the 5.0 mm screw on the left with a Phillips #00 screwdriver.

  4. Canon PowerShot A2200 Lens Assembly Replacement: 手順 4、 3の画像 1 Canon PowerShot A2200 Lens Assembly Replacement: 手順 4、 3の画像 2 Canon PowerShot A2200 Lens Assembly Replacement: 手順 4、 3の画像 3
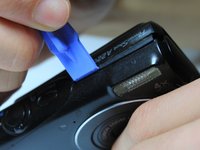
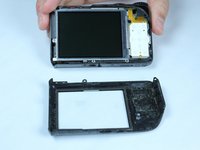
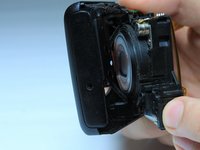
    • Begin taking off the back cover with a plastic opening tool.

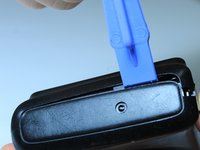
    • Begin by wedging the plastic opening tool behind the bottom left corner of the LCD screen as shown.

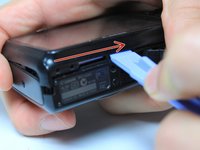
    • Slide the plastic opening tool to the right, along the mating edge, to pry off the back cover.

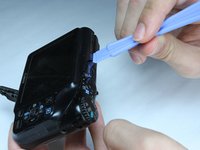
    • Continue taking off the back cover along the left side of the camera as seen in the third picture.

  5. Canon PowerShot A2200 Lens Assembly Replacement: 手順 5、 3の画像 1 Canon PowerShot A2200 Lens Assembly Replacement: 手順 5、 3の画像 2 Canon PowerShot A2200 Lens Assembly Replacement: 手順 5、 3の画像 3
    • Use the plastic opening tool to separate the top section of the back cover from the frame.

    • Once there is enough separation between the back cover and the frame, remove the back cover for replacement.

  6. Canon PowerShot A2200 Lens Assembly Replacement, Button Assembly: 手順 6、 2の画像 1 Canon PowerShot A2200 Lens Assembly Replacement, Button Assembly: 手順 6、 2の画像 2
    • Remove the internal 4.4mm screw with a Phillips 00 screwdriver.

    • Make sure you're removing the screw circled in red, not the screw crossed out in orange.

  7. Canon PowerShot A2200 Lens Assembly Replacement: 手順 7、 1の画像 1
    • Gently lift of the buttons for replacement. They should come off without excessive force.

    • If the buttons do not lift off easily, you may have unscrewed the wrong screw. Revert to previous step.

  8. Canon PowerShot A2200 Lens Assembly Replacement, LCD Screen: 手順 8、 1の画像 1
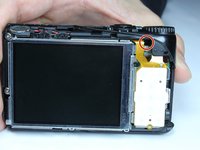
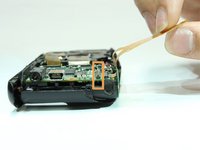
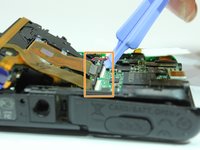
    • Lift up the electrical ribbon shown to access the next screw.

    • Remove the 3.9 mm screw with a Phillips #00 screwdriver.

  9. Canon PowerShot A2200 Lens Assembly Replacement: 手順 9、 1の画像 1
    • Remove the 3.9 mm screw with a Phillips #00 screwdriver.

  10. Canon PowerShot A2200 Lens Assembly Replacement: 手順 10、 1の画像 1
    • Remove the two 3.9 mm screws shown with a Phillips #00 screwdriver.

  11. Canon PowerShot A2200 Lens Assembly Replacement: 手順 11、 2の画像 1 Canon PowerShot A2200 Lens Assembly Replacement: 手順 11、 2の画像 2
    • There is an electrical flap that holds the LCD ribbon down. Note the flap in is closed position.

    • Lift up the flap with a plastic opening tool.

  12. Canon PowerShot A2200 Lens Assembly Replacement: 手順 12、 1の画像 1
    • Holding the outer frame of the LCD screen, gently lift the LCD screen for replacement.

  13. Canon PowerShot A2200 Lens Assembly Replacement: 手順 13、 3の画像 1 Canon PowerShot A2200 Lens Assembly Replacement: 手順 13、 3の画像 2 Canon PowerShot A2200 Lens Assembly Replacement: 手順 13、 3の画像 3
    • This step is only for replacement. If you are not replacing the LCD screen, skip this step.

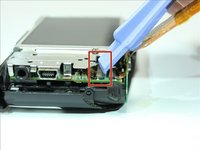
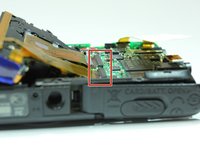
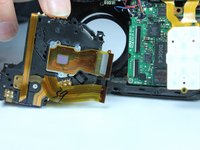
    • Locate ribbon flap, enclosed in red. (picture 1)

    • Using a plastic opening tool, lift up the ribbon flap to allow insertion of the LCD ribbon. (picture 2)

    • Place the LCD screen on the camera and align the ribbon underneath the open ribbon flap. Close the ribbon flap onto the ribbon. (picture 3)

  14. Canon PowerShot A2200 Lens Assembly Replacement, Lens Assembly: 手順 14、 1の画像 1
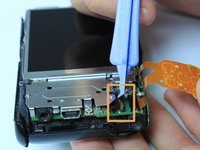
    • Remove the two 5.3 mm screws circled in red with a Phillips #00 screwdriver.

    • Remove the 4.4 mm screw circled in orange with a Phillips #00 screwdriver.

  15. Canon PowerShot A2200 Lens Assembly Replacement: 手順 15、 2の画像 1 Canon PowerShot A2200 Lens Assembly Replacement: 手順 15、 2の画像 2
    • Gently press the front of the lens to begin to remove it from the frame.

    • Gently angle out the lens from the frame as seen in picture 2.

    • A thin circular ribbon should fall out from the front of the lens. Note its original location on the front cover for reassembly.

  16. Canon PowerShot A2200 Lens Assembly Replacement: 手順 16、 3の画像 1 Canon PowerShot A2200 Lens Assembly Replacement: 手順 16、 3の画像 2 Canon PowerShot A2200 Lens Assembly Replacement: 手順 16、 3の画像 3
    • Locate the two electrical ribbons that are attached to the main motherboard.

    • Lift up the two black flaps on the motherboard that hold the electrical ribbons in place.

    • Gently remove the lens for replacement.

終わりに

To reassemble your device, follow these instructions in reverse order.

ある他の人がこのガイドを完成しました。

作成者

2人の作成者と共同で作成されました。

Benjamin Gee

メンバー登録日: 03/31/15

899 ポイント

5のガイドは作成済み

チーム

Baylor, Team 4-5, Williams Spring 2015 Baylor, Team 4-5, Williams Spring 2015人のメンバー

BU-WILLIAMS-S15S4G5

4 メンバー

11のガイドは作成済み

2 件のコメント

Great guide, used it to tear down my A2200.  Found an internal battery:MS6145E located on the top ICB (where the flash is,) does anyone know what this does/powers?

My camera, according to Canon USA has a bad sensor(?) because the display fails after taking one photo, but they did not say what sensor or its location.  I tore it down looking for sensors and found one for the flash/redeye and a questionable object (I don’t think it’s a sensor.)

Ken Short - 返信

If the issue persists, you need to go ahead and update your printer driver. Go to the website of the manufacturer and search for your Canon Printer Error State drivers. Download the driver's recent version manually.

Smith John - 返信

コメントを追加

統計データ:

過去 24時間: 3

過去 7 日: 15

過去 30 日: 69

今までの合計 3,856