
光学エンクロージャーベイのデュアルハードドライブの交換

はじめに
手順 1 に進む光学エンクロージャーベイ78,79,81番用の必須条件
-
-
-
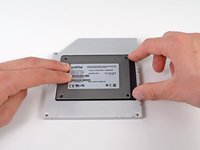
ハードドライブがぴったりと装着できたら、ハードドライブをエンクロージャの底部に固定しながら、プラスチック製ポジショナを再挿入します。
-
オリジナルの光学ドライブから取り外したケーブルを光学エンクロージャーベイに再接続します。
Why no mention of attaching the new hard drive to the Optical Drive Enclosure using the enclosed phillips screws?
Once you have securely inserted the new hard drive into the Optical Drive Enclosure and replaced the plastic positioner you should attach the drive to the enclosure using two of the provided phillips screws. Two holes on the underside of the enclosure should align with two attachment holes on the underside of the drive.
I suspect that the plastic positioner will secure the drive well enough (for this style of adapter). As I mentioned in earlier comment, this should mean you can replace / upgrade the SATA drive later without needing to remove the adapter, skipping many steps.
Do you need a sata cable to connect the new drive to the board or does it connect via the optical drive cable that we disconnected earlier?
It does connect to the optical drive cable but if you don't use the optical bay enclosure you'll need a 13 pins to 22 pins sata adaptor (and some tape!)
The sata cable for the optical drive has 6 + 7 pins while ssd and hhd have 15 + 7 pins
Can someone please explain why you need to remove the black plastic faceplate from the optical bay enclosure. It is designed to receive the standard SSD. What is gained from removing a part of it?
Peter Bull - 返信
Thank you! This guy has made upgrading the mid 2010 iMac I inherited from my mom MUCH easier and saved me a lot of time, trial, and error.
I'm a little confused. Do I need the enclosure from ifixit or am I removing the optical drive and installing an ssd in the preexisting op drive enclosure? If using the already existing enclosure what type of ssd do I need as for Sata connectors?
-


デバイスを再組み立てする際は、これらのインストラクションを逆の順番に従って作業を進めてください。
デバイスを再組み立てする際は、これらのインストラクションを逆の順番に従って作業を進めてください。
ある他の人がこのガイドを完成しました。
以下の翻訳者の皆さんにお礼を申し上げます:
100%

Midori Doiさんは世界中で修理する私たちを助けてくれています! あなたも貢献してみませんか?
翻訳を始める ›


コメント 1 件
Great guide, however I think you overestimated the difficulty of it. The biggest challenge is not stripping any screws and being sure to have all sizes that you may possibly need including some that might not be standard because stripping screws is very possible. Otherwise, nice job
What’s the switch for on the inside of the caddy? What position should it be in? Mine came switched to the right (towards SATA connector that disk inserts into).
Robert Lord - 返信