メインコンテンツにスキップ

‎Battery powered, cordless Two AA batteries required Manufacture Date 2006 ASIN B00014TDJE 5537-715

1回答 すべてを表示

Any ideas on placement of metal part during reassembly?

Basically dismantled the unit to clean as hair gets everywhere, a small metal part fell out before i had the chance to take a placement photo, and now can’t quite figure how it’s meant to realign. Everything else appears to be in order I just can’t place this small metal lever which I’m guessing is what closes the circuit.

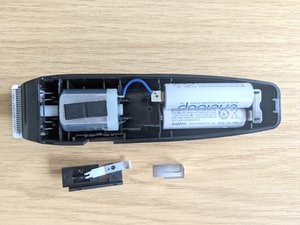
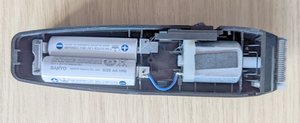
Below is an image of the unit which illustrates the area where the black plastic switch is meant to slot in on the bottom of the image, along with the black plastic switch underneath the unit alongside the metal part that I cannot seem to place correctly. You can see the small metal solder on the bottom right of the motor unit, which i suspect may be what the metal ‘clip’ part is meant to close the circuit on:

Block Image

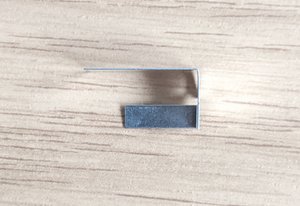
Below are close ups of the actual metal part that I cannot fit correctly into the unit:

Block Image

Block Image

Block Image

Block Image

Block Image

Block Image

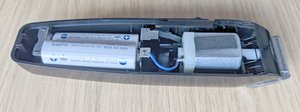
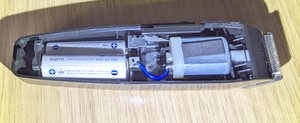
Below is an image of the black plastic switch in position within the unit:

Block Image

Can upload more images if there is something specific that i need to include.

回答がありました! 回答を表示 同じ問題があります

この質問は役に立ちましたか?

スコア 1
2 件のコメント

hello Stripey , can you post a photo of this part?

さんによる

@behavintradie Hi, yes apologies i've just got my phone up and running again.

I can post more informational images if of use - please do let me know.

Thanks,

S

さんによる

コメントを追加

3件の回答

ベストアンサー

So the obvious clue that i was missing - which i could not for the life of me find - was a pinhole in the metal bracket which slots over a corresponding plastic pin on the main body.

The metal bracket sits vertically - not horizontally - and actually provides the second contact point for battery number two, to close and complete the circuit.

I’ve added further photography below to try and illustrate how it is seated within the casing:

Block Image

Block Image

Block Image

このアンサーは役に立ちましたか?

スコア 1
コメントを追加
最も参考になった回答

I’ve uploaded three short videos highlighting the inner space between switch and motor as well as the layout of the top cover in the hopes that this might reveal the proposed location of the metal bracket:

このアンサーは役に立ちましたか?

スコア 1
コメントを追加

thanks for uploading photos Stripey, really detailed, excellent photography skills. :) now i know what you were talking about. this metal part connects battery to the switch , as the switch slides up and down, it actually connects from this metal plate to the motor, its common in little dc devices to use a motor casing ( the chassis) to act as one of the terminals. i can see that the battery negative terminal has a spring and blue wire connecting to one of the motor terminals, but the second battery positive terminal doesn’t have anything to connect to, thats where the metal part comes in using one of the right angle surfaces to act as a terminal for the battery, whilst the other part extends to connects to the sliding switch. what i don’t see is some little narrow slot next to the battery, where the part would sit securely making its way through the plastic to the switch. maybe it’s in the underside of the other cover ? have a look, and good luck.

このアンサーは役に立ちましたか?

スコア 0

6 件のコメント:

Hello Stripey, don't get confused by my theory of motor using its' chasis as a terminal, it could also be that the switch when slides - bends the narrow part of the metal , connecting to the motor terminal. even with your excellent photos, i can't see any working parts "wear and tear" signs - which are very helpful in reassembly of any device . little things like round press and rotate markings of the battery terminals touching the metal, or the switch sliding , which would for sure make any repetitive rub marks on the connecting part.

さんによる

Hi Martin, cheers for your response. It sounds like as I expected, that small metal bracket is supposed to close the circuit allowing the motor to operate. But i also cannot see any telltale signs of wear and tear sadly, I've only used the thing maybe five times. I'm going to try and upload a video i've taken of the aperture to see if this sheds more light on how that part is supposed to slot in to the casing. You are right as well about the location against its top cover - there is a small bulkhead on the inner right side of the cover which must serve some purpose around locating the metal bracket.

さんによる

Hi Stripey, Jim . , third video - where you are pointing at a slot with the screwdriver , i think thats where the sliding switch would fit in , but more often the corresponding slot is in the outter casing of the whole shaver ( or any handheld device ) it marries up as a two part covers making room for the switch to fit in and travel.

さんによる

i like good challenge - but at this stage i can't visualise the exact position, angle etc of this metal plate . the white casing is i presume - cover for the motor , with the one screw holding it together with the outside cover. if you can place the white cover back onto the motor , and the outside casing next to it ( like an open sandwich ) and / or the white cover into the other casing and take another video please, slowly panning around to have a close but birdseye view of it, i would appreciate it. i hope you didn't get discouraged yet. i understand it might be starting to get frustrating by now, but i think you can fix it, it's just the moment of ( @#$%^&) being dificult , when the moment of YES ! it's worth progressing for. .

さんによる

I found it - i've posted it as the answer just above (or below)

さんによる

1以上のコメントを表示

コメントを追加

回答を追加する

Stripey Cat さん、ありがとうございました!
統計データ:

過去 24時間: 0

過去 7 日: 0

過去 30 日: 4

今までの合計 85