注意:あなたは必要条件ガイドを編集しています。あなたが行なう変更は、この手順を含む全ての22個のガイドに反映されます。
手順 8を翻訳中
手順8
-
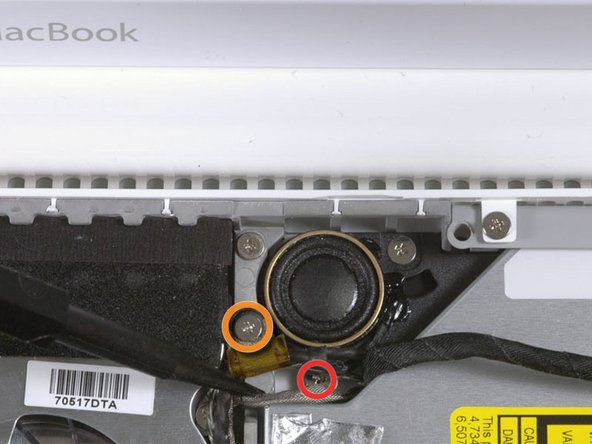
Remove the 2 mm Phillips #00 screw securing the rear corner of the optical drive.
-
The silver-jacketed Bluetooth cable may be covering the screw. If so, carefully push it aside. You may need to remove the screw holding the ground shield lugs for the two nearby cables before you can move the Bluetooth cable aside sufficiently. This screw is 7mm in earlier models, and may be 4.2mm in Santa Rosa/Penryn and 2009 models.
| - | [* red] Remove the 2 mm Phillips #00 screw securing the optical drive. |
|---|---|
| - | [* orange] The Bluetooth cable may be covering the screw. If so, carefully push it aside. You may need to unscrew the cable clip to free the cable enough. |
| + | [* red] Remove the 2 mm Phillips #00 screw securing the rear corner of the optical drive. |
| + | [* icon_note] When reinstalling this screw, make sure none of the cables nearby get caught under the screw's head. |
| + | [* orange] The silver-jacketed Bluetooth cable may be covering the screw. If so, carefully push it aside. You may need to remove the screw holding the ground shield lugs for the two nearby cables before you can move the Bluetooth cable aside sufficiently. This screw is 7mm in earlier models, and may be 4.2mm in Santa Rosa/Penryn and 2009 models. |
クリエイティブコモンズのオープンソース著作権のもと、あなたの投稿は著作権の対象となります。