メインコンテンツにスキップ

Procedimiento de apertura

注意:あなたは必要条件ガイドを編集しています。あなたが行なう変更は、この手順を含む全ての5個のガイドに反映されます。

英語
スペイン語

手順 6を翻訳中

手順6
Opening Procedure: 手順 0、 3の画像 1 Opening Procedure: 手順 0、 3の画像 2 Opening Procedure: 手順 0、 3の画像 3
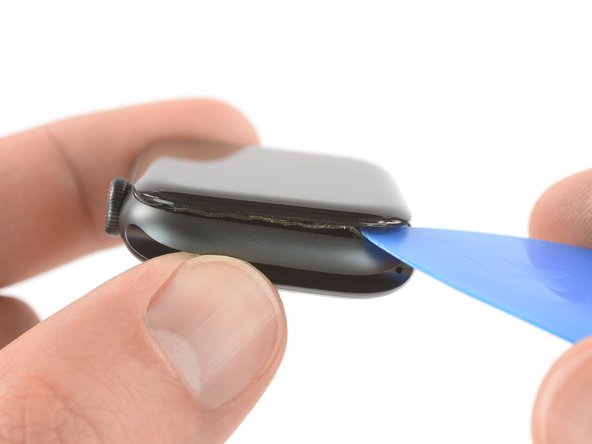
  • It's likely that the Force Touch sensor will stick to the display frame instead to the watch's body. In this case, insert an opening pick under the display and carefully separate the Force Touch gasket from the display.

  • To preserve the Force Touch gasket, pry carefully under the edge of the display. If the Force Touch gasket splits when lifting the display, or if you separate the gasket layers, you'll also need to replace the Force Touch gasket itself.

  • Slide the pick around the display to separate the adhesive between the Force Touch gasket and the display.

  • Don't insert the opening pick deeper than 1/16th of an inch (~2 mm) to avoid damaging other components.

Es probable que el sensor Force Touch se pegue al marco de la pantalla en vez de al cuerpo del reloj. En este caso, inserta una púa de apertura debajo de la pantalla y separe cuidadosamente la junta de Force Touch de la pantalla.

Para conservar la junta Force Touch, haz palanca con cuidado bajo el borde de la pantalla. Si la junta se rompe al levantar la pantalla, o si separas las capas de la junta, también deberás reemplazar la junta de contacto.

Desliza la púa alrededor de la pantalla para separar el adhesivo entre la junta de Force Touch y la pantalla.

No insertes la púa de apertura a más de 2 mm para evitar dañar otros componentes.

クリエイティブコモンズのオープンソース著作権のもと、あなたの投稿は著作権の対象となります