メインコンテンツにスキップ
Yuneec Breeze 4K Motherboard Replacement

Yuneec Breeze 4K Motherboard Replacement

Ryanne Millis

Ryanne Millis とその他 4 人の作成者

最終更新日: May 7, 2024

20 - 30 分
中レベル

Is your drone not functioning the way you want it to? Consider using this guide to replace the motherboard in your drone.

必要な工具と部品

  1. Yuneec Breeze 4K Motherboard Replacement, Motherboard M7: 手順 1、 2の画像 1 Yuneec Breeze 4K Motherboard Replacement, Motherboard M7: 手順 1、 2の画像 2
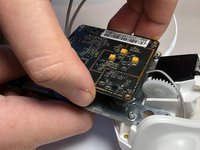
    • Before you begin start by putting on a ESD wrist strap to prevent ESD damage and remove the battery.

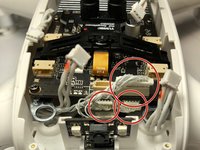
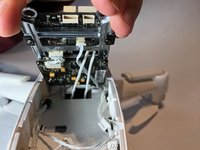
    • Flip over the drone so that the propellers are facing down and the camera is facing up.

  2. Yuneec Breeze 4K Motherboard Replacement: 手順 2、 3の画像 1 Yuneec Breeze 4K Motherboard Replacement: 手順 2、 3の画像 2 Yuneec Breeze 4K Motherboard Replacement: 手順 2、 3の画像 3
    • Grip the cover that covers the rest of the wires, and give it a slight pull to remove it.

  3. Yuneec Breeze 4K Motherboard Replacement: 手順 3、 1の画像 1
    • Remove the 4 rubber plugs that hold the drone and its internal parts together.

    • These plugs can be located in each corner of the drone, and are white.

  4. Yuneec Breeze 4K Motherboard Replacement: 手順 4、 1の画像 1
    • Unplug the four cables that are connected on the top face of the frame.

  5. Yuneec Breeze 4K Motherboard Replacement: 手順 5、 2の画像 1 Yuneec Breeze 4K Motherboard Replacement: 手順 5、 2の画像 2
    この手順で使用する道具:
    Tweezers
    $4.99
    • The rest of the wires that are still connected can be unplugged.

    • Using a pair of tweezers they can be unplugged.

  6. Yuneec Breeze 4K Motherboard Replacement: 手順 6、 3の画像 1 Yuneec Breeze 4K Motherboard Replacement: 手順 6、 3の画像 2 Yuneec Breeze 4K Motherboard Replacement: 手順 6、 3の画像 3
    • Lift up or tilt entire frame and mother board and unplug all the wires.

  7. Yuneec Breeze 4K Motherboard Replacement: 手順 7、 3の画像 1 Yuneec Breeze 4K Motherboard Replacement: 手順 7、 3の画像 2 Yuneec Breeze 4K Motherboard Replacement: 手順 7、 3の画像 3
    • The battery connector has two wires connected to a plug in with two little screws.

    • Unscrew the two screws and pull it apart using a small tweezers.

  8. Yuneec Breeze 4K Motherboard Replacement: 手順 8、 1の画像 1
    • Flip over the frame and mother board and unscrew the mother board.

    • There are four screws on each corner of the mother board.

  9. Yuneec Breeze 4K Motherboard Replacement: 手順 9、 2の画像 1 Yuneec Breeze 4K Motherboard Replacement: 手順 9、 2の画像 2
    • After the screws are out, the motherboard can be pulled out softly with hands.

    • Remove the motherboard from the device.

終わりに

To reassemble your device, follow these instructions in reverse order.

5 の人々がこのガイドを完成させました。

作成者

4人の作成者と共同で作成されました。

Ryanne Millis

メンバー登録日: 10/04/18

318 ポイント

1ガイドが承認済み

チーム

UW Stout, Team S6-G5, Ogden Fall 2018 UW Stout, Team S6-G5, Ogden Fall 2018人のメンバー

UWSTOUT-OGDEN-F18S6G5

4 メンバー

4のガイドは作成済み

コメント 1 件

Excellent step by step instructions.

paul_courville - 返信

コメントを追加

統計データ:

過去 24時間: 0

過去 7 日: 1

過去 30 日: 6

今までの合計 2,041