メインコンテンツにスキップ

Toshiba Satellite C55Dt-A5306 Disc Drive Replacement

必要な工具と部品

  1. Toshiba Satellite C55Dt-A5306 Disc Drive Replacement, Battery: 手順 1、 1の画像 1
    • Place fingers on the latches and slide outwards to unlock.

  2. Toshiba Satellite C55Dt-A5306 Disc Drive Replacement: 手順 2、 1の画像 1
    • Remove battery.

  3. Toshiba Satellite C55Dt-A5306 Disc Drive Replacement, Back Cover: 手順 3、 1の画像 1
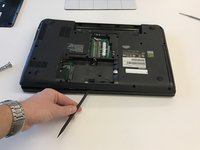
    • Using the Phillips Head #0 Screwdriver, remove one 3mm Phillips #0 screw as indicated.

  4. Toshiba Satellite C55Dt-A5306 Disc Drive Replacement: 手順 4、 1の画像 1
    • Remove hard drive cover. Using the Phillips Head #0 Screwdriver, remove seven 3mm Phillips #0 screws as indicated.

  5. Toshiba Satellite C55Dt-A5306 Disc Drive Replacement: 手順 5、 1の画像 1
    • Using the Phillips Head #0 Screwdriver, remove twelve 3mm Phillips #0 screw as indicated.

  6. Toshiba Satellite C55Dt-A5306 Disc Drive Replacement: 手順 6、 2の画像 1 Toshiba Satellite C55Dt-A5306 Disc Drive Replacement: 手順 6、 2の画像 2
    • Using the plastic spudger, pry the back off along the periphery of the laptop.

  7. Toshiba Satellite C55Dt-A5306 Disc Drive Replacement, Disc Drive: 手順 7、 2の画像 1 Toshiba Satellite C55Dt-A5306 Disc Drive Replacement, Disc Drive: 手順 7、 2の画像 2
    • Slide the disc drive to the left. It should come off with ease.

終わりに

To reassemble your device, follow these instructions in reverse order.

作成者

3人の作成者と共同で作成されました。

zeena qiryaqoz

メンバー登録日: 01/17/17

301 ポイント

3のガイドは作成済み

チーム

Oakland University, Team 2-3, Ruskiewicz Winter 2017 Oakland University, Team 2-3, Ruskiewicz Winter 2017人のメンバー

OAK-RUSKIEWICZ-W17S2G3

4 メンバー

14のガイドは作成済み

コメント 1 件

Change the title to say "optical drive," rather than "disc drive." I was fooled while looking for instructions on removing the hard drive.

ed_l_grey - 返信

コメントを追加

統計データ:

過去 24時間: 0

過去 7 日: 1

過去 30 日: 1

今までの合計 419