メインコンテンツにスキップ
Sony SRS-XB40 Speaker Replacement

Sony SRS-XB40 Speaker Replacement

Zack Coker

Zack Coker とその他 3 人の作成者

最終更新日: May 2, 2018

10 - 15 分
中レベル

In this guide, you will learn how to disassemble the speaker housing first, and then how to replace the actual speaker itself. This is a quick and easy replacement guide.

必要な工具と部品

パーツ

ツール

もっと見る

  1. Sony SRS-XB40 Speaker Replacement, Speaker Assembly Replacement: 手順 1、 1の画像 1
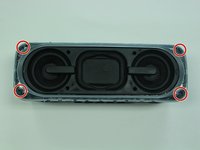
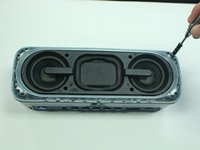
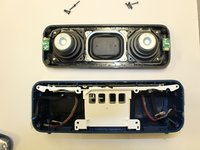
    • Remove the speaker case from the outer casing by prying it from the base of the speaker using a metal spudger.

  2. Sony SRS-XB40 Speaker Replacement: 手順 2、 1の画像 1
    • Remove the four T-8 screws (15 mm long) from the black speaker face.

  3. Sony SRS-XB40 Speaker Replacement: 手順 3、 1の画像 1
    • Pry the two rubber end pieces loose enough to pry off two pieces of the long plastic casing from the speaker body using a metal spudger.

  4. Sony SRS-XB40 Speaker Replacement: 手順 4、 1の画像 1
    • Pry the two remaining rubber pieces of the casing completely away from the body of the speaker with the same metal pry tool.

  5. Sony SRS-XB40 Speaker Replacement: 手順 5、 2の画像 1 Sony SRS-XB40 Speaker Replacement: 手順 5、 2の画像 2
    • Once you have removed the outer blue casing, four T-8 screws (15 mm long) will be revealed on each corner. After removing these screws, simply pull the top part of the speaker way from the body to get the the inner part of the speaker.

  6. Sony SRS-XB40 Speaker Replacement: 手順 6、 1の画像 1
    • Once you have gotten to the internal parts of the speaker, there are seven wires connecting the speaker plate to the body of the speaker. Pinch the release tabs at the top of each of the four main wires to remove them.

  7. Sony SRS-XB40 Speaker Replacement: 手順 7、 3の画像 1 Sony SRS-XB40 Speaker Replacement: 手順 7、 3の画像 2 Sony SRS-XB40 Speaker Replacement: 手順 7、 3の画像 3
    • Simply pull the thin wires on each side to remove them from their attachment points.

    • Remove the final red and black wire by gently pulling it apart.

    • This will ultimately detach the speaker plate from the base.

  8. Sony SRS-XB40 Speaker Replacement, Speaker: 手順 8、 2の画像 1 Sony SRS-XB40 Speaker Replacement, Speaker: 手順 8、 2の画像 2
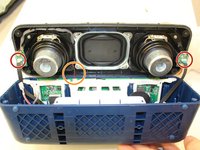
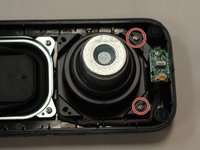
    • After you have gotten the speaker plate off of the main body of the speaker, there will be two PH1 10mm screws that hold on the speaker.

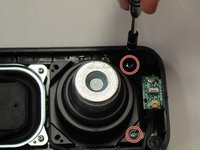
    • Using the screwdriver and PH1 head from your toolkit, unscrew the 2 screws and place them to the side.

  9. Sony SRS-XB40 Speaker Replacement: 手順 9、 1の画像 1
    • Now your speaker is free from the speaker plate and you can replace the broken or faulty one with a new one.

    • Your speaker replacement is now done.

終わりに

To reassemble your device, follow these instructions in reverse order.

作成者

3人の作成者と共同で作成されました。

Zack Coker

メンバー登録日: 01/29/18

382 ポイント

2のガイドは作成済み

チーム

University of Alabama, Team S1-G1, Bedsole Spring 2018 University of Alabama, Team S1-G1, Bedsole Spring 2018人のメンバー

UA-BEDSOLE-S18S1G1

4 メンバー

6のガイドは作成済み

7件のガイドコメント

Where can i purchase a replacement speaker?

Evan Mocke - 返信

Where do I get the replacement speaker?

Elijah allen - 返信

I broke my speaker case. It’s the black, plastic protective case that is in front of the speaker. Where can i get a new replacement part?

Lilee Foster - 返信

Where is the battery

Shane Willison - 返信

コメントを追加

統計データ:

過去 24時間: 1

過去 7 日: 9

過去 30 日: 29

今までの合計 4,650