はじめに
このガイドを使って Samsung Galaxy S10+のバッテリーを交換します。
バッテリーは強力な接着剤で固定されています。iFixitの接着剤リムーバーもしくは高濃度(90%以上)のイソプロピルアルコールを使って、バッテリーの接着剤を柔らかくすると、作業が簡単に進みます。
バッテリーが膨張している場合は、 [[What to do with a swollen battery|適切な方法で処理してください|new_window=true]。
デバイスを解体する前に、バッテリーの残量を25%以下まで放電してください。バッテリーが作業中ダメージを受けてしまった場合、危険な熱火災を引き起こすことがあるため、リスクを軽減することができます。
”ある手順では下部ミッドフレーム/ラウドスピーカーアセンブリが外れた画像を使用しています。このバッテリー外しの手順では、この作業は必要ありません。”
必要な工具と部品
ビデオの概要
-
-
作業を始める前にデバイスの電源を切ります。
-
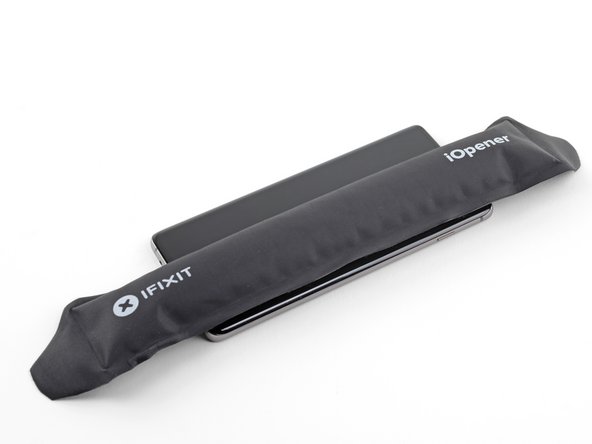
iOpenerを温めて、バックカバーの右側端に約2分間当てます。
-
待機中、バックカバーを外したイメージをご覧になって、接着剤が付けられている位置を確認してください。
-
-
-
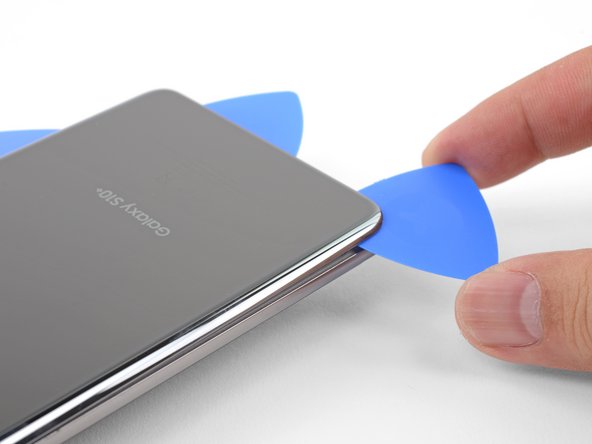
吸盤カップをデバイスの裏側、右側端中央部分にできるだけ近い位置(接着剤の幅が最も狭い場所)に装着します。
-
吸盤カップを一定の強い力で引き上げて、バックカバーとフレームの間に隙間を作ります。
-
開口ピックの先端を隙間に差し込みます。
-
隙間ができない場合は、さらにiOpenerを温めてさらに同じ部分に当ててください。
-
もしくは、高濃度(90%以上)イソプロピルアルコールの数滴を隙間に注入し、接着剤を緩めることもできます。
I can’t get the back cover to seperate, I’ve been trying for several hours now, it just stays with the rest of the phone. I’m fairly certain my phone is hot enough as I touched the back and I can’t place my hand there for more than a few seconds at a time. It’s just not coming off and I’m so frustrated! Any help?
Hi Fiona,
The back adhesive can be very difficult! Have you tried the suggestions in step 3? It may take a few heat cycles to weaken the adhesive. You can use a hairdryer to heat it pretty hot along the edge.
My back cover glass is shattered but not coming apart! What do I do?
I was able to use my fingernails first (with the assistance of the suction cup) to get in the gap, and then, with my fingernails still in the gap there was enough room to put in the pick. I couldn't get the pick in there by itself even after 10 minutes of warming and suction cup prying... but my fingernails could get in, and then I used them to hold the space open and pull a little more so the pick could be inserted.
-
-
-
-
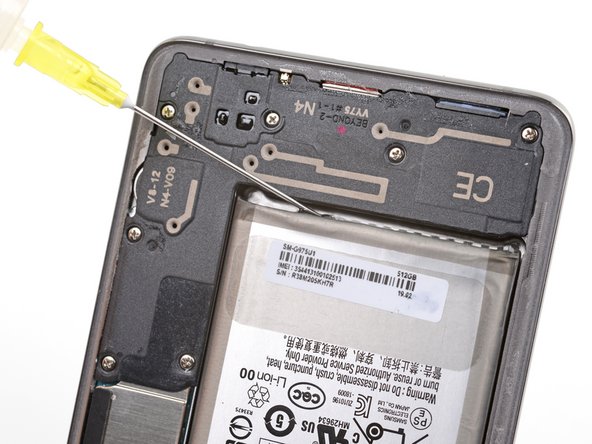
ミッドフレームをデバイス上部コーナーから持ち上げて、取り出します。
-
ミッドフレームの上部端をデバイスの端と揃えて、フレームを下ろして載せます。
-
指を使って、ミッドフレーム周囲に沿って押し込み、ミッドフレームについたクリップを装着します。ミッドフレームと本体のエッジは互いにぴったり重なりあうはずです。
-
-
-
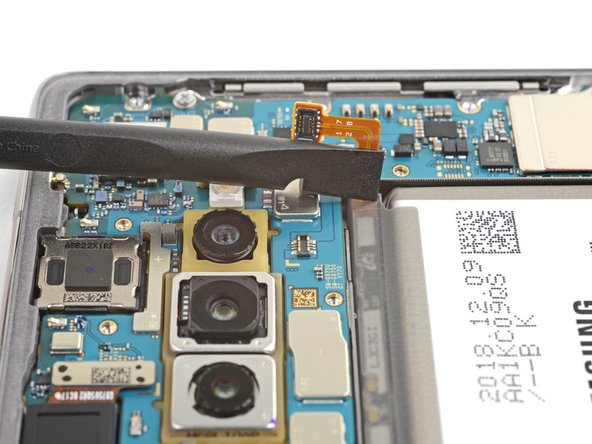
スパッジャーの平面側先端を使って、背面向きカメラの下のマザーボードに繋がったバッテリーコネクタの下に差し込みます。
-
コネクタをソケットからまっすぐ持ち上げて、接続を外します。
-
バッテリーのフレックスケーブルを慎重にマザーボードのソケットから押し出して、アクシデントで接触しないようにします。
-
-
-
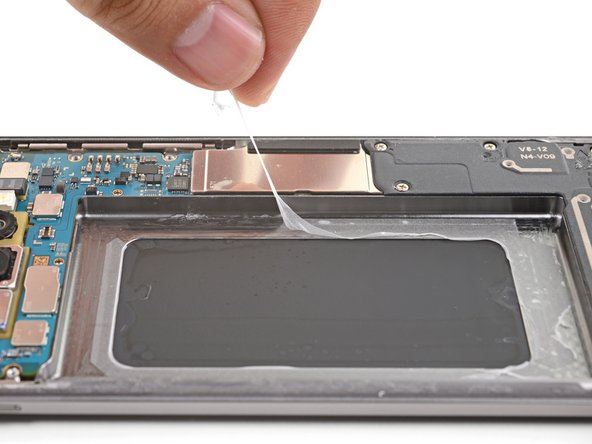
バッテリーは非常に頑丈に接着剤で固定されています。バッテリー下のマークの入った位置にご注意ください。
-
フレームです。ここに装着されている接着剤は非常に強固です。
-
フレーム上の切り欠きの位置。この下に脆いディスプレイアセンブリが搭載されています。このエリアをこじ開ける際は、ディスプレイにダメージを与えないようご注意ください。
-
-
Probably do use the iOpener in this step. Actually waited for an hour for isopropyl alcohol to actually loosen the adhesive barely enough to rip the battery out.
-
-
バッテリーを取り出します。
-
バッテリーを定位置に押し込む前に、プレカットされた接着剤、または両面テープをフレームに貼ってください。
-
ディスプレイ背面の露出した部分に接着剤を塗布しないでください。
Does the back panels adhesive needs to be replaced or its good to reassemble on old one?
Nand Patel - 返信
Yes! If you don’t want to use new adhesive, remove any large chunks of adhesive that might prevent the back cover from sitting down flush, heat the back cover, and apply pressure to secure it. It won't be waterproof, but the leftover adhesive is usually more than strong enough to hold.
It’s a little confusing going through the battery removal for the Samsung S10+ and then being sent to the Samsung S10 installation process instead of the Samsung S10+ install. Although moderately intuitive, it would be nice to have a specific article for a specific phone that identifies the actual process with the physical parts involved since The S10 and the S10+ are not the same back covers and the same parts involved.
Additionally, the inner wireless connector plate NEEDS to be connected to validate a connection otherwise the battery will not power the phone. This is a Requirement on the S10+.
Please address the adhesive issues in the instructions! Add some discussion of how much of the old adhesive to remove (if any) and how to do it. Also there is no mention of how to apply the new adhesive, either to the battery compartment or to seal the back plate with.
Hi Alan,
Thanks for pointing this out! I'll add some links to general adhesive guides to help alleviate this issue.
My new battery came without new adhesive. Now what?
Mistah Moh - 返信
My new battery came without new adhesive. Now what? I guess I was supposed to order the custom-cut battery adhesive separately, right? I should have known this from the start, now all the parts are just lying around... and it seems, I can't even buy it form your shop. Thanks for the insanity.
Mistah Moh - 返信
I also have received new battery without the new adhesive
-


デバイスを再組立する際は、これらのインストラクションを逆の順番に従って作業を進めてください。
バッテリーの最適化のために、この手順を完了後、新しく搭載したバッテリーの残量をキャリブレーション してください。
e-wasteを処理する場合は、認可済みリサイクルセンターR2を通じて廃棄してください。
修理が上手く進みませんか?トラブルシューティングには、私たちのアンサーコミュニティを参照してください。
デバイスを再組立する際は、これらのインストラクションを逆の順番に従って作業を進めてください。
バッテリーの最適化のために、この手順を完了後、新しく搭載したバッテリーの残量をキャリブレーション してください。
e-wasteを処理する場合は、認可済みリサイクルセンターR2を通じて廃棄してください。
修理が上手く進みませんか?トラブルシューティングには、私たちのアンサーコミュニティを参照してください。
44 の人々がこのガイドを完成させました。
以下の翻訳者の皆さんにお礼を申し上げます:
100%

Midori Doiさんは世界中で修理する私たちを助けてくれています! あなたも貢献してみませんか?
翻訳を始める ›


14 件のコメント
Worked great to replace my swollen battery, and thanks to it being swollen I could actually skip the steps to pry open the back cover. Anyway, from my experience everything is correct, the only downside is that I used a little more than a few drops to loosen the battery and after the whole annoyance of removing the glue and placing the new battery I turned on the phone to check everything was working and my back cameras were blurry.... yeah, too much alcohol, had to clean them up very well.... but the sad part is that some of the alcohol made it's way to the front cameras... now they are both blurry.
I agree with isely - the toughest part was removing all the left over adhesive. Removing the battery was a bit of a pain as well, even with isopropyl alcohol. I recommend using heat to remove the battery.
To get rid of the excess adhesive, I recommend using a heat gun and peeling it up with your thumb. As long as it's malleable, you can slowly peel it up to create a ball of adhesive and hopefully get most of it off at once. I was trying Q-Tips with isopropyl alcohol and that mostly just spread around the adhesive and got fluff from the Q-Tip over the phone.
Finally, I recommend buying a precut adhesive card to glue it back in place. It took me quite a while to cut a bunch of strips with my 2mm double sided tape.
And my phone is ruined because, presumably, the alcohol leaked somehow and destroyed the lens. Gonna have to get a new phone now anyway. Please add proper precautions to the instructions to avoid wrecking the lens. I didn't make any careless splashes or drips.
Would I need to replace the water-resistant seal with another to retain IP68 water resistance?
In my case, the old Galaxy 10+ battery swelled up. Getting the back off was simple as the battery expansion pushed the back off for me. Getting all the glue off was a bit of a pain though.
Replacement battery is vastly different from original (no surprise there), but no instructions were given on how to stick the new battery down. A sheet of pre-cut adhesive strips [which were almost impossible to use] came with the kit. I improvised to make my own battery stick-down strips.
The new adhesive for the back plate was a bit daunting to get set "just right". Ended up with a little bit of the material sticking out the side of the back. Some careful use of a single-edge razor blade took care of that.
iFixit guys - good instructions, now tie the bow on it by showing how to secure -your- replacement battery in the phone and how to apply -your- backside adhesive. You've only covered 1/2 of the job in these instructions.
Otherwise, I'm pretty happy with the repair. Resurrected my old Galaxy S10+.
i got sort of lucky and was able to skip straight to step 9 because the glue holding the back on had melted due to a house i used to live in not having a functional AC and it hitting 85F+ inside(that was the main reason i wanted this at first), the battery turning into a forbidden capri sun and warping my case made me pull the trigger(it also might have made me needing needing the iso a moot point).
Total time: 4 hours . Took a lot of time scraping/wiping away glue residue. And the battery was soaking in isopropyl alcohol for a whole hour to be barely loos enough to be ripped out. Use the iOpener for the battery removal.
Total time: 4 hours . Took a lot of time scraping/wiping away glue residue. And the battery was soaking in isopropyl alcohol for a whole hour to be barely loos enough to be ripped out. Use the iOpener for the battery removal.
Just finished an install and I must say this went way smoother than I had expected. Had zero issues and everything (including cameras) all still functioning. Thank you Ifixit team for making it possible to change the battery with ease.
Unfortunately this guide has broken my phone screen, i assume i used too much 100% isopropyl alcohol (probably in excess of 10mL) when removing the battery and it leaked and damaged the screen somehow. Now the screen only works at certain brightness' and has a green tint. Disappointed as there was no warning about using too much alcohol, plus I assumed alcohol was not damaging for electronics... will need to buy a new phone now :(