メインコンテンツにスキップ
PowerShot G7 X Mark II Front Cover Replacement

PowerShot G7 X Mark II Front Cover Replacement

Brandon

Brandon とその他 2 人の作成者

最終更新日: May 25, 2017

40 - 55 分
中レベル
アクションショット
高画質の画像が必要

This guide will show you how to replace the Front Panel and Focus Ring of the camera if it is damaged or if the lens has gotten dirt lodged in it.

必要な工具と部品

ツール

  1. PowerShot G7 X Mark II Front Cover Replacement, Top Cover Button Panel: 手順 1、 2の画像 1 PowerShot G7 X Mark II Front Cover Replacement, Top Cover Button Panel: 手順 1、 2の画像 2
    • Use a Phillips #000 screwdriver to remove four 4mm screws from the NFC panel cover on the bottom of the camera.

  2. PowerShot G7 X Mark II Front Cover Replacement: 手順 2、 2の画像 1 PowerShot G7 X Mark II Front Cover Replacement: 手順 2、 2の画像 2
    • Use a Phillips #000 screwdriver to remove five screws from under the LCD screen:

    • Three 2.4 mm screws

    • Two 3 mm screws

  3. PowerShot G7 X Mark II Front Cover Replacement: 手順 3、 1の画像 1
    • Use a Phillips #000 screwdriver to remove two 3mm screws on the left of the camera.

  4. PowerShot G7 X Mark II Front Cover Replacement: 手順 4、 2の画像 1 PowerShot G7 X Mark II Front Cover Replacement: 手順 4、 2の画像 2
    • Use a Phillips #000 screwdriver to remove one 3mm and one 4mm screw on the surface of the right face of the camera, and one under the USB/HDMI cover.

  5. PowerShot G7 X Mark II Front Cover Replacement: 手順 5、 2の画像 1 PowerShot G7 X Mark II Front Cover Replacement: 手順 5、 2の画像 2
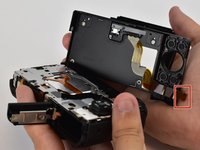
    • Carefully remove the back cover off of the camera by hand. Press the brown actuator in the FFC socket to release the FPC (Flexible Printed Circuit - brown cable attached to the back cover) and pull the FPC out of the socket.

    • If the FPC doesn't come out easily, you haven't yet released it. Do not force it. Do not use a spudger because it will break the socket. A broken socket cannot be fixed and has to be replaced by a skilled technician.

  6. PowerShot G7 X Mark II Front Cover Replacement: 手順 6、 2の画像 1 PowerShot G7 X Mark II Front Cover Replacement: 手順 6、 2の画像 2
    • Use a Phillips #000 screwdriver to remove two 3mm screws on the pop-up flash.

  7. PowerShot G7 X Mark II Front Cover Replacement: 手順 7、 2の画像 1 PowerShot G7 X Mark II Front Cover Replacement: 手順 7、 2の画像 2
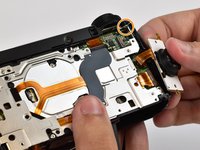
    • Use a Phillips #000 screwdriver to remove two 2mm screws attaching the button panel to the camera body.

    • Use a Phillips #000 screwdriver to remove a 3mm screw from beneath the mode dial.

  8. PowerShot G7 X Mark II Front Cover Replacement: 手順 8、 3の画像 1 PowerShot G7 X Mark II Front Cover Replacement: 手順 8、 3の画像 2 PowerShot G7 X Mark II Front Cover Replacement: 手順 8、 3の画像 3
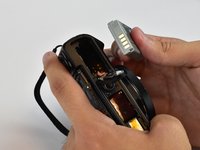
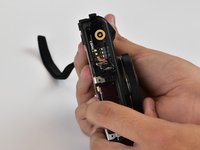
    • Open the battery compartment and remove the battery by flipping the small latch holding it in.

    • Use a Phillips #000 screwdriver to remove one 6mm screw in the bottom of the battery compartment.

  9. PowerShot G7 X Mark II Front Cover Replacement: 手順 9、 2の画像 1 PowerShot G7 X Mark II Front Cover Replacement: 手順 9、 2の画像 2
    • Pry the top cover button assembly off of the camera body by detaching clips around the base of it.

  10. PowerShot G7 X Mark II Front Cover Replacement, Front Cover: 手順 10、 1の画像 1
    • Use a Phillips #000 screwdriver to remove two 3mm screws on the left and one 5mm screw on the right from the front panel.

  11. PowerShot G7 X Mark II Front Cover Replacement: 手順 11、 1の画像 1
    • Remove the USB/HDMI panel from the right side of the camera.

  12. PowerShot G7 X Mark II Front Cover Replacement: 手順 12、 1の画像 1
    • Separate the front cover and focus ring assembly from the front of the camera. Use a plastic spudger to detach the ZIF connector holding the ribbon cable connected to the focus assembly.

終わりに

To reassemble your device, follow these instructions in reverse order.

2 の人々がこのガイドを完成させました。

作成者

2人の作成者と共同で作成されました。

Brandon

メンバー登録日: 02/15/17

626 ポイント

4のガイドは作成済み

チーム

USF Tampa, Team 12-3, Eyestone Spring 2017 USF Tampa, Team 12-3, Eyestone Spring 2017人のメンバー

USFT-EYESTONE-S17S12G3

3 メンバー

4のガイドは作成済み

2 件のコメント

thank you so much for the guide!! extremely helpful, clear pictures, and easy to understand instructions.

victoria - 返信

Please give instructions how to disassemble the flash and replace the flash capacitor. Thank you very much

Momchil Panayotov - 返信

コメントを追加

統計データ:

過去 24時間: 1

過去 7 日: 12

過去 30 日: 36

今までの合計 4,316