メインコンテンツにスキップ

Nokia C5-03 Digitizer Replacement

必要な工具と部品

  1. Nokia C5-03 Digitizer Replacement, Digitizer: 手順 1、 1の画像 1
    • This is the Nokia C5-03 smartphone.

  2. Nokia C5-03 Digitizer Replacement: 手順 2、 2の画像 1 Nokia C5-03 Digitizer Replacement: 手順 2、 2の画像 2
    • There are two clips (highlighted in red) securing the rear cover to the framework of the C5.

    • Pry the rear cover off the C5.

    • Upon removing the rear cover, the back side is left exposed.

  3. Nokia C5-03 Digitizer Replacement: 手順 3、 1の画像 1
    • Lift and remove the battery out of the C5's inner framework.

  4. Nokia C5-03 Digitizer Replacement: 手順 4、 1の画像 1
    • Remove the microSD card (highlighted in orange) from its recess within the inner framework of the C5.

    • It might be helpful to use a thin, blunt object such as a pencil or pen to "pop" the microSD card out of its recess.

  5. Nokia C5-03 Digitizer Replacement: 手順 5、 2の画像 1 Nokia C5-03 Digitizer Replacement: 手順 5、 2の画像 2
    • Carefully wedge the flat end of a plastic opening tool between the rear cover and inner framework.

    • Pry upwards to release the clips securing the bottom cover.

    • Repeat with both clips until the bottom cover is released.

    • Lift and remove the bottom cover away from the C5.

  6. Nokia C5-03 Digitizer Replacement: 手順 6、 1の画像 1
    • Remove the following screws securing the inner framework and its plastic surround to the rest of the C5:

    • Four T6 Torx screws.

    • All four screws are the same length.

  7. Nokia C5-03 Digitizer Replacement: 手順 7、 2の画像 1 Nokia C5-03 Digitizer Replacement: 手順 7、 2の画像 2
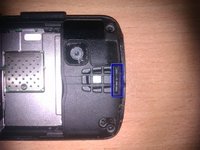
    • Wedge the flat end of a plastic opening tool between the front panel assembly retaining clip and the outer case (highlighted in blue).

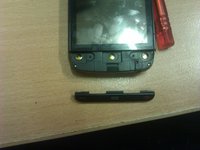
    • Carefully pry the opening tool upwards to release the retaining clip securing the upper portion of the front panel assembly.

    • Do not use excessive force when releasing the retaining clip. The plastic is very weak and may snap easily.

    • Run the flat edge of a plastic opening tool around the perimeter of the front panel assembly to release the remaining retaining clips.

  8. Nokia C5-03 Digitizer Replacement: 手順 8、 1の画像 1
    • Use the flat end of a plastic opening tool to pry the digitizer cable connector up and out of its socket on the motherboard.

  9. Nokia C5-03 Digitizer Replacement: 手順 9、 2の画像 1 Nokia C5-03 Digitizer Replacement: 手順 9、 2の画像 2
    • Be careful when using a heat gun in the forthcoming steps. Use it at a very low heat setting, and make sure not to melt the plastic framework.

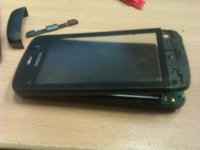
    • Using a heat gun or hairdryer, heat the top area of the front panel assembly for approximately 20 seconds.

    • Use your fingernails or a plastic opening tool to separate the glass from the front panel assembly. The glass is held to the front panel assembly by adhesive, it may require some work to free it.

    • If it seems that too much force is required to separate the glass from the front panel, try using the heat gun again to reheat the problematic area.

    • Use either the existing double-sided tape (if it is still in good condition) or new tape when reattaching the new digitizer.

終わりに

To reassemble your device, follow these instructions in reverse order.

10 の人々がこのガイドを完成させました。

作成者

3人の作成者と共同で作成されました。

Michael Ollis

メンバー登録日: 08/30/11

487 ポイント

1ガイドが承認済み

チーム

ITZ Computers ITZ Computers人のメンバー

Business

1 メンバー

1のガイドは作成済み

0 件のコメント

コメントを追加

統計データ:

過去 24時間: 0

過去 7 日: 2

過去 30 日: 4

今までの合計 12,831