メインコンテンツにスキップ
Nokia 8290 Circuit Board Replacement

Nokia 8290 Circuit Board Replacement

Parker Niebauer

Parker Niebauer とその他 5 人の作成者

最終更新日: October 10, 2017

6分
中レベル

The circuit board processes all the information the phone uses. Removing the circuit board allows access to several underlying components.

必要な工具と部品

ツール

  1. Nokia 8290 Circuit Board Replacement, Front Cover: 手順 1、 3の画像 1 Nokia 8290 Circuit Board Replacement, Front Cover: 手順 1、 3の画像 2 Nokia 8290 Circuit Board Replacement, Front Cover: 手順 1、 3の画像 3
    • Locate the small button on the top of the phone.

    • Depress the button.

    • With your other hand, pull the front cover away from the phone.

  2. Nokia 8290 Circuit Board Replacement, Circuit Board: 手順 2、 3の画像 1 Nokia 8290 Circuit Board Replacement, Circuit Board: 手順 2、 3の画像 2 Nokia 8290 Circuit Board Replacement, Circuit Board: 手順 2、 3の画像 3
    • Remove all six 5.3 mm long T6 screws.

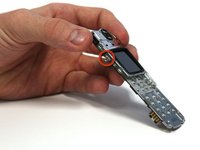
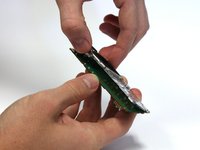
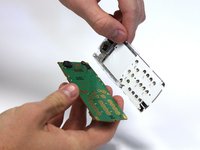
    • Remove the circuit board/faceplate sub-assembly from the back of the phone.

    • Take care to place screws in a safe location.

  3. Nokia 8290 Circuit Board Replacement: 手順 3、 3の画像 1 Nokia 8290 Circuit Board Replacement: 手順 3、 3の画像 2 Nokia 8290 Circuit Board Replacement: 手順 3、 3の画像 3
    • Using your fingers, pull the small plastic tab away from the circuit board/faceplate sub-assembly.

    • Rotate the faceplate away from the circuit board.

    • Gently remove the faceplate from the circuit board, taking care to not break the small plastic tab on the other side of the sub-assembly.

終わりに

To reassemble your device, follow these instructions in reverse order.

作成者

5人の作成者と共同で作成されました。

Parker Niebauer

メンバー登録日: 10/22/12

7 ポイント

6のガイドは作成済み

チーム

Clemson, Team 15-3, Benson Fall 2012 Clemson, Team 15-3, Benson Fall 2012人のメンバー

CLEM-BENSON-F12S15G3

3 メンバー

21のガイドは作成済み

0 件のコメント

コメントを追加

統計データ:

過去 24時間: 0

過去 7 日: 0

過去 30 日: 3

今までの合計 474