はじめに
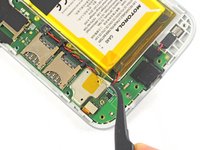
Motorola Moto G4 Plusの充電バッテリーを交換するには、このガイドを参照してください。バッテリーが膨張している場合は、適切な方法で処理してください。
始める前に、Rescue and Smart Assistantアプリをダウンロードしてデバイスをバックアップし、問題がソフトウェアまたはハードウェアに関連しているかを診断してください。
デバイスを再組み立てする前に、バッテリーの残量を25%以下まで放電してください。充電されたリチウムイオンバッテリー は引火の原因となったり、アクシデントで穴を開けてしまうと爆発の恐れがあります。
必要な工具と部品


デバイスを再組み立てする際は、これらの手順を逆の順番に従って作業を進めてください。
この修理ガイドを完成したら、新しく装着したバッテリーのキャリブレーションを行なってください。
e-wasteを処理する場合は、認可済みリサイクルセンターR2を通じて廃棄してください。
修理が上手く進みませんか?トラブルシュートのヘルプには、Motorola Moto G4 Plusのアンサーコミュニティを参照してください。
デバイスを再組み立てする際は、これらの手順を逆の順番に従って作業を進めてください。
この修理ガイドを完成したら、新しく装着したバッテリーのキャリブレーションを行なってください。
e-wasteを処理する場合は、認可済みリサイクルセンターR2を通じて廃棄してください。
修理が上手く進みませんか?トラブルシュートのヘルプには、Motorola Moto G4 Plusのアンサーコミュニティを参照してください。
50 の人々がこのガイドを完成させました。
以下の翻訳者の皆さんにお礼を申し上げます:
100%

これらの翻訳者の方々は世界を修理する私たちのサポートをしてくれています。 あなたも貢献してみませんか?
翻訳を始める ›


10 件のコメント
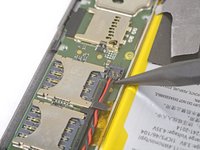
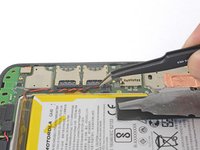
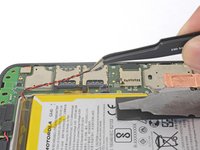
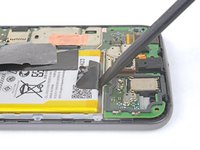
in step 9, when i took the connector away the hole plug came out :( need micro soldering to paste the conector to the board
I’m really sorry to hear that! I’ll add some extra warning on that step.
One of the last screws stripped and I wasn't applying a lot of force. Being a jeweler, I tried every trick I knew of but that sucker would not budge. Since it was a corner screw, I rotated the entire cover (while pulling up on it to miss the components directly beneath) to expose all of the battery area. Hope I explained that part well enough. The battery was also tough to remove. I think they used way too much glue the first time around. Anyway, I was thrilled it powered right up with the new battery and I saved over $50 bucks doing it myself (and with the help of ifixit.com). Thanks!
Anna White - 返信
Thank you for the guide! My wife and I did it together and the steps were very clear.
Mega mega mega, kinderleicht, Spitzenbeschreibung…