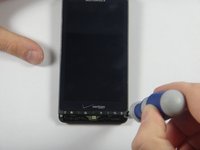
メインコンテンツにスキップ

Motorola Droid X2 Motherboard Replacement

必要な工具と部品

  1. Motorola Droid X2 Motherboard Replacement, Battery: 手順 1、 3の画像 1 Motorola Droid X2 Motherboard Replacement, Battery: 手順 1、 3の画像 2 Motorola Droid X2 Motherboard Replacement, Battery: 手順 1、 3の画像 3
    • Slide the plastic case off of the back of the phone, exposing the battery.

  2. Motorola Droid X2 Motherboard Replacement: 手順 2、 3の画像 1 Motorola Droid X2 Motherboard Replacement: 手順 2、 3の画像 2 Motorola Droid X2 Motherboard Replacement: 手順 2、 3の画像 3
    • Pull up on the red battery release tab and pull the battery out of the phone.

  3. Motorola Droid X2 Motherboard Replacement, Motherboard: 手順 3、 2の画像 1 Motorola Droid X2 Motherboard Replacement, Motherboard: 手順 3、 2の画像 2
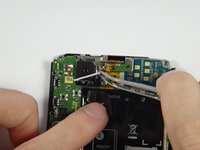
    • Remove the circled screws using a T-5 torques. These screws will be 4.3 millimeters in length.

    • Be careful to not strip any screws.

  4. Motorola Droid X2 Motherboard Replacement: 手順 4、 3の画像 1 Motorola Droid X2 Motherboard Replacement: 手順 4、 3の画像 2 Motorola Droid X2 Motherboard Replacement: 手順 4、 3の画像 3
    • Using a prying tool, snap off the front casing on the top and bottom of the phone.

    • Be careful not to lose the small rubber piece that sits over the microphone.

  5. Motorola Droid X2 Motherboard Replacement: 手順 5、 2の画像 1 Motorola Droid X2 Motherboard Replacement: 手順 5、 2の画像 2
    • Remove the circled screws using a T-5 torques.. These screws should be 5.8 millimeters in length.

  6. Motorola Droid X2 Motherboard Replacement: 手順 6、 3の画像 1 Motorola Droid X2 Motherboard Replacement: 手順 6、 3の画像 2 Motorola Droid X2 Motherboard Replacement: 手順 6、 3の画像 3
    • Using a plastic opening tool, snap open the phone. It should separate into a front piece with the hardware and a plastic backing.

  7. Motorola Droid X2 Motherboard Replacement: 手順 7、 3の画像 1 Motorola Droid X2 Motherboard Replacement: 手順 7、 3の画像 2 Motorola Droid X2 Motherboard Replacement: 手順 7、 3の画像 3
    • Using tweezers, remove the white wire at the top of the phone near the camera.

  8. Motorola Droid X2 Motherboard Replacement: 手順 8、 2の画像 1 Motorola Droid X2 Motherboard Replacement: 手順 8、 2の画像 2
    • Remove these nine screws using a T-3 torques. These screws should be 2.40 mm in length

  9. Motorola Droid X2 Motherboard Replacement: 手順 9、 2の画像 1 Motorola Droid X2 Motherboard Replacement: 手順 9、 2の画像 2
    • Using tweezers, removed the white electrical tape on the motherboard.

  10. Motorola Droid X2 Motherboard Replacement: 手順 10、 2の画像 1 Motorola Droid X2 Motherboard Replacement: 手順 10、 2の画像 2
    • Using the plastic opening tool, lift up to remove the connector.

  11. Motorola Droid X2 Motherboard Replacement: 手順 11、 2の画像 1 Motorola Droid X2 Motherboard Replacement: 手順 11、 2の画像 2
    • Using a pry tool, lift the jawbone connector.

  12. Motorola Droid X2 Motherboard Replacement: 手順 12、 2の画像 1 Motorola Droid X2 Motherboard Replacement: 手順 12、 2の画像 2
    • Using tweezers, carefully disconnect the cable connector by pulling the cable out.

  13. Motorola Droid X2 Motherboard Replacement: 手順 13、 3の画像 1 Motorola Droid X2 Motherboard Replacement: 手順 13、 3の画像 2 Motorola Droid X2 Motherboard Replacement: 手順 13、 3の画像 3
    • Use a spudger to disconnect the cable connector.

  14. Motorola Droid X2 Motherboard Replacement: 手順 14、 3の画像 1 Motorola Droid X2 Motherboard Replacement: 手順 14、 3の画像 2 Motorola Droid X2 Motherboard Replacement: 手順 14、 3の画像 3
    • Using a spudger, remove the camera. Lift up the motherboard and slide the spudger under the camera.

終わりに

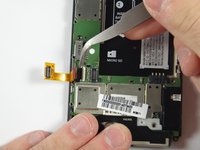
To reassemble your device, follow these instructions in reverse order.

ある他の人がこのガイドを完成しました。

作成者

6人の作成者と共同で作成されました。

Aaron Mak

メンバー登録日: 10/29/14

658 ポイント

4のガイドは作成済み

チーム

UMass Dartmouth, Team 4-3, Miles Fall 2014 UMass Dartmouth, Team 4-3, Miles Fall 2014人のメンバー

UMASSD-MILES-F14S4G3

3 メンバー

8のガイドは作成済み

0 件のコメント

コメントを追加

統計データ:

過去 24時間: 1

過去 7 日: 3

過去 30 日: 4

今までの合計 759