メインコンテンツにスキップ

Motorola Droid 4 Motherboard Replacement

必要な工具と部品

  1. Motorola Droid 4 Motherboard Replacement, Removing Rear Panel: 手順 1、 3の画像 1 Motorola Droid 4 Motherboard Replacement, Removing Rear Panel: 手順 1、 3の画像 2 Motorola Droid 4 Motherboard Replacement, Removing Rear Panel: 手順 1、 3の画像 3
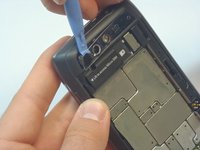
    • Insert the rear cover removal tool, or a paper clip, in the hole near the back camera lens.

    • Slide the cover down to remove.

  2. Motorola Droid 4 Motherboard Replacement, Battery: 手順 2、 1の画像 1
    • Remove the sticker on the rear compartment to reveal the battery.

    • Hold the battery with your thumb while removing the sticker or you might end up ripping the battery out of the phone, damaging the flex cable.

  3. Motorola Droid 4 Motherboard Replacement: 手順 3、 2の画像 1 Motorola Droid 4 Motherboard Replacement: 手順 3、 2の画像 2
    この手順で使用する道具:
    T5 Torx Screwdriver
    $5.49
    購入する
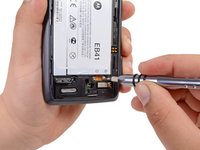
    • Use the T5 Torx Screwdriver to remove both 2.5 mm screws from the battery cable.

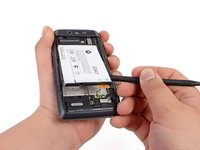
    • Use the Spudger to unstick the battery.

    • It's difficult to remove the battery without a pry tool like the spudger because of the strong adhesive. If you try removing it with just your fingers, the battery may bend.

  4. Motorola Droid 4 Motherboard Replacement, Camera Cover Removal: 手順 4、 3の画像 1 Motorola Droid 4 Motherboard Replacement, Camera Cover Removal: 手順 4、 3の画像 2 Motorola Droid 4 Motherboard Replacement, Camera Cover Removal: 手順 4、 3の画像 3
    • Using the blue plastic opening tool, pry off the thin plastic camera cover.

    • The plastic cover is fragile, so proceed carefully.

  5. Motorola Droid 4 Motherboard Replacement, Remove Screws: 手順 5、 2の画像 1 Motorola Droid 4 Motherboard Replacement, Remove Screws: 手順 5、 2の画像 2
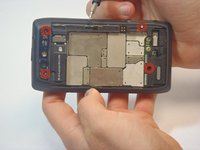
    • Remove the four screws, indicated by the red circles, with the screwdriver and T5 Torx bit.

    • The screws are philips 2.5mm. One screw is a different color (silver) from the others (black).

  6. Motorola Droid 4 Motherboard Replacement, Remove Bezel: 手順 6、 3の画像 1 Motorola Droid 4 Motherboard Replacement, Remove Bezel: 手順 6、 3の画像 2 Motorola Droid 4 Motherboard Replacement, Remove Bezel: 手順 6、 3の画像 3
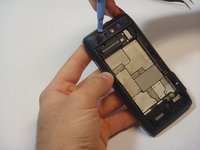
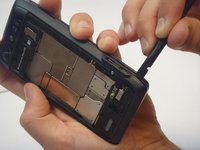
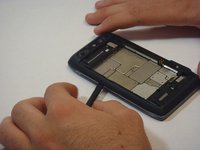
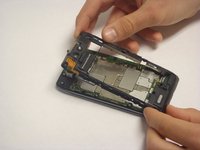
    • Insert the spudger between the rear bezel and the main housing.

    • The bezel is fragile, so proceed carefully.

    • Slide the spudger around all sides of the phone to separate the bezel from the housing.
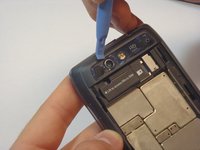
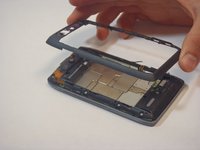
    • Pry the bezel free.

    • Be careful of the adhesive that holds the bezel to the main housing. Prying too hard may damage your phone.

  7. Motorola Droid 4 Motherboard Replacement, Removing screws: 手順 7、 2の画像 1 Motorola Droid 4 Motherboard Replacement, Removing screws: 手順 7、 2の画像 2
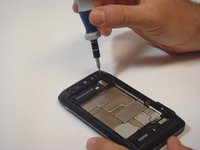
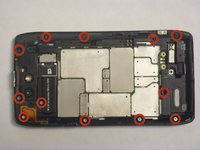
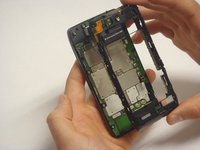
    • Remove the 12 screws holding the housing in place using a T5 Torx screwdriver.

    • Follow the red circles, indicated in the picture, to locate the screws.

    • The 12 screws are (silver) philips 2.5mm

  8. Motorola Droid 4 Motherboard Replacement, Separation of the Housing from the Motherboard: 手順 8、 3の画像 1 Motorola Droid 4 Motherboard Replacement, Separation of the Housing from the Motherboard: 手順 8、 3の画像 2 Motorola Droid 4 Motherboard Replacement, Separation of the Housing from the Motherboard: 手順 8、 3の画像 3
    • Separate the housing from the motherboard.

    • Be careful while separating the housing. The power and volume buttons are easily separated from the housing and can be damaged.

  9. Motorola Droid 4 Motherboard Replacement, Motherboard: 手順 9、 2の画像 1 Motorola Droid 4 Motherboard Replacement, Motherboard: 手順 9、 2の画像 2
    • The Motherboard is the brain of the phone, handle with care.

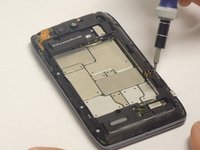
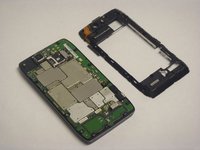
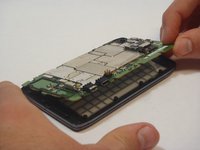
    • Using the spudger, separate the motherboard from the keyboard frame.

    • Tilt the motherboard upward from the side of the charger connection as shown in the picture.

  10. Motorola Droid 4 Motherboard Replacement, Disconnecting the Motherboard: 手順 10、 2の画像 1 Motorola Droid 4 Motherboard Replacement, Disconnecting the Motherboard: 手順 10、 2の画像 2
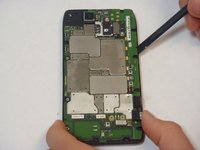
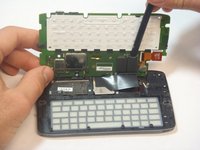
    • Using the spudger, gently disconnect the two motherboard connections.

    • Once the motherboard is separated from the phone place it in a safe place.

終わりに

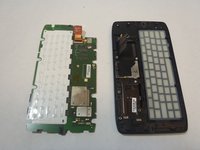
To reassemble your device, follow these instructions in reverse order.

ある他の人がこのガイドを完成しました。

作成者

3人の作成者と共同で作成されました。

Javier

メンバー登録日: 09/29/14

530 ポイント

4のガイドは作成済み

チーム

USF Tampa, Team 5-1, Mcgee Fall 2014 USF Tampa, Team 5-1, Mcgee Fall 2014人のメンバー

USFT-MCGEE-F14S5G1

5 メンバー

5のガイドは作成済み

0 件のコメント

コメントを追加

統計データ:

過去 24時間: 0

過去 7 日: 0

過去 30 日: 3

今までの合計 940