はじめに
MacBook Air 13インチ Retina Display Early 2020 ファンの交換をする方法です。
必要な工具と部品
-
この手順で使用する道具:Magnetic Project Mat$19.95
-
MacBookにBig Sur v11.1以降がインストールされている場合、自動起動を無効にするとうまくいかないことがあります。通常通りに作業を進めることができますが、開口できたらすぐにバッテリーを外してください。
-
P5ドライバーを使って、次のネジを外します。
-
7.9mmネジー2本
-
7.1mmネジー2本
-
2.6mmネジー6本
-
-
-
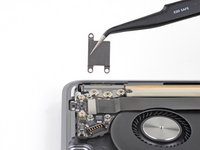
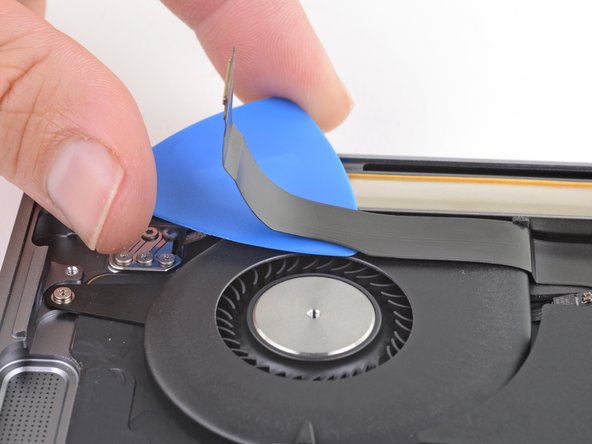
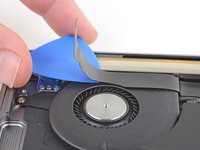
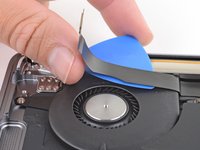
指先をディスプレイと下部ケースの間に挟んで、Airから下部ケースを上向きに引き上げます。
-
下部ケースを取り出します。
-
本体を正しい位置に揃えてしっかりと押し込み、下にある2つの隠しクリップをはめ込みます。カチッと装着音がして固定されます。
When reassembling, the “snaps” are in the middle of the laptop (from top to bottom), and just to the left and right of center. I assumed it was near the hinge so it took a bit for me to hear the snaps.
Laurie, the two clips are outlined in the third photo of step two. Hope this helps—happy fixing!
-
-
-
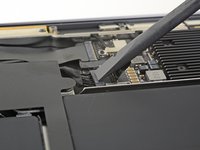
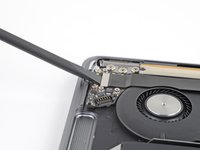
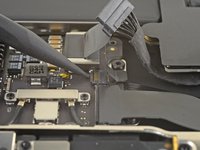
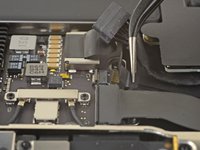
バッテリーコネクタを覆っているテープを剥がして、下のコネクタを露出させます。
This image is incorrect correct for the A2179 EMC 3302 model, also doesn’t match the next image in this guide
There is other guide for the model you reffer to, I was using that one until i realize it was different, this is the one you are looking for: MacBook Air 13" Retina Late 2020
I initially thought the image was incorrect, but I was just looking for the connector in the wrong place. This picture IS correct for the A2179 EMC 3302. Note that the connector is on the left side of the heat sink (the black thing with parallel ridges in the picture and on the computer), and the connector wires gather together towards the left the side of the computer, not the back. Note that "left side" assumes the Air is upside-down, with the hinge on the side farthest away from you (I'm not doing the "right speaker is on the left side because it's upside-down" thing that iFixit does in step 5).
-
-
-
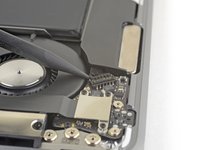
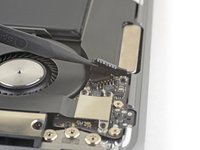
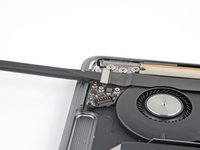
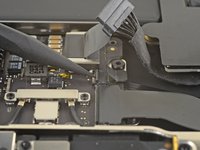
スパッジャーを使って、バッテリーコネクタの下に差し込み、ロジックボードと並行にスライドして、ロジックボード上のソケットからコネクタを外します。
-
-
-
-
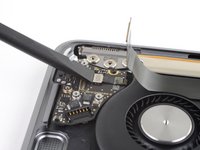
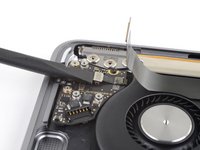
T4トルクスドライバーを使って、オーディオボードのコネクタカバーを固定している1.4mmネジを3本外します。
-
オーディオボードコネクタカバーを取り出します。
-
-
-
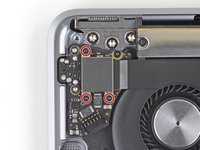
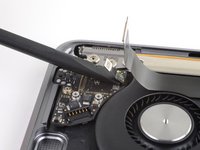
T4トルクスドライバーを使って、オーディオボードを固定しているネジを3本外します。
-
4.3mm T5トルクスネジー2本
-
2.4mm T4トルクスネジー1本
-
-
-
T4トルクスドライバーを使って、3本の2.7mmネジをファンから外します。
In my case, the screw on the left was a T5
-


オリジナルのパーツと交換用パーツをよく見比べてください。交換用パーツに付いていない残りのコンポーネントや接着シールなどは、インストールする前に新パーツに移植する必要があります。
デバイスを再組み立てする際は、これらの手順を逆の順番に従って作業を進めてください。
e-wasteを処理する場合は、認可済みリサイクルセンターR2を通じて廃棄してください。
修理が上手く進みませんか?このモデルのアンサーコミュニティに尋ねてみましょう。
オリジナルのパーツと交換用パーツをよく見比べてください。交換用パーツに付いていない残りのコンポーネントや接着シールなどは、インストールする前に新パーツに移植する必要があります。
デバイスを再組み立てする際は、これらの手順を逆の順番に従って作業を進めてください。
e-wasteを処理する場合は、認可済みリサイクルセンターR2を通じて廃棄してください。
修理が上手く進みませんか?このモデルのアンサーコミュニティに尋ねてみましょう。
5 の人々がこのガイドを完成させました。
以下の翻訳者の皆さんにお礼を申し上げます:
100%

これらの翻訳者の方々は世界を修理する私たちのサポートをしてくれています。 あなたも貢献してみませんか?
翻訳を始める ›


コメント 1 件
Thank you very much. This helped me a lot when my fan started making buzzing noise an$ had the change it.
P5 is also a PL4 (so confusing) - i like the wiha 26764 thanks to @mayer for this post. P5 pentalobe and 1.2 pentalobe screwdriver
greg - 返信