メインコンテンツにスキップ
Lenovo Thinkpad x230 Keyboard Replacement

Lenovo Thinkpad x230 Keyboard Replacement

Johannes

Johannes とその他 2 人の作成者

最終更新日: June 23, 2022

20分
中レベル
コミュニティメンバーによる寄稿ガイド

必要な工具と部品

ツール

  1. Lenovo Thinkpad x230 Keyboard Replacement, Preparations: 手順 1、 1の画像 1
    • Before you begin, be sure to turn off your laptop and unplug it from the outlet.

  2. Lenovo Thinkpad x230 Keyboard Replacement, Locate the battery: 手順 2、 1の画像 1
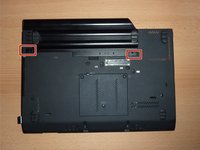
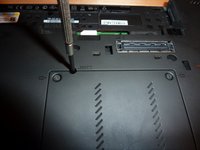
    • Flip the computer upside down.

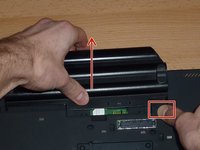
    • The red rectangle shows the location of the battery.

  3. Lenovo Thinkpad x230 Keyboard Replacement, Unlock the left switch: 手順 3、 3の画像 1 Lenovo Thinkpad x230 Keyboard Replacement, Unlock the left switch: 手順 3、 3の画像 2 Lenovo Thinkpad x230 Keyboard Replacement, Unlock the left switch: 手順 3、 3の画像 3
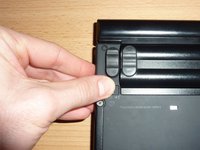
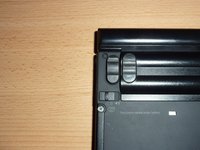
    • Locate the two switches that lock the battery. Push the left-hand switch outward into the "unlocked" position.

  4. Lenovo Thinkpad x230 Keyboard Replacement, Remove the battery: 手順 4、 3の画像 1 Lenovo Thinkpad x230 Keyboard Replacement, Remove the battery: 手順 4、 3の画像 2 Lenovo Thinkpad x230 Keyboard Replacement, Remove the battery: 手順 4、 3の画像 3
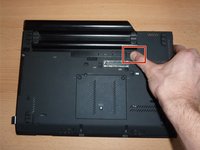
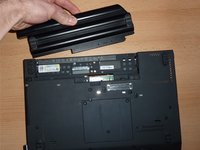
    • Now push and hold the right clip to the right while using your other hand to gently slide the battery away from the computer.

  5. Lenovo Thinkpad x230 Keyboard Replacement, remove screws: 手順 5、 3の画像 1 Lenovo Thinkpad x230 Keyboard Replacement, remove screws: 手順 5、 3の画像 2 Lenovo Thinkpad x230 Keyboard Replacement, remove screws: 手順 5、 3の画像 3
    • There are 2 screws securing the keyboard. You can identify them by a small keyboard symbol (marked by an orange rectangle in the second picture).

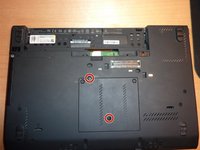
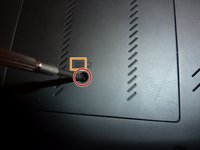
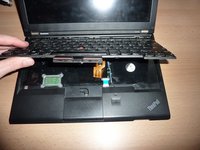
    • Once you have located the two screws, remove them with a small Phillips screwdriver.

  6. Lenovo Thinkpad x230 Keyboard Replacement, remove strip above keyboard: 手順 6、 3の画像 1 Lenovo Thinkpad x230 Keyboard Replacement, remove strip above keyboard: 手順 6、 3の画像 2 Lenovo Thinkpad x230 Keyboard Replacement, remove strip above keyboard: 手順 6、 3の画像 3
    • This step is not required.

    • Gently pull the strip out from the case.

  7. Lenovo Thinkpad x230 Keyboard Replacement, pop keyboard out of the casing: 手順 7、 2の画像 1 Lenovo Thinkpad x230 Keyboard Replacement, pop keyboard out of the casing: 手順 7、 2の画像 2
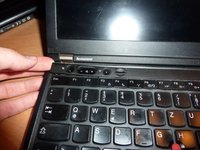
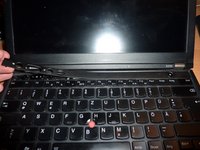
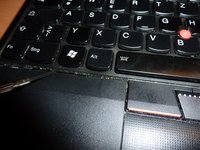
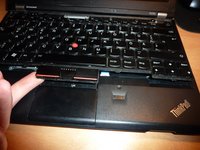
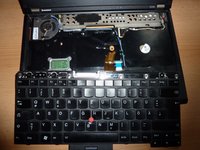
    • Use a a plastic spudger (or a flat screwdriver) to push the keyboard towards the screen. This will pop the bottom of the keyboard out of the casing.

  8. Lenovo Thinkpad x230 Keyboard Replacement, lift keyboard: 手順 8、 2の画像 1 Lenovo Thinkpad x230 Keyboard Replacement, lift keyboard: 手順 8、 2の画像 2
    • Carefully lift the keyboard so that you can access its connector.

  9. Lenovo Thinkpad x230 Keyboard Replacement, Unplug keyboard: 手順 9、 2の画像 1 Lenovo Thinkpad x230 Keyboard Replacement, Unplug keyboard: 手順 9、 2の画像 2
    • Carefully unplug the connector by pulling.

  10. Lenovo Thinkpad x230 Keyboard Replacement, done: 手順 10、 1の画像 1
    • You are done - the keyboard is not connected to the laptop any more and can be replaced.

終わりに

To reassemble your device, follow these instructions in reverse order.

10 の人々がこのガイドを完成させました。

作成者

2人の作成者と共同で作成されました。

Johannes

メンバー登録日: 02/25/14

1,061 ポイント

3のガイドは作成済み

4 件のコメント

Very good instructions. Really easy. Difficulty rather easy than moderate. Took me two minutes.

Carsten Mühlberg - 返信

How do I reinsert the strip above the keyboard? When I insert the bottom clips first I can’t get the top ones in and vice versa. Also I don’t understand the mechanism of the top clips, why do they have the shape they do?

Daan - 返信

Worked perfectly. It was easy enough that I could use a key ring screw driver

Chris Barry - 返信

Quisiera saber cómo reparar el teclado ya que está en corte y no me deja encender la laptop

Mario Sánchez Soroa - 返信

コメントを追加

統計データ:

過去 24時間: 8

過去 7 日: 26

過去 30 日: 77

今までの合計 11,322