
Lenovo ThinkPad S431 Screen Assembly Replacement

5 - 10 分
簡単
はじめに
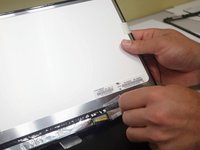
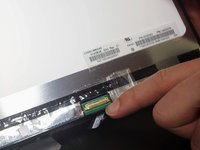
手順 1 に進むThis guide will show you the steps to safely remove the damaged screen from your laptop. Once the screen is broken, you cannot receive accurate information from your laptop.
必要な工具と部品
パーツ

ツール


もっと見る
これらのリンクを通じて購入すると、iFixit は手数料を得ます。


もう少しです!
To reassemble your device, follow these instructions in reverse order.
終わりに
To reassemble your device, follow these instructions in reverse order.

チーム

Linn Benton Community College, Team S2-G2, Johnson Spring 2018 Linn Benton Community College, Team S2-G2, Johnson Spring 2018人のメンバー
LBCC-JOHNSON-S18S2G2
4 メンバー
7のガイドは作成済み