メインコンテンツにスキップ
JBL Charge 3 Button Replacement

JBL Charge 3 Button Replacement

Sunmin Yoon

Sunmin Yoon とその他 3 人の作成者

最終更新日: May 10, 2024

3 - 5 分
簡単

Sometimes the button switches on your JBL Charge 3 can wear out or get dirt in them causing one or more buttons to not work. Luckily the buttons are easy to clean once the cover is removed.

必要な工具と部品

ツール

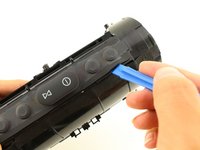
  1. JBL Charge 3 Button Replacement, Front Cover: 手順 1、 3の画像 1 JBL Charge 3 Button Replacement, Front Cover: 手順 1、 3の画像 2 JBL Charge 3 Button Replacement, Front Cover: 手順 1、 3の画像 3
    • Turn your speaker upside down and insert the plastic opening tool vertically into the slit in the front cover.

    • Slowly pull the plastic opening tool outward to remove the four clips holding the covering in place.

    • Repeat this process for all four edges of the front cover.

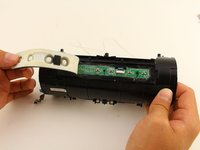
  2. JBL Charge 3 Button Replacement: 手順 2、 1の画像 1
    • Pull apart your cover gently from both sides and remove it from the speaker housing.

    • There are screws around the foot of the device that may need loosening to be able to unclip the other side of the cover.

    • The inside of the front cover has holes that must match with their corresponding pins on the speaker housing for proper reassembly.

    • Removing the Front Cover does not affect the waterproof seals of the device. However, removing any further disassembly of your speaker will require removing waterproof seals and gaskets. Your device may no longer be waterproof after these have been altered.

  3. JBL Charge 3 Button Replacement, Button: 手順 3、 2の画像 1 JBL Charge 3 Button Replacement, Button: 手順 3、 2の画像 2
    • Use your plastic opening tool to pry around the edges of the button cover. This will begin to separate the adhesive from the cover.

    • Peel away the button cover with your hand once you have enough separated from the speaker housing to grab.

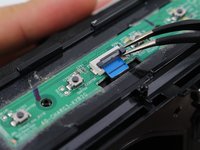
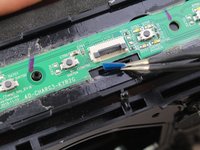
  4. JBL Charge 3 Button Replacement: 手順 4、 2の画像 1 JBL Charge 3 Button Replacement: 手順 4、 2の画像 2
    この手順で使用する道具:
    Tweezers
    $4.99
    • Flip open the top flap on the ZIF connector.

    • Gently pull out the ZIF connector cable with tweezers.

終わりに

To reassemble your device, follow these instructions in reverse order.

15 の人々がこのガイドを完成させました。

作成者

3人の作成者と共同で作成されました。

Sunmin Yoon

メンバー登録日: 10/30/18

1,970 ポイント

2のガイドは作成済み

チーム

Cal Poly, Team S13-G1, White Fall 2018 Cal Poly, Team S13-G1, White Fall 2018人のメンバー

CPSU-WHITE-F18S13G1

3 メンバー

26のガイドは作成済み

4 件のコメント

my jbl dont turn on even its in charge it wont turn on

batteries are new but still wont wor

D- ASTRO - 返信

Where do i buy new buttons?

Thomas Bjerregaard - 返信

Could you please provide info about where to get the green board?

Alvaro Pérez Morales - 返信

Next steps are missing.

5.) What happens after the disconnecting the ZIF?

6.) a.) How do you remove the button board? Is that what needs to then be replaced?)

6.) b) Or do I need soldiering skills and learn to attach new buttons to the existing board.

Happy to learn - hoping to be pointed in the right direction...

Mark Freeman - 返信

コメントを追加

統計データ:

過去 24時間: 8

過去 7 日: 51

過去 30 日: 205

今までの合計 25,516