メインコンテンツにスキップ

HP Stream x360 11-p015wm Speaker Replacement

必要な工具と部品

  1. HP Stream x360 11-p015wm Speaker Replacement, Back Cover: 手順 1、 2の画像 1 HP Stream x360 11-p015wm Speaker Replacement, Back Cover: 手順 1、 2の画像 2
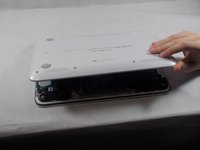
    • Orient the laptop to have the back cover facing upwards.

    • Remove the four rubber pads located in each corner.

  2. HP Stream x360 11-p015wm Speaker Replacement: 手順 2、 1の画像 1
    この手順で使用する道具:
    JIS Driver Set
    $19.99
    購入する
    • Tool required: JIS #1 Screwdriver

    • Using the screwdriver, remove all of the exposed screws.

  3. HP Stream x360 11-p015wm Speaker Replacement: 手順 3、 2の画像 1 HP Stream x360 11-p015wm Speaker Replacement: 手順 3、 2の画像 2
    この手順で使用する道具:
    iFixit Opening Tool
    $1.99
    購入する
    • Tool required: iFixit opening tool

    • Open the laptop and orient the keyboard facing upward.

    • Slowly wedge the opening tool into the gap between the keyboard and the back cover.

    • After loosening the back cover, close the laptop and orient the back cover facing upward. Open the cover.

  4. HP Stream x360 11-p015wm Speaker Replacement: 手順 4、 2の画像 1 HP Stream x360 11-p015wm Speaker Replacement: 手順 4、 2の画像 2
    この手順で使用する道具:
    Tweezers
    $3.99
    購入する
    • This is a good time to clean any accumulated dust or debris. Use this link on tips for cleaning.

    • Tool required: Tweezers

    • Carefully use tweezers to remove the audio jack connector from the motherboard.

  5. HP Stream x360 11-p015wm Speaker Replacement, Speaker: 手順 5、 1の画像 1
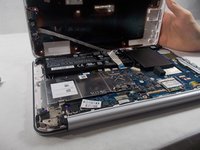
    • Locate your speaker on the left and right ends of the front rear side of your laptop.

  6. HP Stream x360 11-p015wm Speaker Replacement: 手順 6、 3の画像 1 HP Stream x360 11-p015wm Speaker Replacement: 手順 6、 3の画像 2 HP Stream x360 11-p015wm Speaker Replacement: 手順 6、 3の画像 3
    • Use JIS J1 screwdriver to remove exposed screws on one or both of the speakers.

  7. HP Stream x360 11-p015wm Speaker Replacement: 手順 7、 1の画像 1
    • Unplug the speaker wire connected to the laptop.

  8. HP Stream x360 11-p015wm Speaker Replacement: 手順 8、 1の画像 1
    • Carefully remove the speaker from the laptop.

終わりに

To reassemble your device, follow these instructions in reverse order.

作成者

2人の作成者と共同で作成されました。

DaisyHaskell

メンバー登録日: 10/15/18

683 ポイント

6のガイドは作成済み

チーム

UMass Dartmouth, Team S1-G2, Valliere Fall 2018 UMass Dartmouth, Team S1-G2, Valliere Fall 2018人のメンバー

UMASSD-VALLIERE-F18S1G2

4 メンバー

6のガイドは作成済み

コメント 1 件

Hey, so is there any idea how to remove the memory on this laptop? I'm very new to disassembly and these guides are very useful for the laptop I have. Thanks!

j ! - 返信

コメントを追加

統計データ:

過去 24時間: 0

過去 7 日: 1

過去 30 日: 3

今までの合計 163