メインコンテンツにスキップ
HP Stream 11-d010nr Motherboard Replacement

HP Stream 11-d010nr Motherboard Replacement

Riley Patrick Geoghegan

Riley Patrick Geoghegan とその他 3 人の作成者

最終更新日: December 16, 2022

見積もりなし
中レベル
作成中の学生
より良い紹介部分
詳細が不足

必要な工具と部品

ツール

もっと見る

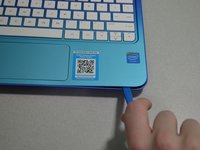
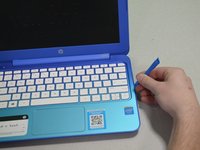
  1. HP Stream 11-d010nr Motherboard Replacement, Pry out the inserts: 手順 1、 2の画像 1 HP Stream 11-d010nr Motherboard Replacement, Pry out the inserts: 手順 1、 2の画像 2
    • Unplug and turn off the HP Stream 11 before disassembling the device.

    • Using a spudger, gently pry off the two elliptical rubber inserts located in the top corners.

    • Carefully remove the two circular rubber inserts positioned beneath the removed elliptical inserts.

  2. HP Stream 11-d010nr Motherboard Replacement, Unscrew the back cover: 手順 2、 1の画像 1
    • Using a Phillips #1 screwdriver, remove the eleven 5.6 mm screws securing the back cover.

    • Keep the screws in a safe place for reassembly.

  3. HP Stream 11-d010nr Motherboard Replacement, Pry the keyboard casing up: 手順 3、 2の画像 1 HP Stream 11-d010nr Motherboard Replacement, Pry the keyboard casing up: 手順 3、 2の画像 2
    • Using an iFixit opening tool, carefully pry open the case to separate the keyboard from the main body. Work slowly to avoid damaging the edges.

    • HP Stream 11s tend to be really difficult to open. If your device is not opening with a standard iFixit opening tool, use a nylon spudger, then the metal spudger, or a metal Jimmy as the last resort.

    • When using the metal spudger or Jimmy, be careful not to bring these tools into contact with any electronic components of the device as this can damage the device.

  4. HP Stream 11-d010nr Motherboard Replacement, Identify the connectors: 手順 4、 1の画像 1
    • Carefully lift the keyboard and identify the three ribbon cables connecting the main body of the laptop to the keyboard.

    • Lift the keyboard with extreme care to avoid damaging the delicate ribbon cables. Applying excessive force can easily tear or break them easily.

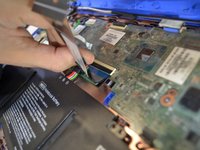
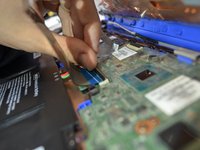
  5. HP Stream 11-d010nr Motherboard Replacement, Disconnect the cables: 手順 5、 3の画像 1 HP Stream 11-d010nr Motherboard Replacement, Disconnect the cables: 手順 5、 3の画像 2 HP Stream 11-d010nr Motherboard Replacement, Disconnect the cables: 手順 5、 3の画像 3
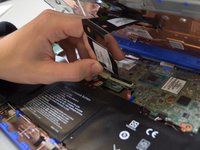
    • Using a spudger, gently lift the flaps on the ZIF connectors to release the three ribbon cables securely attached to them.

    • Carefully disconnect the three ribbon cables.

  6. HP Stream 11-d010nr Motherboard Replacement, Lift the keyboard out: 手順 6、 1の画像 1
    • Gently lift the keyboard out of the laptop to fully detach it from the device.

    • While handling, avoid damaging any remaining components.

  7. HP Stream 11-d010nr Motherboard Replacement, Battery: 手順 7、 1の画像 1
    • Remove any tape holding the battery connector in place.

    • Using your fingers, carefully unplug the battery.

  8. HP Stream 11-d010nr Motherboard Replacement: 手順 8、 2の画像 1 HP Stream 11-d010nr Motherboard Replacement: 手順 8、 2の画像 2
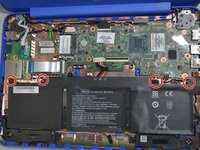
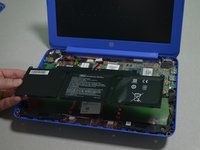
    • Remove the four 3mm #000 Phillips screws holding the battery in place.

    • Carefully lift the battery out of the laptop.

  9. HP Stream 11-d010nr Motherboard Replacement, Motherboard: 手順 9、 1の画像 1
    • Remove Wi-Fi card from the motherboard.

  10. HP Stream 11-d010nr Motherboard Replacement: 手順 10、 1の画像 1
    • Use a Phillips #000 screwdriver to remove all 3 mm screws from the motherboard.

  11. HP Stream 11-d010nr Motherboard Replacement: 手順 11、 1の画像 1
    • Gently lift the ribbon-cable ZIF tabs and remove all 6 cables from the motherboard.

終わりに

To reassemble your device, follow these instructions in reverse order.

作成者

3人の作成者と共同で作成されました。

Riley Patrick Geoghegan

メンバー登録日: 10/03/22

193 ポイント

2のガイドは作成済み

0ガイドコメント

コメントを追加

統計データ:

過去 24時間: 0

過去 7 日: 2

過去 30 日: 10

今までの合計 525