メインコンテンツにスキップ

HP Elitebook 8460p Keyboard Replacement

必要な工具と部品

  1. HP Elitebook 8460p Keyboard Replacement, Battery: 手順 1、 1の画像 1
    • On the back of the computer, slide the left switch towards the outside of the laptop until you hear a click.

  2. HP Elitebook 8460p Keyboard Replacement: 手順 2、 1の画像 1
    • Slide the battery away from the switches until it can be lifted away from the laptop.

    • Lift the battery away from the laptop.

  3. HP Elitebook 8460p Keyboard Replacement, Back Panel: 手順 3、 1の画像 1
    • On the back of the laptop, slide the right switch toward the outside of the laptop until you hear a click.

  4. HP Elitebook 8460p Keyboard Replacement: 手順 4、 1の画像 1
    • Slide the back shell of the laptop away from the switches until it can be lifted up.

    • Lift the shell straight up.

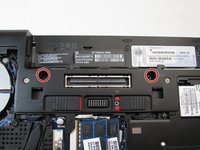
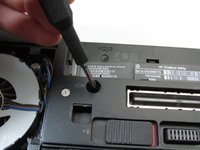
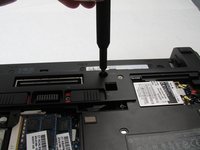
  5. HP Elitebook 8460p Keyboard Replacement, Keyboard: 手順 5、 3の画像 1 HP Elitebook 8460p Keyboard Replacement, Keyboard: 手順 5、 3の画像 2 HP Elitebook 8460p Keyboard Replacement, Keyboard: 手順 5、 3の画像 3
    • Attach ESD strap around your wrist and to a ground.

    • Using a Phillips #0 bit, unscrew the two screws in front of the battery slot located on the bottom of the laptop.

  6. HP Elitebook 8460p Keyboard Replacement: 手順 6、 1の画像 1
    • Flip the laptop over and open the screen.

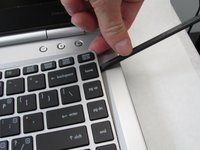
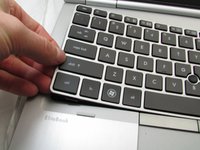
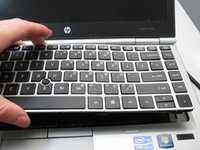
  7. HP Elitebook 8460p Keyboard Replacement: 手順 7、 3の画像 1 HP Elitebook 8460p Keyboard Replacement: 手順 7、 3の画像 2 HP Elitebook 8460p Keyboard Replacement: 手順 7、 3の画像 3
    • Using a spudger, work around the edge of the keyboard and pry it up from the device.

  8. HP Elitebook 8460p Keyboard Replacement: 手順 8、 2の画像 1 HP Elitebook 8460p Keyboard Replacement: 手順 8、 2の画像 2
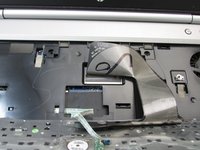
    • Lift the keyboard out of the laptop and flip it over.

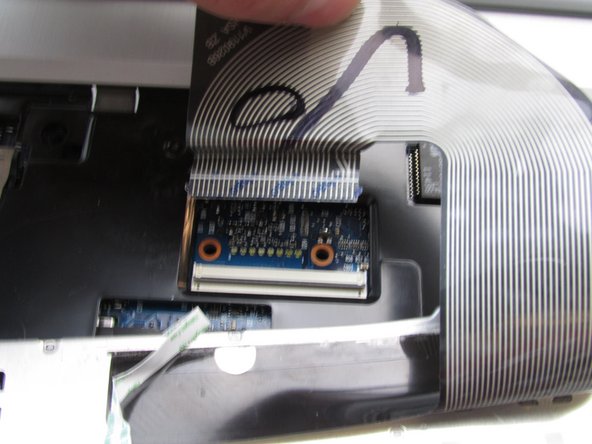
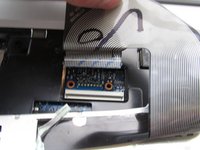
    • This exposes two different connectors. Both need to be detached in order to remove the keyboard. The larger connector is the main keyboard cable.

  9. HP Elitebook 8460p Keyboard Replacement: 手順 9、 2の画像 1 HP Elitebook 8460p Keyboard Replacement: 手順 9、 2の画像 2
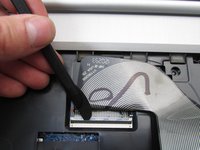
    • Disconnect the keyboard cable on the laptop using a thin pry tool to open the connection.

    • Open the connection by inserting a thin plastic pry tool under the black tab in the connector and flipping it up.

  10. HP Elitebook 8460p Keyboard Replacement: 手順 10、 2の画像 1 HP Elitebook 8460p Keyboard Replacement: 手順 10、 2の画像 2
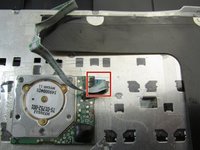
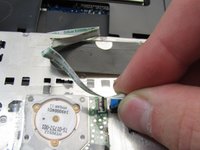
    • Using the spudger again, disconnect the thin ribbon strip on the back of the keyboard.

終わりに

To reassemble your device, follow these instructions in reverse order.

3 の人々がこのガイドを完成させました。

作成者

1人の作成者と共同作成されました。

Garrett Anderson

メンバー登録日: 09/16/19

2,184 ポイント

10のガイドは作成済み

チーム

2 件のコメント

There's a third keyboard screw right beside the fan

Colin Chaplin - 返信

yeah just wanted to say this ...

Also the screws are PH1 not PH0

Robert Kohari -

コメントを追加

統計データ:

過去 24時間: 0

過去 7 日: 18

過去 30 日: 40

今までの合計 3,787