はじめに
Googleは未来型ロボットアシスタント機能を世の中にもたらす方法を模索しています。Google Assistantを装備したGoogle Homeは、Googleのサービスをサポートし、日常の様々な疑問に答えてくれるスマートホームデバイスです。 このGoogle Homeはスマートホームの夢と未来的ファンタジーを叶えてくれるのでしょうか?さあ、分解の時がやってきました!
私たちは、皆さんが未来が現在になるものを見逃して欲しくありません。
Instagram, Facebook、TwitterやTwitter日本語版で最新情報をフォローしてください。
必要な工具と部品
-
-
Ok, Google‼︎あなたのお家(Home)の仕様を見てみましょう。
-
2インチドライバー+デュアル2インチパッシブラジエータ
-
広域マイク
-
カスタマイズ可能なベース
-
802.11ac (2.4GHz/5GHz) Wi-Fi
-
"Touch surface" コントロール
-
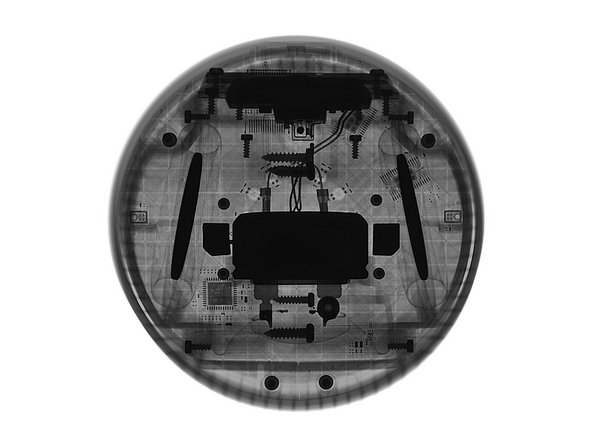
Creative Electron社によるレントゲン偵察隊で装備している私たちは、このHome ー家屋へ侵入する準備が出来ています。
-
-
-
この
芳香剤のようなデバイスからいい匂いはしませんが、LED付きのHomeマイク専用「スタンドバイ」ボタンが確認できます。 -
フット部分はA/C 電源ポート、モデル番号と様々な証明書が付いています。
-
この直径3.79インチ(約9.6センチ)、高さは5.62 インチ(約14センチ)で、このより円形で、より親しみやすいスピーカーはAmazon Echoの高さの約半分ほどです。
Your dimensions are totally wrong. The GH is about 3.5" in diameter, and 5.5" tall.
We revisited this step after seeing your comment and noticed that we worded this step poorly. Thank you for the heads up! We have since gone in and edited. For those that are curious, here are the specs from Google.
I'm not sure "charging port" is appropriate here since there is no battery inside to charge.
Good catch! We updated the wording there to make it more accurate. Thanks :)
-
-
-
ここにHomeの極小サイズの無線通信機があります。というのは冗談で、ミュートボタンとボード上のスイッチの間に伸びるアームがあります。このアームには弾力性が若干つけられています。
-
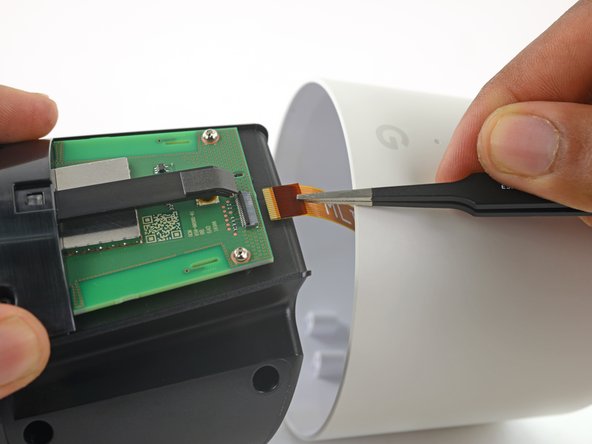
数回テストシグナルを送信した後、連系ケーブルの接続を外します。
-
このケーブルはマザーボードからカバーの上部に包まれたボードまで繋がってします。LED アレイと特製マイクのホームだと思われます。
Would it be possible to get one of those cables/ribbon connector to make a sort of remote control ?
-
-
-
-
この分解でも、熱を当てて温め、高度な検査ツールを使って破壊していきますー厳密に言うとiOpenerと歯医者で使われるピックです。
-
上部ケースに留められているこのボードには、かなり強度な接着剤が付けられています。
-
最後に強く引っ張り(それとかなりの量の接着剤を溶かすため、体に優しいイソプロピルアルコールを使いましょう)、LEDボードを取り出すと、これまでの苦労のもとが確認できます。大量の接着剤テープです。
-
-
-
さて、これが私たちが行ったボード取り外し作業の様子です。1枚の強力な接着剤シートがプラスチック製の上側ケースと容量ボードを留めています。
-
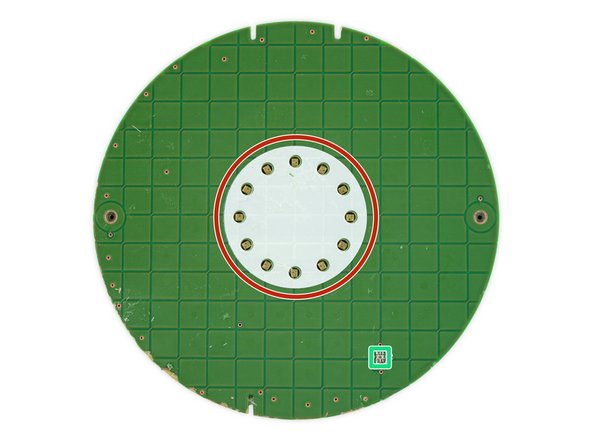
基板のこちら側には12個のステータスLEDも配置されています。
-
裏側にはチップが埋め込まれています。
-
Atmel ATSAMD21 32-bit ARM Cortex-M0+ マイクロコントローラ
-
Two NXP PCA9956BTW LED ドライバー
-
2つのInvenSense INMP621 MEMS マイク—Echoは7つのマイクが付けられているのに対して、2つのマイクとは十分なのでしょうか?
-
環境光センサー
It says QCM650-00987-010A6AD02571. It appears to be the number of the board silk screened at approximatly 2:00 on the board photo.
Jeff Hager - 返信
Any idea what IC U2 on the top is?
Also, MP1? “MP” usually designates a mechanical part but it’s tough to tell from the pictures what that is for?
Kevin Fisk - 返信
My microphone went bad on my Google home, is it possible to replace those?
Here is a suggestion. This is what I did, I disconnected the google home from power and hard tap few times on the top after turning it on the mic started to work.
zeusmos -
IC U2 on top is an ALS (Ambient Light Sensor) for control the bridness of the LEDs.
Any idea which brand/type of LED are these?
-
-
-
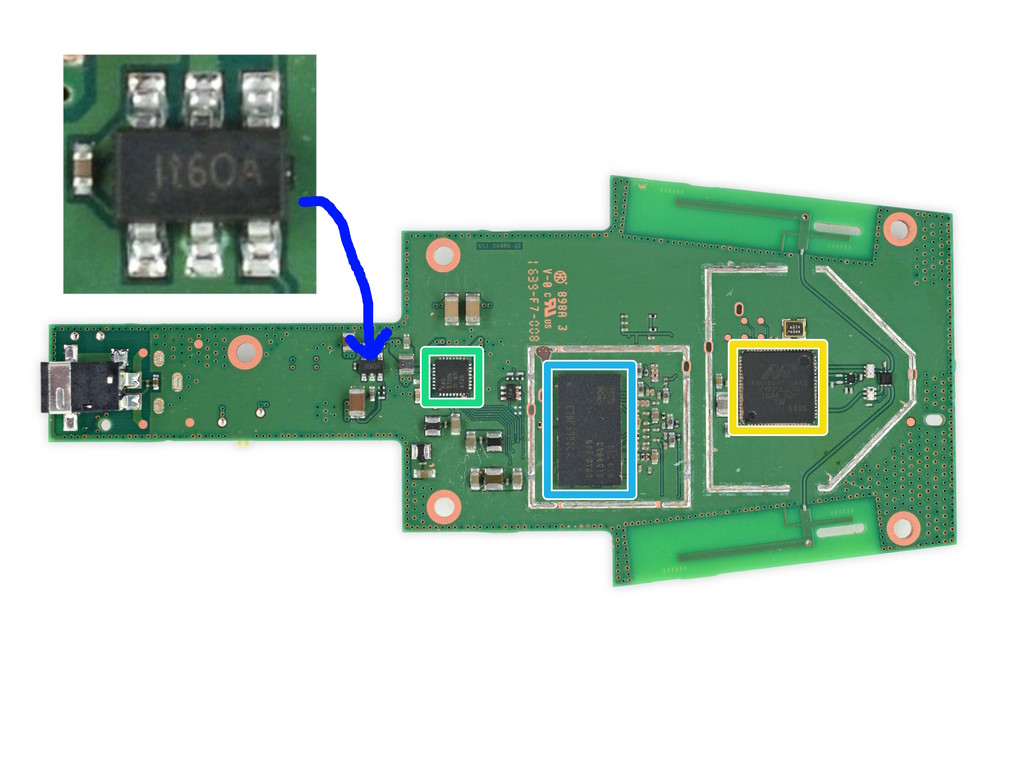
これらのチップはデジャブなのでしょうか。下にある多くのチップ(CPU, フラッシュとRAM) が昨年のChromecastで見られたものと類似しています。
-
Marvell 88DE3006Armada 1500 Mini Plus dual-core ARM Cortex-A7 media processor
-
Toshiba TC58NVG1S3HBA16256 MB NAND flash
-
Marvell Avastar 88W8887 WLAN/BT/NFC SoC
-
Texas Instruments TAS5720 audio amplifier
-
Samsung K4B4G1646E-BYK0 512 MB B-Die DDR3 SDRAM
-
Marvell パワーマネージメント
-
Texas Instruments TS3USB31 480 Mbps USB 2.0スイッチ
Help….my daughter gave me her Amazon home which she bought in Oz. Like a fool i thought you could plug it in, in the uk (same voltage etc). Now its blown the chip that has the green surround in the picture in step 8. Anyone know where I can get a replacement motherboard or how to fix.
Thank, in anticipation…………………Paul
Sorry that this reply is literally two years late, but you can’t fix a single chip on a board like this without some talented microsoldering. I’d just get a new device.
The very first thing I noticed when seeing the X-ray image was the "home" shaped shielding over the wireless SoC. I was surprised that it wasn't mentioned here despite the iFixit silly-billy commentary 😞
-
-
-
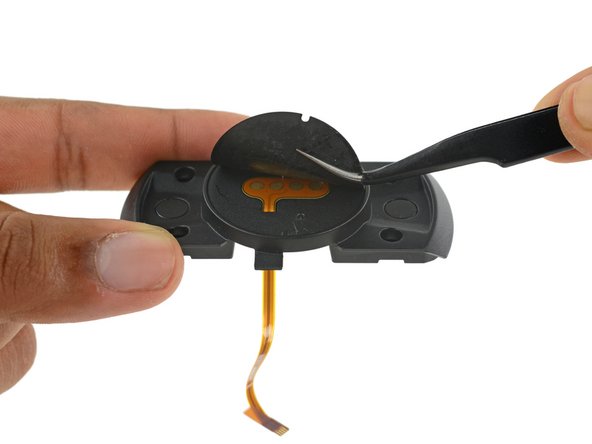
ボトムケースのためのマグネットが付いている部品には内部がロックされたミステリーなケーブルがあります。
-
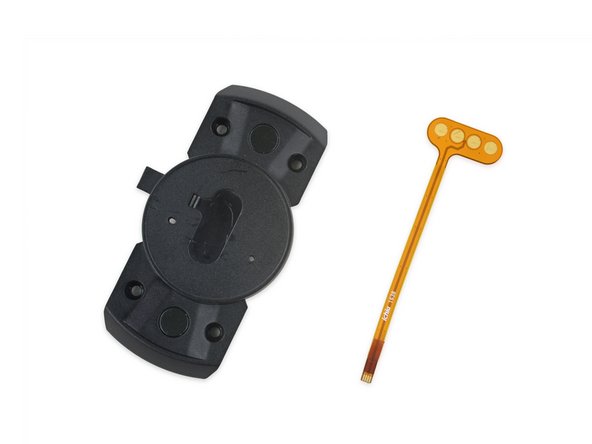
より詳細に内部を見ていきましょう。さらにミステリーがあるようです!ケーブルは4つの接続ポイントに枝分かれしています。これはなんでしょうか?試験ポイントを増やしたのでしょうか?
-
ベースの色を認識することができる。するとHome本体は外側のケースとより良くカラーコーディネートができる。
-
充電機構の名残(Homeの設計者はポータブルデバイスを目指していたのかもしれない?)
-
分解エンジニアにとっては見捨てられたイースターエッグを探すレベルほどの困難さです。
Maybe a serial port connector to fix the firmware, when it has a soft-brick, or something like that...
It has a Micro-USB port for debuging
I would guess a serial or USB port that the hardware manufacturer uses for initial programming; probably special base stations in the factory they plonk these things down on before applying that sticker to the bottom or the colored base. Though it's a bit perplexing since the USB port is accessible with the colored base removed.
Two of the contacts are connected to each other (outer two) through conductive material below the film and share thicker planes/copper to the ribbon connector that goes to the motherboard. I highly suspect that the outer two are electrical ground connectors, designed to provide some degree of shielding for the two lines in the center, which are likely differentially paired signals. This would suggest the connector is half duplex serial (as USB has a 5V, D+, D-, and GND connector).
I'm almost tempted to break out an ohmmeter and try and figure out where those signals go on the board.
Maybe there's a possibility of future connectivity with peripherals of some sort for expansion via Special USB docks
Paul Ebrey - 返信
UART board for firmware loading and debugging
Did you check the additional contacts to see if they might be the other audio channel? (assuming it uses left for mono sound, this would be the right channel)
Jeff Young - 返信
These contacts are exposed on a retail demo model I saw once. The base platform contains four pins that contact these. Maybe for firmware?
-
-
-
スピーカーケースを半分に離すため、両側を引っ張ります。
-
…ドライバーを取り出して…
-
二つに離れました!
-
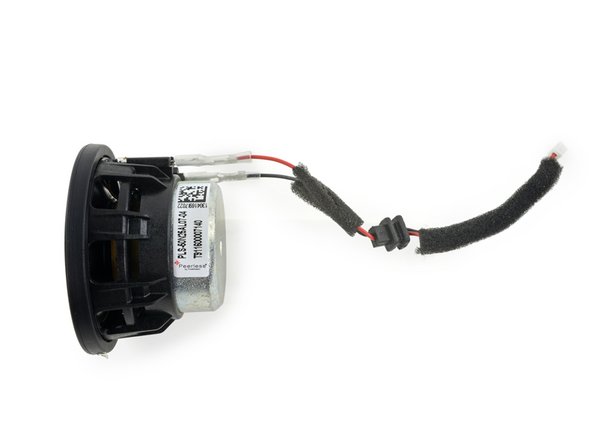
Homeは新登場の PLS-50N25AL07-04によって動いているようで、 PLS-50N25AL01-08ととても類似しています。
-
私たちのマルチメーターと最後の機番"-04"から読み解くと、4オームではないかと考えられます。
-


以下の翻訳者の皆さんにお礼を申し上げます:
100%

これらの翻訳者の方々は世界を修理する私たちのサポートをしてくれています。 あなたも貢献してみませんか?
翻訳を始める ›

62 件のコメント
Does it have GPS?
No, that's why it asks you to input your address during the setup process.
izzy -
Why would a stationary, internet-connected device have a GPS receiver?!
Amazon advertises that in the Echo, the mute button uses analog electronics to disconnect the microphone so that it's impossible for a software hack to ignore the mute button. Can you tell if this is the case with Google Home?
Great question! I'd also be interested to know this.
Im also interested in this question
+1 to the question
Can you point to where this is advertised? I'm very curious how this works as the button does not feel like it's toggling anything.
I don't think bluetooth is necessary because I can cast to Google Home from the Home app.
It's much better than Bluetooth .
Ditto! - Let the imbecile... ummm umbilical cord be cut.
The connection in the foot is maybe for an optional battery pack like the Heos? So you can carry it outside or around the house?
That may be the case and I can say people would like the option. I can also say from experience it is most likely that it's for powering the unit during final testing. Now that said, it is a secondary power source. So I would expect DIY'rs and Makers to utilize this feature before Google does.
No line out? Like the first gen Echo.
This was the one thing that really surprised me.
But unlike the Echo, the Home can send (well, control) audio to a Chromecast Audio (or two, or three, in sync!), which is far more versatile than having an audio output on the device itself. I've been using various Echoes (including a couple of output-jack-equipped Dots) since their first release, but the Chromecast connection is the primary reason why I purchased a Google Home.
Use Chromecast Audio. No line out needed.
What does the Micro USB port do?
No doubt something that will make all of us hacker types very happy, once we figure it out.
Probably for Android ADB.
eric -
It has Bluetooth but it seems there is no way to pair it as Bluetooth speaker. Very inconvenient when I want to watch videos the tablet but have louder speaker. With Echo it is easy just annoying 1sec latency, hoped Google would be better but no such functionality exposed.
Bluetooth pairing could always come in a future update and be managed in the Google Home app.
It seems to work as a BT speaker at the time of this posting. I have done this on both the Home and the Mini.
Ps. LG is coming out with wireless speakers and sound bars with Chromecast Audio built in.
Ok really cool teardown. Now put it back together. =)
dmart91300 - 返信
It's fully reassembled and working great for teardown room tunes :)
Is it possible to estimate the manufacturing cost from this? I
Cut the msrp by 60% to 70%, or more in some cases. This is so for every unit sold they can produce another one, pay for manufacturing (including transit) and make a profit. Thats my loose guess for google.
Thank you for this! Discovered too late. So ... what is the final word on 802.15.4. Is there a chip in there? I speculated about Thread in Google Home here, with a nod to this teardown: http://www.cepro.com/article/ces_2017_vo.... Thanks again!
Would it be possible to hack an audio-out into the home? It's a bit annoying to have this sitting next to my stereo and having to use a Chromecast Audio at the same time.
Toby White - 返信
Good question. People have Now added an audio jack to the mini, but unfortunately the mini is mono. Presumably if an audio jack could be added to the home, it would be stereo? I’d love to do this too!
Rick -
is there an optional power supply available, so the unit can be carried to another room without unplugging the power supply?
My question, too. What adapter would I need to accomplish this? There's a replacement power adapter available on eBay from a seller in China, but they want $30. There's got to be a way more reasonable means of accomplishing this.
The the mystery cable mist hold the chip for the wifi when in setup mode the google home connect your phone to its wifi.
I need a new power cord for mine and cannot find one any ideas?
did you ever come to a conclusion on this one?
There is an eBay seller from China offering a replacement adapter for $29.99. Search item no. 322441245141. That seems high for what it is. Specifically what would the layman look for in an alternative, cheaper solution, like maybe in a universal adapter set?
It' a 16.5v/2A DC power supply. I can't see there being anything special about it.
I find the Google home speaker to have excellent bass but higher frequencies sound muffled. The Echo on the other hand has much crisper and clearer highs. Could this be to do with the fact that the Google just has one speaker without a tweeter where is the Echo seems to have one of each? Or am I misunderstanding something.
Russ Smith - 返信
What ADC and DAC's are they using? TI?
The INMP621 microphone has an embedded ADC. Check the specification.
Great work! Maybe you can add a final bill of materials to your tear down format. Thanks!
Can you disable or disconnect the wireless module if there is a module. I saw someone manage to Ethernet wire it using a google chromecast Ethernet adapter.
So, that additional audio channel. Did you check it to see if it might be a right audio out. This might be a real game changer when it comes to modding.
Jeff Young - 返信
FYI, the Marvell IC part number you referenced is incorrect the package says “88W8887”
I did some digging and the google home mini has the 88W8897. I am curious if the latest hardware for google home still uses the 88W8887 IC
Actually the google home mini uses the 88W8887 too.
Good eye! I believe you’re correct, and that step has now been updated.
What's all that empty space in the plastic cavity above the speakers? Looks unnecessary, and explains why the mini is so much smaller. They could've eliminated it and made the Home a couple inches shorter (?)
Help….my daughter gave me her Amazon home which she bought in Oz. Like a fool i thought you could plug it in, in the uk (same voltage etc). Now its blown the chip that has the green surround in the picture in step 8. Anyone know where I can get a replacement motherboard or how to fix.
Thank, in anticipation…………………Paul
so, anyone managed to find what those pads under the UL sticker on the bottom is used/ can be used for?
Watching this steps I tried to open the Google home. I am unable to unscrew 2 out of the 6 t8 screw which makes it into two part. I feel either this screw are security torx screws or the groove are damaged. Basically I want to change the sound driver because by mistake I pressed the speaker dome and need to change or fix it. Any idea how to fix it.
Could someone tell me what this component is on the main board? Mine has burnt out and I need to replace it: https://www.spinningplanet.co.nz//images...
Hi, I am hoping someone here can help out. My Google Home Smart Speaker stopped working and I cannot reset it. The LED above the G sign goes yellow, then white and that’s all I get. None of the LEDs on top come on; there is no sound; and I have tried the method of resetting it by powering it ten successive times (although I did not see any of the LEDs on top ever come on).
I used to love listening to radio and music with this while in the kitchen. Anyone knows how to reset it back another way? Is there a hard reset button on the board itself?
thanks in advance.
hello, can i ask what component is this? and what value? thanks. https://usaupload.com/5rew/Screen_Shot_2...
Mine lost configuration when power goes off, is there a CMOS battery in it??
What cord does it take to charge
The shield on the back of the motherboard looks like a little house in this picture... intentional "home" easter egg?
kevlargibs - 返信
This article is excellent. I’m a grade 7 student, and I’m writing a tech article at school about the design of Google Home smart speakers. I’m wondering if I can use your photos in my project. I’ll quote the source, of course. Thanks in advance. Evelyn
Evelyn Zhu - 返信