メインコンテンツにスキップ

Game Boy Advance Logic Board Replacement

必要な工具と部品

  1. Game Boy Advance Logic Board Replacement, Remove the Battery Cover/Batteries: 手順 1、 3の画像 1 Game Boy Advance Logic Board Replacement, Remove the Battery Cover/Batteries: 手順 1、 3の画像 2 Game Boy Advance Logic Board Replacement, Remove the Battery Cover/Batteries: 手順 1、 3の画像 3
    • Take the battery cover off by releasing the locking tab and hinging the cover away. Remove the batteries inside the cover

    • Do not forget to remove the batteries! This applies to working with any electronic device as working with live electricity may damage the device or cause malfunctions

  2. Game Boy Advance Logic Board Replacement, Unscrew the Back Panel: 手順 2、 2の画像 1 Game Boy Advance Logic Board Replacement, Unscrew the Back Panel: 手順 2、 2の画像 2
    • Remove the six back panel screws using a Tri-wing Screwdriver.

    • Remove bottom back panel screw with a Phillips #1 screw driver. (Image #2)

  3. Game Boy Advance Logic Board Replacement, Remove the Back Panel: 手順 3、 1の画像 1
    • Remove the back panel by pulling away with one hand and the front secured in the other hand.

    • Removal of the back panel may cause shoulder buttons and side panels to come loose and fall off.

  4. Game Boy Advance Logic Board Replacement, Remove Triggers: 手順 4、 2の画像 1 Game Boy Advance Logic Board Replacement, Remove Triggers: 手順 4、 2の画像 2
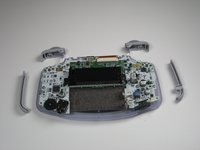
    • Remove left and right triggers by lifting and pulling them away from the system.

    • Do the same for side panels

    • For finicky or jammed triggers only! Adjust and correct triggers and reassemble. Most jammed triggers are caused by buttons misplaced or jammed in its enclosure.

  5. Game Boy Advance Logic Board Replacement, Remove the On/Off Switch: 手順 5、 1の画像 1
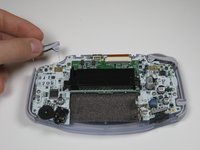
    • Remove the gray On/Off Switch by pulling up and away from the unit. Replace with another switch if necessary.

  6. Game Boy Advance Logic Board Replacement, Buttons and LCD Screen: 手順 6、 1の画像 1
    • Remove the three screws on the circuit board with a Phillips #1 screw driver.

  7. Game Boy Advance Logic Board Replacement: 手順 7、 2の画像 1 Game Boy Advance Logic Board Replacement: 手順 7、 2の画像 2
    • Pull circuit board away from the front panel by pulling up at the bottom of the circuit board, keeping the top ribbon still connected.

    • Handle with care! The ribbon connecting the circuit board to the LCD screen can easily be damaged and will require replacement if broken.

  8. Game Boy Advance Logic Board Replacement, Buttons: 手順 8、 3の画像 1 Game Boy Advance Logic Board Replacement, Buttons: 手順 8、 3の画像 2 Game Boy Advance Logic Board Replacement, Buttons: 手順 8、 3の画像 3
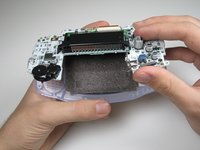
    • Remove the rubber button pads from their pockets.

    • Remove the plastic buttons and the D-pad from beneath the rubber pads with tweezers or by hand.

  9. Game Boy Advance Logic Board Replacement, Logic Board: 手順 9、 3の画像 1 Game Boy Advance Logic Board Replacement, Logic Board: 手順 9、 3の画像 2 Game Boy Advance Logic Board Replacement, Logic Board: 手順 9、 3の画像 3
    • Using the tweezers, gently pull the ribbon from the logic board.

終わりに

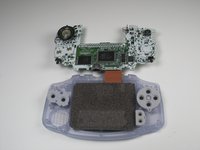
To reassemble your device, follow these instructions in reverse order.

6 の人々がこのガイドを完成させました。

作成者

5人の作成者と共同で作成されました。

Jay Aricheta

メンバー登録日: 01/20/10

319 ポイント

1ガイドが承認済み

チーム

Cal Poly, Team 16-29, Maness Winter 2010 Cal Poly, Team 16-29, Maness Winter 2010人のメンバー

CPSU-MANESS-W10S16G29

5 メンバー

61のガイドは作成済み

0 件のコメント

コメントを追加

統計データ:

過去 24時間: 0

過去 7 日: 23

過去 30 日: 141

今までの合計 16,546