メインコンテンツにスキップ

Disassembling Canon PowerShot S50 Outer Casing

必要な工具と部品

  1. Disassembling Canon PowerShot S50 Outer Casing, Battery: 手順 1、 2の画像 1 Disassembling Canon PowerShot S50 Outer Casing, Battery: 手順 1、 2の画像 2
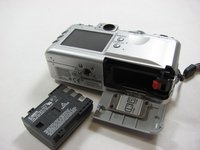
    • Place camera LCD side up and press up on the battery door.

    • Let it swing open until you can see the battery inside.

  2. Disassembling Canon PowerShot S50 Outer Casing: 手順 2、 1の画像 1
    • Press down on the orange plastic.

    • This will gently eject the battery from its compartment.

  3. Disassembling Canon PowerShot S50 Outer Casing: 手順 3、 2の画像 1 Disassembling Canon PowerShot S50 Outer Casing: 手順 3、 2の画像 2
    • Holding the edges, slide out the battery.

  4. Disassembling Canon PowerShot S50 Outer Casing, Front Panel/Battery Door: 手順 4、 1の画像 1
    • Look at the camera from the side with the lanyard and 4 screws.

    • Remove the two 3.4 mm screws on the metallic colored part.

  5. Disassembling Canon PowerShot S50 Outer Casing: 手順 5、 1の画像 1
    • Remove the 3mm screw on the top left.

    • NOTE: When reassembling, it is helpful to put the top screw back in before placing the front cover back on the camera.

    • Now remove the 5.3mm screw on the bottom.

  6. Disassembling Canon PowerShot S50 Outer Casing: 手順 6、 1の画像 1
    • Place the camera LCD side down.

    • Remove the two 5.3mm screws by the battery door.

  7. Disassembling Canon PowerShot S50 Outer Casing: 手順 7、 1の画像 1
    • Remove the four 3.4mm screws on the bottom of the camera around the tripod mount.

    • Make sure to keep these screws separate from the previous 5.3 mm screws.

  8. Disassembling Canon PowerShot S50 Outer Casing: 手順 8、 1の画像 1
    • Stand the camera back up.

    • Remove the two 3.6mm screws on the side with the A/V Out port.

  9. Disassembling Canon PowerShot S50 Outer Casing: 手順 9、 1の画像 1
    • Lift open the rubber flap covering the A/V Out port.

    • Remove the 3.4mm screw in the center.

    • During reassembly, put the A/V out rubber door on before replacing the front panel of the camera

  10. Disassembling Canon PowerShot S50 Outer Casing: 手順 10、 1の画像 1
    • Use a spudger and gently open up the front panel of the camera.

    • A thin plastic ribbon will stay connected by a brown piece to front panel of the camera.

  11. Disassembling Canon PowerShot S50 Outer Casing: 手順 11、 1の画像 1
    • There will be a brown plastic piece keeping the thin plastic ribbon in place.

    • Use the spudger to pull out the brown plastic piece attached to the orange plastic.

  12. Disassembling Canon PowerShot S50 Outer Casing: 手順 12、 1の画像 1
    • Use a pair of tweezers and remove the metal piece inside the camera.

  13. Disassembling Canon PowerShot S50 Outer Casing: 手順 13、 1の画像 1
    • Remove the battery door

    • NOTE: Putting this back on requires aligning the spring on the back of the door with the hole on the camera

  14. Disassembling Canon PowerShot S50 Outer Casing, Outer Casing: 手順 14、 1の画像 1
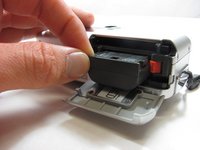
    • Using a spudger, gently separate the back panel from the rest of the camera and remove it.

終わりに

To reassemble your device, follow these instructions in reverse order.

作成者

3人の作成者と共同で作成されました。

Karim

メンバー登録日: 04/12/12

24 ポイント

3のガイドは作成済み

チーム

Cal Poly, Team 7-34, Maness Spring 2012 Cal Poly, Team 7-34, Maness Spring 2012人のメンバー

CPSU-MANESS-S12S7G34

5 メンバー

6のガイドは作成済み

0 件のコメント

コメントを追加

統計データ:

過去 24時間: 1

過去 7 日: 3

過去 30 日: 20

今までの合計 1,622