メインコンテンツにスキップ
Dell Vostro V13 Keyboard Replacement

Dell Vostro V13 Keyboard Replacement

Amy Ledermann

Amy Ledermann とその他 3 人の作成者

最終更新日: July 1, 2019

5 - 10 分
中レベル

If your keyboard is unresponsive, you may need to replace it. You can follow these steps to replace it properly.

必要な工具と部品

ツール

  1. Dell Vostro V13 Keyboard Replacement, Back Cover: 手順 1、 3の画像 1 Dell Vostro V13 Keyboard Replacement, Back Cover: 手順 1、 3の画像 2 Dell Vostro V13 Keyboard Replacement, Back Cover: 手順 1、 3の画像 3
    • Back up the memory to an external drive and power off the laptop before starting.

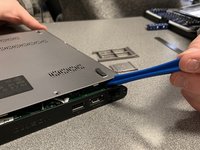
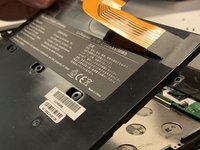
    • Flip the laptop over so the vents are facing you.

    • Remove the six 5.0 mm Phillips #1 screws using the magnetic driver.

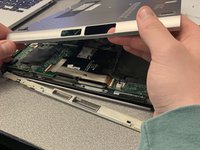
    • Remove the two 5.0 mm Phillips #1 screws on the back side of the laptop.

  2. Dell Vostro V13 Keyboard Replacement: 手順 2、 3の画像 1 Dell Vostro V13 Keyboard Replacement: 手順 2、 3の画像 2 Dell Vostro V13 Keyboard Replacement: 手順 2、 3の画像 3
    • Slide out the SD and MicroSD holders.

    • If you are having trouble sliding them out, use the plastic opening tool.

  3. Dell Vostro V13 Keyboard Replacement: 手順 3、 3の画像 1 Dell Vostro V13 Keyboard Replacement: 手順 3、 3の画像 2 Dell Vostro V13 Keyboard Replacement: 手順 3、 3の画像 3
    • Slide the plastic opening tool around the perimeter of the laptop until the cover pops off.

    • Pull the back cover off.

  4. Dell Vostro V13 Keyboard Replacement: 手順 4、 2の画像 1 Dell Vostro V13 Keyboard Replacement: 手順 4、 2の画像 2
    • Remove the three black 3.9 mm Phillips #1 screws holding the battery in place.

  5. Dell Vostro V13 Keyboard Replacement: 手順 5、 3の画像 1 Dell Vostro V13 Keyboard Replacement: 手順 5、 3の画像 2 Dell Vostro V13 Keyboard Replacement: 手順 5、 3の画像 3
    • Flip up the clip of the ribbon connector.

    • Pull the strip out to disconnect the battery.

  6. Dell Vostro V13 Keyboard Replacement: 手順 6、 2の画像 1 Dell Vostro V13 Keyboard Replacement: 手順 6、 2の画像 2
    • Remove the battery.

    • Removing the battery allows you to work safely.

  7. Dell Vostro V13 Keyboard Replacement, Keyboard: 手順 7、 1の画像 1
    • Open the laptop so the keyboard is visible.

  8. Dell Vostro V13 Keyboard Replacement: 手順 8、 3の画像 1 Dell Vostro V13 Keyboard Replacement: 手順 8、 3の画像 2 Dell Vostro V13 Keyboard Replacement: 手順 8、 3の画像 3
    • Wedge the plastic opening tool around the seam of the notification panel to pop it off.

  9. Dell Vostro V13 Keyboard Replacement: 手順 9、 3の画像 1 Dell Vostro V13 Keyboard Replacement: 手順 9、 3の画像 2 Dell Vostro V13 Keyboard Replacement: 手順 9、 3の画像 3
    • Disconnect the ribbon connector on the panel.

    • Remove the panel.

  10. Dell Vostro V13 Keyboard Replacement: 手順 10、 2の画像 1 Dell Vostro V13 Keyboard Replacement: 手順 10、 2の画像 2
    • Remove the two silver 3.1 mm Phillips #1 screws.

  11. Dell Vostro V13 Keyboard Replacement: 手順 11、 2の画像 1 Dell Vostro V13 Keyboard Replacement: 手順 11、 2の画像 2
    • Use the plastic opening tool to pry the keyboard out of the laptop.

    • Do not pull the keyboard all the way out yet.

  12. Dell Vostro V13 Keyboard Replacement: 手順 12、 2の画像 1 Dell Vostro V13 Keyboard Replacement: 手順 12、 2の画像 2
    • Disconnect the ribbon cable that connects the keyboard to the laptop by flipping up the white locking tab on the ZIF connector.

    • If you're having trouble, use the plastic opening tool to help.

  13. Dell Vostro V13 Keyboard Replacement: 手順 13、 3の画像 1 Dell Vostro V13 Keyboard Replacement: 手順 13、 3の画像 2 Dell Vostro V13 Keyboard Replacement: 手順 13、 3の画像 3
    • Remove the keyboard.

終わりに

To reassemble your device, follow these instructions in reverse order.

作成者

3人の作成者と共同で作成されました。

Amy Ledermann

メンバー登録日: 01/16/19

361 ポイント

3のガイドは作成済み

チーム

University of Alabama, Team S2-G1, Bedsole Spring 2019 University of Alabama, Team S2-G1, Bedsole Spring 2019人のメンバー

UA-BEDSOLE-S19S2G1

4 メンバー

6のガイドは作成済み

0 件のコメント

コメントを追加

統計データ:

過去 24時間: 0

過去 7 日: 18

過去 30 日: 22

今までの合計 413