メインコンテンツにスキップ

Dell Latitude E6520 LCD Screen Replacement

必要な工具と部品

  1. Dell Latitude E6520 LCD Screen Replacement, Battery: 手順 1、 2の画像 1 Dell Latitude E6520 LCD Screen Replacement, Battery: 手順 1、 2の画像 2
    • With the laptop closed and the bottom side facing up, slide the two battery latches towards the sides of the laptop.

    • When the latches are unlocked, a small logo resembling an open padlock will become visible.

  2. Dell Latitude E6520 LCD Screen Replacement: 手順 2、 2の画像 1 Dell Latitude E6520 LCD Screen Replacement: 手順 2、 2の画像 2
    • Grasp the battery from the top and pull upward.

  3. Dell Latitude E6520 LCD Screen Replacement, LCD Screen: 手順 3、 1の画像 1
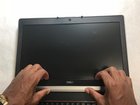
    • Gently pry the protective LCD cover from around the screen. You shouldn't have a problem just using your fingers.

  4. Dell Latitude E6520 LCD Screen Replacement: 手順 4、 2の画像 1 Dell Latitude E6520 LCD Screen Replacement: 手順 4、 2の画像 2
    • Remove the six 5.75 mm JIS #0 screws that hold the LCD screen to the cover.

  5. Dell Latitude E6520 LCD Screen Replacement: 手順 5、 2の画像 1 Dell Latitude E6520 LCD Screen Replacement: 手順 5、 2の画像 2
    • Once all the screws have been removed, lay the screen down on the keyboard and disconnect the LCD cable.

終わりに

To reassemble your device, follow these instructions in reverse order.

ある他の人がこのガイドを完成しました。

作成者

3人の作成者と共同で作成されました。

Alec Weiss

メンバー登録日: 11/05/18

800 ポイント

8のガイドは作成済み

チーム

IUPUI, Team S2-G2, Baechle Fall 2018 IUPUI, Team S2-G2, Baechle Fall 2018人のメンバー

IUPUI-BAECHLE-F18S2G2

3 メンバー

8のガイドは作成済み

0 件のコメント

コメントを追加

統計データ:

過去 24時間: 0

過去 7 日: 4

過去 30 日: 19

今までの合計 1,179