メインコンテンツにスキップ
Dell Inspiron 15 7579 RAM (Memory) Replacement

Dell Inspiron 15 7579 RAM (Memory) Replacement

Inaki Madrigal

Inaki Madrigal とその他 6 人の作成者

最終更新日: May 7, 2024

10分
中レベル

Upgraded RAM can help your computer run smoother. Be cautious when following guide backwards.

必要な工具と部品

ツール

もっと見る

  1. Dell Inspiron 15 7579 RAM (Memory) Replacement, Back Panel: 手順 1、 1の画像 1
    • Remove the ten 7.9 mm screws with the Phillips PH0 screwdriver.

  2. Dell Inspiron 15 7579 RAM (Memory) Replacement: 手順 2、 2の画像 1 Dell Inspiron 15 7579 RAM (Memory) Replacement: 手順 2、 2の画像 2
    • Insert metal spudger into a gap in between the back panel and the back of the screen.

    • Pry off the back panel using the metal spudger as a lever, and remove the back panel by lifting the rest off by hand.

  3. Dell Inspiron 15 7579 RAM (Memory) Replacement, RAM (Memory): 手順 3、 1の画像 1
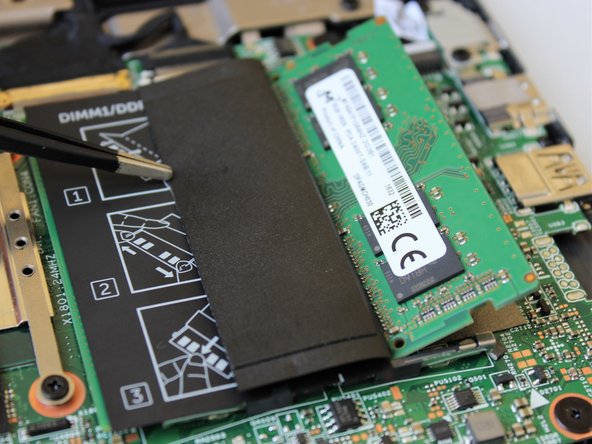
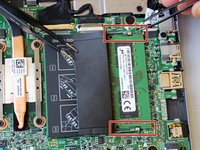
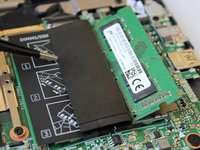
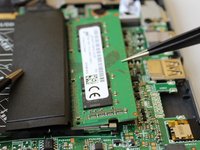
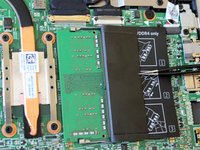
    • Fold protective flaps to the side on the RAM module located in the upper right corner of the laptop.

  4. Dell Inspiron 15 7579 RAM (Memory) Replacement: 手順 4、 3の画像 1 Dell Inspiron 15 7579 RAM (Memory) Replacement: 手順 4、 3の画像 2 Dell Inspiron 15 7579 RAM (Memory) Replacement: 手順 4、 3の画像 3
    この手順で使用する道具:
    Tweezers
    $4.99
    • Use the tweezers to push the crimping metal away from the chip. The chip will pop up into an angled position.

    • Remove the chip by pulling at the same angle as the chip with the tweezers.

  5. Dell Inspiron 15 7579 RAM (Memory) Replacement: 手順 5、 3の画像 1 Dell Inspiron 15 7579 RAM (Memory) Replacement: 手順 5、 3の画像 2 Dell Inspiron 15 7579 RAM (Memory) Replacement: 手順 5、 3の画像 3
    • Fold the plastic flap over on the other side.

    • As before, pull the fasteners away from the chip with the tweezers.

    • Remove the chip by carefully pulling it out with the tweezers.

  6. Dell Inspiron 15 7579 RAM (Memory) Replacement: 手順 6、 2の画像 1 Dell Inspiron 15 7579 RAM (Memory) Replacement: 手順 6、 2の画像 2
    • When reassembling, you must match the notch in the card with the notch in the connector header shown in red.

    • Doing otherwise will break the stick if forced.

終わりに

To reassemble your device, follow these instructions in reverse order.

作成者

6人の作成者と共同で作成されました。

Inaki Madrigal

メンバー登録日: 04/23/18

775 ポイント

6のガイドは作成済み

チーム

Cal Poly, Team S24-G9, Maness Spring 2018 Cal Poly, Team S24-G9, Maness Spring 2018人のメンバー

CPSU-MANESS-S18S24G9

4 メンバー

6のガイドは作成済み

0 件のコメント

コメントを追加

統計データ:

過去 24時間: 0

過去 7 日: 8

過去 30 日: 19

今までの合計 749