メインコンテンツにスキップ

Dell Inspiron 13 7378 Display Assembly Replacement

必要な工具と部品

  1. Dell Inspiron 13 7378 Display Assembly Replacement, Peeling off the Tape: 手順 1、 2の画像 1 Dell Inspiron 13 7378 Display Assembly Replacement, Peeling off the Tape: 手順 1、 2の画像 2
    • WARNING: Before working inside your computer, read the safety information that shipped with your computer and follow the steps in Before Working Inside Your Computer. After working inside your computer, follow the instructions in After Working Inside Your Computer.

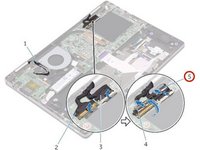
    • Peel off the pieces of tape that secure the display cable and touch-screen board-cable to the system board.

  2. Dell Inspiron 13 7378 Display Assembly Replacement, Open the Latches: 手順 2、 1の画像 1
    • Open the latches to disconnect the display cable and the touch-screen board-cable from the system board.

  3. Dell Inspiron 13 7378 Display Assembly Replacement, Open the Display: 手順 3、 1の画像 1
    • Turn the computer over and open the display as far as possible.

    • CAUTION: Place the computer on a soft and clean surface to avoid scratching the display.

  4. Dell Inspiron 13 7378 Display Assembly Replacement, Remove the Screws: 手順 4、 1の画像 1
    • Place the computer face down on a flat surface.

    • Remove the screws that secure the display assembly to the palm-rest assembly.

  5. Dell Inspiron 13 7378 Display Assembly Replacement, Lifting the Display Assembly: 手順 5、 1の画像 1
    • Lift the display assembly off the palm-rest assembly.

  6. Dell Inspiron 13 7378 Display Assembly Replacement, Placing the Display Assembly: 手順 6、 1の画像 1
    • Place the NEW display assembly face down on the palm-rest assembly.

  7. Dell Inspiron 13 7378 Display Assembly Replacement, Align the Screw Holes: 手順 7、 1の画像 1
    • Align the screw holes on the display hinges with the screw holes on the palm-rest assembly.

  8. Dell Inspiron 13 7378 Display Assembly Replacement, Replace the Screws: 手順 8、 1の画像 1
    • Replace the screws that secure the display assembly to the palm-rest assembly.

  9. Dell Inspiron 13 7378 Display Assembly Replacement, Close the Display: 手順 9、 1の画像 1
    • Close the display and turn the computer over.

  10. Dell Inspiron 13 7378 Display Assembly Replacement, Securing the Cables: 手順 10、 1の画像 1
    • Slide the display cable and the touch-screen board-cable into their respective connectors on the system board and close the latches to secure the cables.

  11. Dell Inspiron 13 7378 Display Assembly Replacement, Adhering the Tape: 手順 11、 1の画像 1
    • Adhere the pieces of tape that secure the display cable and the touch-screen board-cable to their respective connectors on the system board.

終わりに

To reassemble your device, follow these instructions in reverse order.

作成者

2人の作成者と共同で作成されました。

Terrence15

メンバー登録日: 12/18/17

79,121 ポイント

441のガイドは作成済み

チーム

RampUP America, Inc. RampUP America, Inc.人のメンバー

Community

42 メンバー

1,985のガイドは作成済み

コメント 1 件

Hi, I was wondering if there's any possibility of cross compatibility between i7378 and i7359 from dell? My computer is the i7359 but I haven't been able to find a reasonably priced replacement display. Thank you very much!

Ankita C - 返信

コメントを追加

統計データ:

過去 24時間: 1

過去 7 日: 5

過去 30 日: 12

今までの合計 1,706