メインコンテンツにスキップ

Dell Chromebook 13-7310 Network Card Replacement

必要な工具と部品

  1. Dell Chromebook 13-7310 Network Card Replacement, Back Cover: 手順 1、 2の画像 1 Dell Chromebook 13-7310 Network Card Replacement, Back Cover: 手順 1、 2の画像 2
    • Remove the eleven 3mm Phillips #1 screws.

  2. Dell Chromebook 13-7310 Network Card Replacement: 手順 2、 1の画像 1
    • Use a plastic opening tool to gently remove the back panel.

    • It can be easier to pry open near a corner.

  3. Dell Chromebook 13-7310 Network Card Replacement, Battery: 手順 3、 1の画像 1
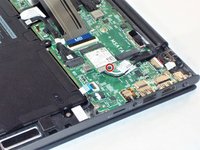
    • Use your fingers to remove the connecting cable to the battery unit. Firmly grab the cord closest to the motherboard connection and pull straight back.

  4. Dell Chromebook 13-7310 Network Card Replacement: 手順 4、 1の画像 1
    • Remove the four 2mm screws on the sides of the battery.

  5. Dell Chromebook 13-7310 Network Card Replacement: 手順 5、 1の画像 1
    • To remove the battery, lift up on one side to get your fingers underneath and lift away.

  6. Dell Chromebook 13-7310 Network Card Replacement, Network Card: 手順 6、 2の画像 1 Dell Chromebook 13-7310 Network Card Replacement, Network Card: 手順 6、 2の画像 2
    • Use #1 Phillips screwdriver to remove the 1mm screw in the network card.

  7. Dell Chromebook 13-7310 Network Card Replacement: 手順 7、 1の画像 1
    • Disconnect the network card from motherboard socket.

  8. Dell Chromebook 13-7310 Network Card Replacement: 手順 8、 1の画像 1
    • Disconnect 2 cable connectors from network card.

    • If the cables are stuck, continue to gently wiggle them until they disconnect.

終わりに

To reassemble your device, follow these instructions in reverse order.

作成者

3人の作成者と共同で作成されました。

Brett Raymond

メンバー登録日: 11/01/18

469 ポイント

3のガイドは作成済み

チーム

UMass Dartmouth, Team S5-G1, Gulbrandsen Fall 2018 UMass Dartmouth, Team S5-G1, Gulbrandsen Fall 2018人のメンバー

UMASSD-GULBRANDSEN-F18S5G1

3 メンバー

5のガイドは作成済み

0 件のコメント

コメントを追加

統計データ:

過去 24時間: 0

過去 7 日: 2

過去 30 日: 9

今までの合計 531