メインコンテンツにスキップ

Canon PowerShot A80 Internal Battery Replacement

必要な工具と部品

  1. Canon PowerShot A80 Internal Battery Replacement, Back Cover: 手順 1、 1の画像 1
    • Remove the three Phillips #00 screws from the bottom of the camera.

  2. Canon PowerShot A80 Internal Battery Replacement: 手順 2、 2の画像 1 Canon PowerShot A80 Internal Battery Replacement: 手順 2、 2の画像 2
    • Open the door to the CompactFlash memory card slot by sliding it towards you and swinging it open.

    • Remove the memory card if it is still in the camera.

    • Use the Phillips #00 screwdriver to remove the single screw underneath the memory card slot door.

  3. Canon PowerShot A80 Internal Battery Replacement: 手順 3、 1の画像 1
    • Remove the Phillips #00 screw located inside the top of the memory card compartment.

  4. Canon PowerShot A80 Internal Battery Replacement: 手順 4、 2の画像 1 Canon PowerShot A80 Internal Battery Replacement: 手順 4、 2の画像 2
    • Open the battery compartment door at the bottom of the camera by sliding the latch to the right and then sliding the door down.

    • Remove the batteries from the compartment.

    • Remove the three Phillips #00 screws located inside the battery compartment.

    • The screw on the left is longer than the other two.

  5. Canon PowerShot A80 Internal Battery Replacement: 手順 5、 1の画像 1
    • Remove the top lid of the camera.

    • Be cautious of the fragile mylar cable that connects the lid to the main body of the camera.

    • Removing the lid takes a little force. Do this gently. There may be a snapping sound.

    • The door to the memory card compartment will be freed and should be removable now.

    • In other versions of this camera, there is a tab that secures the top from the wrist strap. If yours has this, you won't be able to completely separate the top until you have removed the top screw in Step 8.

  6. Canon PowerShot A80 Internal Battery Replacement: 手順 6、 1の画像 1
    • Remove the two Phillips #00 screws from the side of the camera.

    • Open the small rubber door below this screw that covers the connectors.

  7. Canon PowerShot A80 Internal Battery Replacement: 手順 7、 2の画像 1 Canon PowerShot A80 Internal Battery Replacement: 手順 7、 2の画像 2
    • Open and pivot the LCD screen to its widest open position.

    • Remove the rear cover by pulling it straight away from the body of the camera.

    • When reassembling the camera, remember to replace the screws in the same location from which you removed them. Otherwise, you may damage the camera.

  8. Canon PowerShot A80 Internal Battery Replacement, Internal Battery: 手順 8、 2の画像 1 Canon PowerShot A80 Internal Battery Replacement, Internal Battery: 手順 8、 2の画像 2
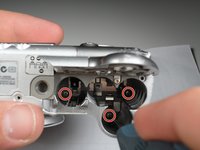
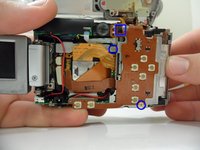
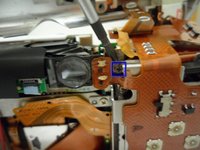
    • Unscrew the top 3.9mm, middle 2.7 mm, and bottom 2.9mm screws that hold the metal foundation covering the internal battery.

    • See next photo for zoomed image of the boxed screw.

  9. Canon PowerShot A80 Internal Battery Replacement: 手順 9、 1の画像 1
    • Remove the marked 2.9mm screw shown.

  10. Canon PowerShot A80 Internal Battery Replacement: 手順 10、 1の画像 1
    • Lift open the battery cover and unscrew the 3.8mm screw as shown.

  11. Canon PowerShot A80 Internal Battery Replacement: 手順 11、 2の画像 1 Canon PowerShot A80 Internal Battery Replacement: 手順 11、 2の画像 2
    • Gently lift up the plate as shown.

    • Loosen and gently pry the internal battery with the point blade probe.

終わりに

To reassemble your device, follow these instructions in reverse order.

4 の人々がこのガイドを完成させました。

作成者

8人の作成者と共同で作成されました。

konrad

メンバー登録日: 01/11/11

220 ポイント

3のガイドは作成済み

チーム

Cal Poly, Team 7-31, Regan Winter 2011 Cal Poly, Team 7-31, Regan Winter 2011人のメンバー

CPSU-REGAN-W11S7G31

6 メンバー

12のガイドは作成済み

2 件のコメント

Excellent guide. Congratulations.

Bryn Thomas

Wales

Bryn Thomas - 返信

What kind of battery is used internally?

Sarah Schmeltz - 返信

コメントを追加

統計データ:

過去 24時間: 2

過去 7 日: 4

過去 30 日: 38

今までの合計 8,247