メインコンテンツにスキップ

Apple Watch Series 2 Force Touch ガスケットの交換

必要な工具と部品

  1. Apple Watch Series 2 Force Touch ガスケットの交換, Apple Watchの電源を切る: 手順 1、 2の画像 1 Apple Watch Series 2 Force Touch ガスケットの交換, Apple Watchの電源を切る: 手順 1、 2の画像 2
    • 作業の前にApple Watchの電源を切り、充電器から取り外してください。

    • タッチスクリーンが破損し、電源を切れない場合は、ここに示されている方法で電源を切ってください。

    Verify your model. The back of the Cellular model just says GPS, so be sure to check the groves where the watch band goes to determine you model. I made the mistake of just reading the back of the device and since I’d been gifted the device didn’t know it was cellular. Cellular has a different type of touch force gasket, different screen, and different battery connections.

    Ryan Holt - 返信

    From what I just read on Apple, the only differences in watch series 3 is 38mm and 42mm.

    mcr4u2 -

    As a consumer all you need to know are 38mm and 42mm

    Michael Adoga - 返信

    The back will say GPS LTE if it’s the cellular version. If it doesn’t say LTE it is only the GPS version. The displays are different whether or not it is LTE(cellular).

    themepark - 返信

    This alternative method only reboots the watch.

    Gregg Stanley - 返信

  2. Apple Watch Series 2 Force Touch ガスケットの交換, 熱を当てます: 手順 2、 1の画像 1
    • iOpenerを使って、(もしくはヘアドライヤーかヒートガン)ディスプレイを温めます。触ると熱い程度まで温めてください。

    • iOpenerを少なくとも1分は載せて、スクリーンを十分に温めて、ケースに沿って留められた接着剤を柔らかくします。

    • iOpenerを再度温めるか、接着剤が冷却されないように、スクリーン周辺に動かしながら温め続けてください。

    I have heated up the iOpener to 165 degrees and left it on for more than a minute. No way I can lift the screen off with the exact knife. Tried different angles in various places, but no go. I also used a hair dryer un til the watch screen was too hot to touch and even tried a very hard cutting tool blade and also no go. Could n ever get the blade under the face I applied enough force where I could see that the blade left small marks, not very big, but could never get anything to move or lift. What am I doing wrong? I spent 47 years at a global computer company and I am used to taking apart small things and applying force when required. I don’t know what I am doing wrong. Please help me.

    Rafael Blanco - 返信

    Getting the initial gap is not easy. Maybe a playing card could work its way in the tiny gap and cut some adhesive. After that there might be some success with an exacto knife. Or you want to try a piece of aluminum foil (folded for more rigidity) for cutting the adhesive. Be aware of the force touch gasket and that it might get damaged during that procedure.

    Tobias Isakeit -

    I finally used a hot air gun set to 150 deg. C heating up the edges by slowly spinning the watch around before the technique worked. Difficult is the level noted and it’s correct. Finally worked and watch perfectly functioning.

    Chris Giavotto - 返信

    I used a heat gun, too. I was worried after reading comments that it would burn up the LCD, so I heated it a little bit at a time, rotating it like you did, and checking to see if I could get my knife under it. I must have hit one of the buttons because it did turn on, but that did reassure me that the display was okay.

    It's open. Now that the watch and I have had a few minutes to cool down, I'm ready for the next step. Not as difficult as I thought it could be. Tomorrow, I'll be replacing the battery in an iPod Touch 6th Gen.

    bester -

    I had to heat the iOpener 2 times and leave it on top of the watch for 10 minutes.

    Axel Trujillo - 返信

  3. Apple Watch Series 2 Force Touch ガスケットの交換, あらゆる危険性に備えます: 手順 3、 3の画像 1 Apple Watch Series 2 Force Touch ガスケットの交換, あらゆる危険性に備えます: 手順 3、 3の画像 2 Apple Watch Series 2 Force Touch ガスケットの交換, あらゆる危険性に備えます: 手順 3、 3の画像 3
    この手順で使用する道具:
    Safety Glasses
    $3.19
    購入する
    • スクリーンとWatch本体の間の隙間は非常に狭いため、鋭利なブレードを使ってこの二つを乖離させなければなりません。作業を始める前に、次の注意書きをよく読んでください。

    • 作業中、ナイフから完全に指を離して指先を保護してください。不安な方は、ナイフを持っていない側の手をレザーグローブやガーデニング用グローブを着用してください。

    • 強いプレッシャーを本体に与えないようにご注意ください。ナイフがスリップしてしまい、怪我をしたりWatchにダメージを与えてしまうことになります。

    • 保護メガネを着用してください。ナイフもしくはガラスが割れてしまうと、破片が飛び散ることがあります。

    • Watch用ハンドの有無によってコントロール加減が変わる場合は、作業がやりやすい様に着用する、もしくは外してください。

    Don’t cut your finger off!

    Mike - 返信

    The Watch 3 stainless Steel has an additional Frame. Where do i have To Open it?

    asteffen@me.com - 返信

    I wore thick gardening gloves just to be safe 😅 and it took a while but the screen did come off.

    Axel Trujillo - 返信

  4. Apple Watch Series 2 Force Touch ガスケットの交換, スクリーンをこじ開けます: 手順 4、 3の画像 1 Apple Watch Series 2 Force Touch ガスケットの交換, スクリーンをこじ開けます: 手順 4、 3の画像 2 Apple Watch Series 2 Force Touch ガスケットの交換, スクリーンをこじ開けます: 手順 4、 3の画像 3
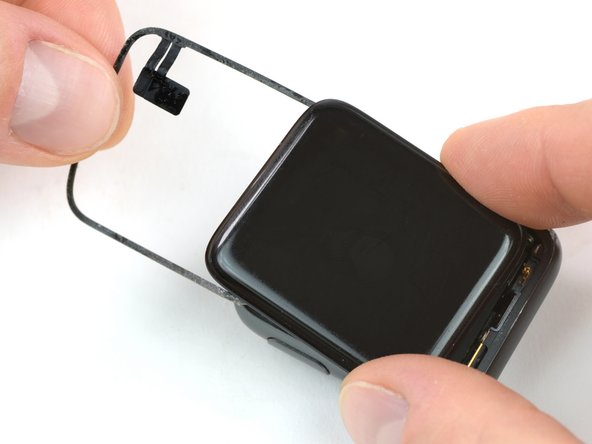
    • カーブしたブレードをディスプレイとアウターケースの間の隙間の中に当てます。デジタルクラウンに一番近いディスプレイの短いサイドから初めます。

    • 隙間に向けてまっすぐ、しっかりと押し込みます。

    • 差し込んだら、ブレードの角度を傾けてディスプレイをわずかに開く様にこじ開けます。

    • ナイフ先端を2 mm以上、挿入しないでください。

    It’s difficult to grip case in a way that keeps fingers safe from the blade but doesn’t hit the side buttons and turn the device on!

    If it’s a struggle to get the display to release, warm case for a few more minutes.

    Kyle Powderly - 返信

    I have tried so may times to get the display to release but nothing works. Should have bought a new watch LOL. Kept the iOpener on 2 times for 10 minutes and it still won't open. There must be a better way.

    Susan E. White - 返信

    Hi Susan,

    if you're struggling to get the adhesive loose enough a hair dryer, heat gun, or hot plate may also be used, but be careful not to overheat the device. The edge should feel slightly too hot to the touch.

    Dominik Schnabelrauch -

  5. Apple Watch Series 2 Force Touch ガスケットの交換: 手順 5、 2の画像 1 Apple Watch Series 2 Force Touch ガスケットの交換: 手順 5、 2の画像 2
    • カーブした刃によって、小さな隙間ができたら、ナイフから開口ツールに持ち替えて、細い先端を隙間に挿入します。

    • 親指をコテにして、ディスプレイを少し持ち上げて開き、隙間に開口ツールを押し込みます。

    • ディスプレイを完全に開いたり、外したりしないでください。

  6. Apple Watch Series 2 Force Touch ガスケットの交換: 手順 6、 3の画像 1 Apple Watch Series 2 Force Touch ガスケットの交換: 手順 6、 3の画像 2 Apple Watch Series 2 Force Touch ガスケットの交換: 手順 6、 3の画像 3
    • 開口ピックをディスプレイの下に挿入し、Force Touchガスケットをディスプレイから慎重に取り外します。

    • 交換用Force Touchガスケットを含む、iFixitスクリーンとバッテリー用修理キットを販売しています。あなたのWatchに修理が必要でも大丈夫です。

    • もしくは、Force Touchガスケットを保存して再利用する場合は、ディスプレイ端の下を慎重にこじ開けてください。ディスプレイを持ち上げた際に、Force Touchガスケットが切断したり、ガスケットのレイヤーから外れてしまった時は、Force Touchガスケット自体も交換しなければなりません。

    • 開口ピックをディスプレイ周辺にスライドして、Force Touchガスケットとディスプレイ間に付けられた接着剤をはがします。

    • 開口ピックを2 mm以上、差し込まないでください。

  7. Apple Watch Series 2 Force Touch ガスケットの交換: 手順 7、 3の画像 1 Apple Watch Series 2 Force Touch ガスケットの交換: 手順 7、 3の画像 2 Apple Watch Series 2 Force Touch ガスケットの交換: 手順 7、 3の画像 3
    • ディスプレイケーブルを引っ張らないようにするには、ディスプレイを完全に開かないことです。

    • ディスプレイを約45度の角度で開き、ピンセットを使ってディスプレイとForce Touchガスケットの間の接着剤を慎重に剥がします。

    • ディスプレイケーブル周辺と裏に貼られた接着剤を綺麗に剥がします。

  8. Apple Watch Series 2 Force Touch ガスケットの交換, バッテリーの接続を外す: 手順 8、 2の画像 1 Apple Watch Series 2 Force Touch ガスケットの交換, バッテリーの接続を外す: 手順 8、 2の画像 2
    • Y000ドライバーを使って、メタル製バッテリーコネクタのカバーを固定している、トライポイントネジを外します。

    • カバーを取り出します。

  9. Apple Watch Series 2 Force Touch ガスケットの交換: 手順 9、 2の画像 1 Apple Watch Series 2 Force Touch ガスケットの交換: 手順 9、 2の画像 2
    • 開口ツールの先端を使って、バッテリーのコネクタをまっすぐ持ち上げて、接続を外します。

    • アクシンデントでコネクタが接触しないように、コネクタを反対側に若干、折り曲げます。

  10. Apple Watch Series 2 Force Touch ガスケットの交換, Force Touchガスケット: 手順 10、 2の画像 1 Apple Watch Series 2 Force Touch ガスケットの交換, Force Touchガスケット: 手順 10、 2の画像 2
    • 開口ツールの先端を使って、Force Touchガスケットを外側の端よりまっすぐこじ開けて接続を外します。

    • 実際に接続を外したコネクタは、マザーボードに繋がっています。コネクタの下のソケットは、Force Touchガスケット上にあります。

  11. Apple Watch Series 2 Force Touch ガスケットの交換: 手順 11、 3の画像 1 Apple Watch Series 2 Force Touch ガスケットの交換: 手順 11、 3の画像 2 Apple Watch Series 2 Force Touch ガスケットの交換: 手順 11、 3の画像 3
    • Force Touchガスケットのコネクタプレートを持ち上げます。

    • ピンセットもしくは開口ツールをガスケットの下にスライドさせて、この下に留められた接着剤を剥がします。

    • アクシデントでケーブルを切断しないよう、ディスプレイケーブルが搭載されている端を除いてWatchの周囲全体の接着剤を剥がします。

  12. Apple Watch Series 2 Force Touch ガスケットの交換: 手順 12、 3の画像 1 Apple Watch Series 2 Force Touch ガスケットの交換: 手順 12、 3の画像 2 Apple Watch Series 2 Force Touch ガスケットの交換: 手順 12、 3の画像 3
    • Force Touchガスケットを慎重にディスプレイ周辺で引っ張ります。

    • ディスプレイを交換するために、すでに本体から外している場合、今のところ新しいディスプレイを外したままにしておく方が作業は簡単です。 Force Touchガスケットを交換した後、ディスプレイを接続します。(手順を5つスキップしてください)

    • ディスプレイをおおよそ閉じて、残りの端からForce Touchガスケットを慎重に剥がします。

    • Force Touch ガスケットを取り出します。

  13. Apple Watch Series 2 Force Touch ガスケットの交換, ケースのクリーニング: 手順 13、 2の画像 1 Apple Watch Series 2 Force Touch ガスケットの交換, ケースのクリーニング: 手順 13、 2の画像 2
    この手順で使用する道具:
    Adhesive Cleanup Kit (Set of 12)
    $4.99
    購入する
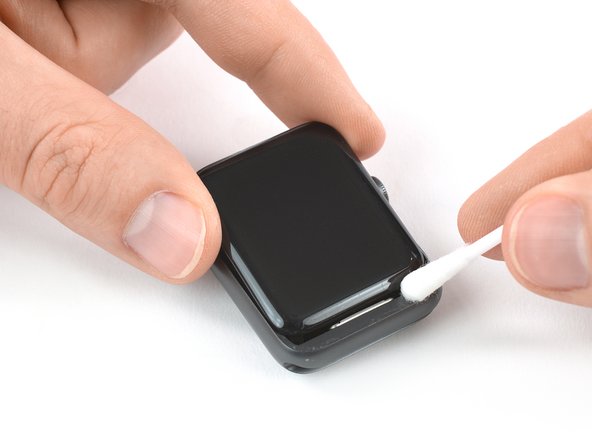
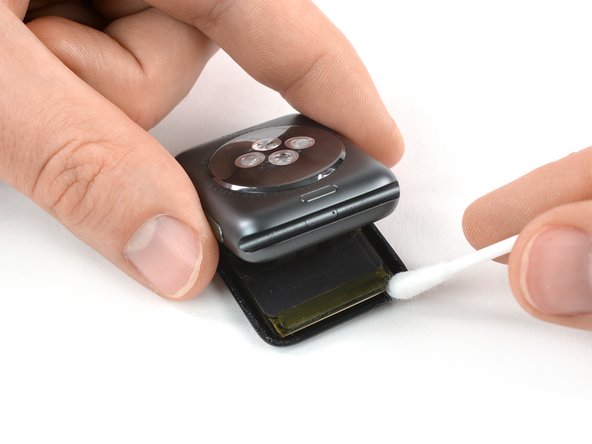
    • 90%以上の濃度のイソプロピルアルコールを少量、綿棒に含ませるか、クリーニングパッドを使って、Force Touchガスケットがあった場所を綺麗に拭き取り、残りの接着剤を除去してください。

    • ディスプレイケーブル下のサイドに付いた接着剤を除去するには、デイスプレイをほぼ閉じた状態で端から慎重に引っ張り、クリーニングを行ってください。

  14. Apple Watch Series 2 Force Touch ガスケットの交換, ディスプレイのクリーニング: 手順 14、 2の画像 1 Apple Watch Series 2 Force Touch ガスケットの交換, ディスプレイのクリーニング: 手順 14、 2の画像 2
    • Watchを裏返して、ケースをわずかに持ち上げながら、ディスプレイを水平にします。

    • 慎重にディスプレイの裏側から残りの接着剤を剥がします。

  15. Apple Watch Series 2 Force Touch ガスケットの交換, 新しいガスケットをインストールします。: 手順 15、 1の画像 1
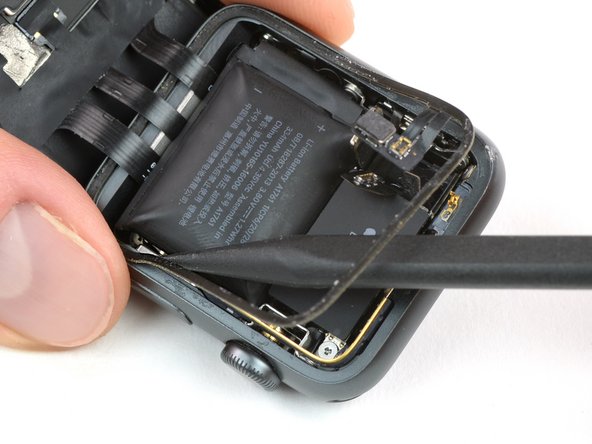
    • ピンセットを使って、新しいForce Touch ガスケットの底側から保護用シールを慎重に剥がして、接着面を下にします。

    • ガスケットが自分から見て向こう側のコネクタピンと向きが合っていることを確認してください。さもなければ、ライナーを反対側から外してしまいます。

    There’s a clear plastic stiffener that must be removed at the same time as or just before removing the protective liner. Be careful to remove only the plastic and not the protective liners, it is possible!

    Kyle Powderly - 返信

  16. Apple Watch Series 2 Force Touch ガスケットの交換: 手順 16、 3の画像 1 Apple Watch Series 2 Force Touch ガスケットの交換: 手順 16、 3の画像 2 Apple Watch Series 2 Force Touch ガスケットの交換: 手順 16、 3の画像 3
    • Force Touchガスケットをディスプレイ上に対して対角に持ちます。

    • ディスプレイをわずか手前に傾けます。Force Touchガスケットとフレームの位置が揃います。

    • Force Touchガスケットのコネクタと反対側のコーナーから作業を初めて、ガスケットをフレームに装着し、押し込みます。

  17. Apple Watch Series 2 Force Touch ガスケットの交換: 手順 17、 2の画像 1 Apple Watch Series 2 Force Touch ガスケットの交換: 手順 17、 2の画像 2
    • Force Touchガスケットのコネクタプレートを、こじ開けツールで奥に折りたたみます。

    • フレックスケーブルを慎重に押さえて、再接続します。

  18. Apple Watch Series 2 Force Touch ガスケットの交換: 手順 18、 2の画像 1 Apple Watch Series 2 Force Touch ガスケットの交換: 手順 18、 2の画像 2
    • バッテリーを再接続する前に、ディスプレイの接続が繋がっていることを確認してください。

    • スパッジャーの先端を使ってバッテリーコネクタを曲げ、オリジナルの状態に戻します。

    • バッテリーのフレックスケーブルを慎重に押さえて、再接続します。

  19. Apple Watch Series 2 Force Touch ガスケットの交換: 手順 19、 2の画像 1 Apple Watch Series 2 Force Touch ガスケットの交換: 手順 19、 2の画像 2
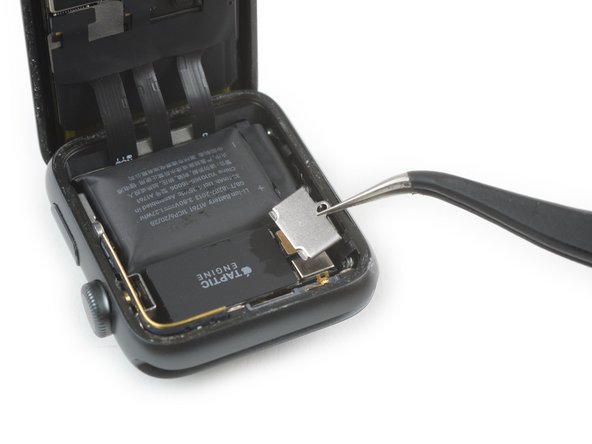
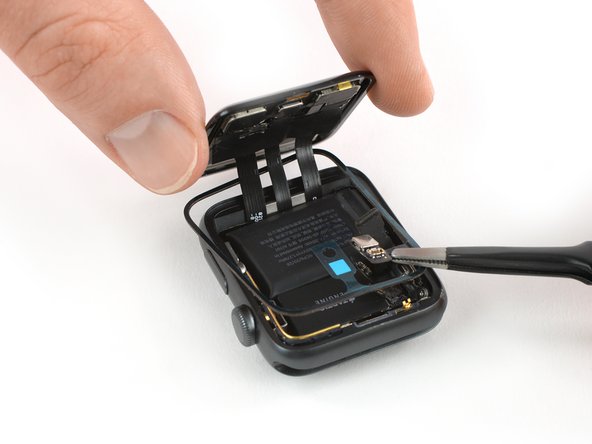
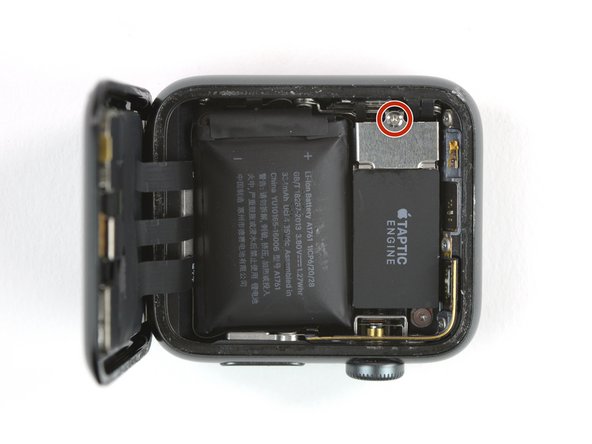
    • ピンセットを使って、バッテリーコネクタを覆っているメタルプレートを元の位置に戻します。

    • 再装着にはトライポイント #000ネジを使用します。

    • この時点で、Watchの電源を入れて、修理が上手く進んでいるか確認しましょう。点検が済んだら、デバイスを密封します。

    My watch didn’t turn until I connected it to a charger…

    Björn Tirsén - 返信

  20. Apple Watch Series 2 Force Touch ガスケットの交換: 手順 20、 1の画像 1
    • ピンセットを使って、Force TOuchガスケットの先端にある保護フィルムを慎重に剥がします。

  21. Apple Watch Series 2 Force Touch ガスケットの交換: 手順 21、 1の画像 1
    • ディスプレイの位置を揃えて、接着剤をしっかりと押さえます。

    • 接着剤をより効果的に装着させるには、iOpenerでディスプレイを温めることをおすすめします。それから数時間、重量のあるもの(本など)をディスプレイの上に載せておきます。

終わりに

e-wasteを処理する場合は、認可済みリサイクルセンターR2を通じて廃棄してください。

修理が上手く進みませんか?こちらのベーシックなトラブルシューティングを参照するか、アンサーフォーラムで尋ねてみましょう。

48 の人々がこのガイドを完成させました。

以下の翻訳者の皆さんにお礼を申し上げます:

en jp

100%

Midori Doiさんは世界中で修理する私たちを助けてくれています! あなたも貢献してみませんか?
翻訳を始める ›

作成者

2人の作成者と共同で作成されました。

Tobias Isakeit

メンバー登録日: 03/31/14

117,598 ポイント

188のガイドは作成済み

チーム

Master Techs Master Techs人のメンバー

Community

322 メンバー

2,532のガイドは作成済み

7 件のコメント

Hola, Me presento como nuevo y NOVATO. Me llamo Jaime, y Yo creo que os mereceis un 10. La caña de España.

Jaime Villa - 返信

Hola Jaime! Bienvenido! Muchas gracias por tu comentario. Nos alegra que te guste nuestro sitio. Cualquier duda que tengas, no dudes en consultarme. Soy la moderadora y líder de la comunidad hispanohablante.

Mariana Roca -

The gasket comes with all the necessary adhesive or you need to put he the sealing adhesive separately? I need to replace my screen and I got the gasket and screen but don’t know if I need glue to waterproof it?

Jose F - 返信

I bought iFixit’s battery replacement kit and the gasket which I received had adhesive on both sides, just like in this guide.

The repair kit does comes with extra gasket adhesive, which confused me at first. The extra adhesive is included in case you manage to open the watch without damaging the original gasket.

dalexgray -

I have no idea why they include the extra adhesives. When I tried to use one the screen sat too high and it looked bad.

Donald Fournier -

Thank you for an awesome guide. It got a little dodgy for a second there, but I replaced the screen, Force Touch Gasket and Battery. It works as new!

Donald Fournier - 返信

Congrats, welcome to the club of fixers :)

Tobias Isakeit -

コメントを追加

統計データ:

過去 24時間: 3

過去 7 日: 29

過去 30 日: 164

今までの合計 25,735