メインコンテンツにスキップ

iPhoneディスプレイ用接着剤の交換

英語
日本語

手順 22を翻訳中

手順22
iPhone Display Adhesive Replacement: 手順 0、 3の画像 1 iPhone Display Adhesive Replacement: 手順 0、 3の画像 2 iPhone Display Adhesive Replacement: 手順 0、 3の画像 3
  • In order for the adhesive to bond correctly, you'll need to apply even pressure around the perimeter of your iPhone. The camera bump complicates matters, but you can compensate by laying your iPhone face-down and placing coins around the perimeter.

  • Alternatively, you can use screen vise clamps around the perimeter of your device to set the new adhesive.

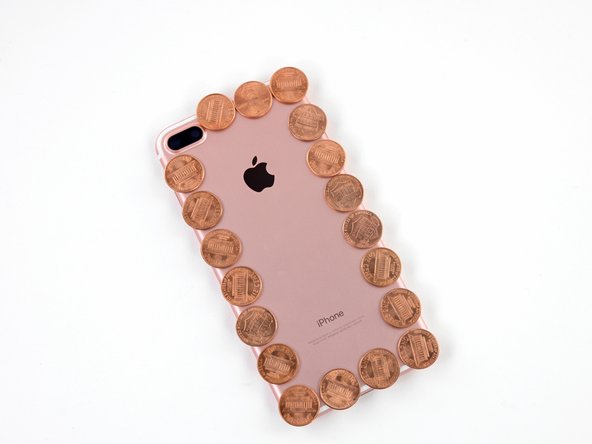
  • You can use coins of any denomination, so long as they are as thick or slightly thicker than the camera bump.

  • If your iPhone has a high-gloss finish, such as Jet Black, add a strip of tape around the perimeter to protect the finish before placing any coins.

  • Place a coin at each corner of your iPhone, and place two coins on either side of the camera bump.

  • Place additional coins around the entire perimeter of your iPhone.

  • Using a hair dryer or heat gun, evenly heat the side edges all the way around the iPhone until they are slightly too hot to touch. The heat will help the adhesive form a more complete bond. Don't overheat the iPhone, or you may cause the battery to ignite or damage other heat-sensitive components, like the display.

接着剤を正しく取り付けるためには、iPhoneの周辺に沿って均等な力を与えて押し込みます。カメラの突起が少し作業を複雑にしますが、iPhoneのフロントを下向きに置いて、本体周辺に硬貨を置くと突起とほぼ同じ高さになり作業がしやすくなります。

別の方法として、デバイスの周囲にスクリーン用のバイスクランプを使用して新しい接着剤を装着することもできます。

どの硬貨を使っても構いませんが、カメラの突起よりもわずかに高い(厚い)ものを使用してください。

iPhoneがJet Blackのようなハイグロスのフィニッシュのデザインであれば、硬貨を載せる前にフィニッシュ加工を保護するため、iPhone本体周辺にテープを貼ってください。

iPhoneの四隅に硬貨を置きます。そしてカメラの突起の両側にコインを置きます。

さらにiPhone周辺全体に硬貨を敷き詰めます。

ヘアドライヤーやヒートガンをiPhoneの周辺端に当てて均等に温めます。触ると熱い程度まで温まったら止めてください。熱は複雑な圧着剤の粘着を緩めてくれます。iPhoneを温めすぎないようにご注意ください。バッテリーに引火したり、ディスプレイなどの熱に弱いコンポーネントにダメージを与えてしまいます。

クリエイティブコモンズのオープンソース著作権のもと、あなたの投稿は著作権の対象となります