はじめに
必須条件のみ
必要な工具と部品
-
-
ディスプレイガラスにひびが入っている場合は、ガラス表面にテープを貼り,修復中に怪我をしないように注意してください。
-
iPadのディスプレイの表面全体が覆われように、透明テープを重ね張りします。
-
残りも手順通りに作業をしますが,ガラスが割れてしまうと,ひび割れが広がってしまいます。その場合,金属製のヘラなどを使用する必要があるかもしれません。
-
-
-
温めたiOpenerをiPadのホームボタンアセンブリの左横サイドに当たるように載せます。
-
iOpenerを約5分間置き、ガラスの下に付けられた接着剤を柔らかくします。
Can you explain how using the iOpener ? That's can be great !
The iOpener used is essentially a bag of gel, which you put in the microwave for 30 seconds. You lay this against the screen edges to transfer heat and loosen up the glue.
You could also use a hot-air blower with a re-work station but that's up to you. Mine worked well up to 150°C
That might work! Rice is less likely to get, and stay, hot enough. But it can't hurt to try! Just be sure you're being patient and letting it really warm up before you pry. People have had luck double bagging a washcloth dipped in very hot water, too.
-
-
-
温めた側の中央部分より少し上辺りに、吸盤カップを取り付けます。
-
吸盤がしっかりとスクリーンに装着されるように、スクリーン上に完全に平らに付いているかを確認してください。
-
iPadを片手で押さえながら、吸盤カップを上部に向けて引っ張りあげます。
I'm having trouble getting the suction cup to stay connected to the screen to pull it. It just isn't creating a seal no matter how flat I make it. I thought maybe the crack was causing it, so I tried tape. I originally didn't put tape on it because it wasn't losing glass. The tape made it worse of creating a seal. Any advice?
After following instructions to cover cracked glass with packing tape, the suction cup won’t adhere at all. Not even a little bit. Any suggestions?
Brian Tate - 返信
I had that exact problem when I fixed an Iphone 8. What I did was that I put some ducktape where the suction cup would be placed. That worked for me. That’s of course is if you where doing to replace the glass anyway.
I had a screen on an iPad 4 that was so shattered that I literally had to spend 2.5 hours picking every single piece of glass out with tweezers after pulling the few larger pieces off with tape on them. Sometimes you need a lot of patience to be successful. The final cleaning out of the sticky tape along the sides is also very important once the glass is removed. Or the new screen will stick out an/or not go in neatly.
-
-
-
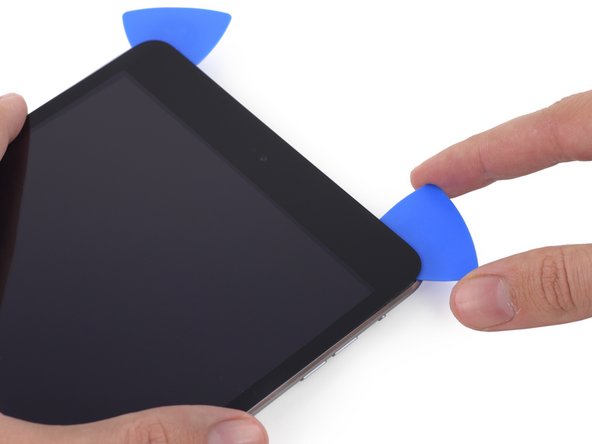
吸盤でガラスを引き上げながら、ピックの先端をガラスとiPad本体の隙間に差し込みます。
-
吸盤カップのプラスチック部分の持ち手(ノブ)を引っ張り、吸盤力を緩めてディスプレイアセンブリから外します。
I'm not sure what the correct balance of thickness to strength you'd need, maybe try a couple different types. The idea is to be thin and fit into the smallest gap, but if it gets bogged down in adhesive, it needs to be strong enough to push through. Be sure to use heat and be patient!
i have to use a blow dryer and pack that came with the replacement is there anything i could do to make the adhesive more hot?
-
-
-
iOpenerを再び温めて、同じ箇所に載せます。
-
iPadの左側を再度温めるため、数分間iOpenerを置きます。
Well if you want to save some time and your screen is shattered just pry up one corner either left or right side at the top and tear the whole screen off going down towards the home button but do not completely remove the screen there is a wire connecting the digitizer to the board inside but tearing off the screen will skip you down to step 29 :-) i seen this in a video and saved me about an hour after the fact because my screen was cracking as i was inserting the blue picks so i ripped the whole screen off and used some adhesive remover to get off all the extra goo leftover
-
-
-
2番目のピックを1番目を差し込んだ付近に挿入し、iPadの端に沿って接着剤を剥がしながら下側に動かします。
I found that all the following step were much easier for me using a heat gun while keeping the pull on the screen with the suction cup. Basically heat up a section, put the suction cup on, keep pulling the screen upwards on that side, while using the heat gun to continuously heat along the side. It came nicely off, one or two inches at a time. Once I had a whole side up, I just put some of the picks in to keep it up and continued along the side, heating, pulling, heating pulling. This obviously only works if the screen is not totally shattered. Mine only had two cracks.
-
-
-
-
1つ目のピックを再度深く挿し直し、フロントカメラから角に向かってスライドさせます。
If you have the LTE there is a cable on the right upper side! There’s no mention of this in this guide even though it’s for the LTE. I found out after the fact when I saw I cut the cable with the pick.
Will Lyon, you may want to look again. This is the guide for the WiFi version.
mcr4u2 -
-
-
-
新しいピックを挿し込み、iPad上部右側コーナーの中央までスライドさせて粘着を剥がします。
-
-
-
ピックを挟んだまま、iOpenerで再び温めます。
-
温めたiOpenerをホームボタン端の上に置いてそのまま数分待ち、接着剤を柔らかくします。
For those who are replacing a severely shattered front panel, be aware that there are two smart cover magnets attached to the interior side of the front panel that you will need later. Keep an eye out for them (see steps 49 and 50 below for pictures of what these tiny magnets look like) so that you don't have to go digging through the debris later.
-
-
-
最後のピックの先端を前の手順で差し込んだピックの付近に差し込み、ホームボタンの下をスライドさせます。
-
ピックを少し深く差し込み、ホームボタンの方向にスライドさせます。
Be very careful in the vicinity and to the right of the home button. Only insert the very tip of the pick (similar to the instructions earlier for by the camera). Do not try to go beneath the home but as suggested here, just along the glass edge. I damaged the small metal clip under the button and detached the IC tape from the button, meaning I had to replace the glass touch screen with digitiser and home button.
-
-
-
全ての接着がはがれたら、前面ガラスを本のページをめくるように開き作業台に置きます。
-
フロントパネルアセンブリを再利用して再組み立てする際は、ディスプレイ用の接着剤を交換してください。ディスプレイ用の接着剤塗布ガイドを参照して、デバイスに接着剤を再装着してから、本体を密封します。
This picture and several others that follow are not for the "LTE" model.
Tim Osborn - 返信
Some of the steps, including the comments, are replicated between guides. Be aware! This can render them somewhat generic, and possibly non-optimal. For instance, this step is replicated between at least the mini 2 LTE, mini 2 Wi-Fi, mini 3 LTE, & mini 3 Wi-Fi.
ciradrak -
Maybe that’s because this is for the WiFi model.
mcr4u2 -
Remember to remove the old black adhesive from the digitizer and iPad frame. Some can be pulled out and some needs a sharp blade to remove. This will give you room to apply your new adhesive strips when reassembling.
-
-
-
LCDを固定している#00プラスネジを取り外します。
-
3つの3.3 mmネジ
-
1つの4.5 mmネジ
This is VERY IMPORTANT please be sure to put the screws EXACTLY how they were when you removed them otherwise your screen will not rotate when you put the new digitizer on. i closed my ipad thinking everything was ok but now the screen does not automatically rotate, but lucky i jailbroke my ipad first and have an activator gesture to rotate for me :-)
stripped the screws at the home button side of the ipad and the precision screw extractor set is too big to work. help?! paramedic064@gmail.com
We have some great posts on Answers about getting stripped screws out, you can refer to What are your tips/tricks for removing or extracting stripped screws? for advice, or ask a new one and see if someone can come up with new ideas. We also have a stripped screw removal guide for you to check out. Good luck!
This is a tip:
I have a terrible time cleaning the lcd because no matter how hard I try not to touch it, I always get smudges! So take my advice…remove the front film from the new digitizer and place it over the lcd. It is bigger so you can cut it down or just lift it to get to the screws. Now no fingerprints and also less chance for scratches. The front side is easy to clean once it’s installed so need to have that covered while working-the insides are what needs protecting.
-
-
-
スパッジャーの平坦側をLCDとLCDシールドプレートの間に差し込み徐々に持ち上げます。
-
フロスや釣り用の糸などをディスプレイの下に通します。上部から始めて、作業のしやすい方向に動かします。
-
薄くてフレキシブルなカードなどを使って、上部から接着剤を切開することもできます。
Be very careful not to get the spudger under the shield plate, but between the LCD and the shield. Also, not that on the LTE models, the antennas are at this end and there is a bit of adhesive holding this end of the LCD down.
Tim Osborn - 返信
I have seen countless comments about the LCD breaking when trying to remove it from the LCD shield with adhesive. I have found a simple solution. Once the 4 screws have been removed take a piece of fishing line (longer than the iPad) and simply run it beneath the top of the LCD from one side to the other. Once it's in place, gently pull it down applying equal pressure from both sides. The fishing line will break the adhesive in the process, freeing the LCD. It has worked for me every time.
Thanks for the fishing line suggestion. It certainly worked for me (used 6lb test line). With using the fishing line, one is a lot less likely to break the LCD compared to using a spudger.
rgstout -
awesome tip thanks
Pa Du -
The tutorial procedure should be edited once and for all to instruct to detach the adhesive strip from the top of the LCD prior to attempting to lift it. Failure to do so will invariably result in a broken LCD!!!
The simplest way to do that is to first gently remove the foam strip running around the top of the LCD with a pair of tweezers. Only then will the shiny metallic adhesive tape be visible and accessible.
The LCD is extremely fragile, DO NOT allow it to bend or you will break it. The adhesive near the speakers that connect to the LCD are a danger spot and if you pull wrong you could break the LCD. Be careful.
Yeah, I broke my LCD because the guide did not specify the glue on the top portion if you have an LTE model. I didn’t even try hard at all. I tried to lift it with the plastic spudger and saw that it did not move. Came to check the comments and when I looked back the top corner was already broken.
Thanks iFixit! Awesome guide
Another LCD broken victim. Getting it loose from the adhesive was easy. However, it would not fold over like a book. Something had it bound at the bottom. Heard the dreaded crack. First iFixit fail for me.
-
-
-
スパッジャーをLCDとLCDシールドプレートの間に差し込みiPadの端から端までスライドさせます。
Hi. I noticed that the tutorial is for an LTE iPad mini 2. However, these pictures do not show and LTE device. I'm having issues removing the LCD from the iPad due to the antenna. Any suggestions? (How to remove antenna?)
This step needs extra detail on how the LCD adhesive should be loosened. I've now got stress marks on the LCD which show up when solid backgrounds are displayed on screen as the LCD flexed when trying to pry it out.
I have seen countless comments about the LCD breaking when trying to remove it from the LCD shield with adhesive. I have found a simple solution. Once the 4 screws have been removed take a piece of fishing line (longer than the iPad) and simply run it beneath the top of the LCD from one side to the other. Once it's in place, gently pull it down applying equal pressure from both sides. The fishing line will break the adhesive in the process, freeing the LCD. It has worked for me every time.
thanks you very much!
ind w -
Great tip about the fishing wire because you will most certainly crack the LCD just yanking it out. Thank you and hit em with the hein
The LCD is extremely fragile, DO NOT allow it to bend or you will break it. The adhesive near the speakers that connect to the LCD are a danger spot and if you pull wrong you could break the LCD. Be careful.
"mild adhesive" is really an understatement.
The LCD is firmly attached to the metal plate below it.
Especially if you try to repair an older ipad, the adhesive gets hard.
Do not attempt to lift the LCD with spudgers in an attempt to get it out.
You will break it.
Use fishing line or some other strong wire to cut loose this adhesive.
Even a strong sewing wire will do (it will take 5~6 wires because sharp edges of the housing will cut the wire easily). -
-
-
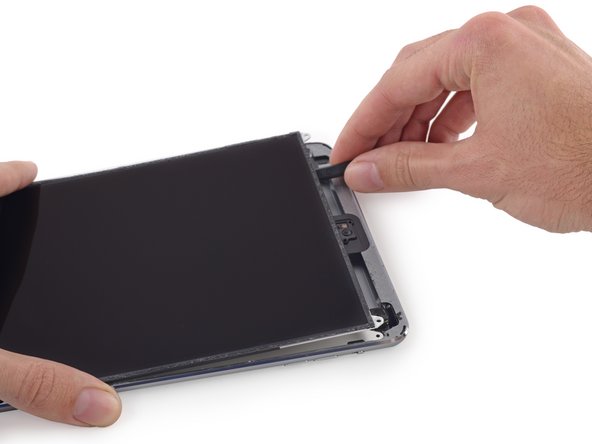
LCDを片手でつかみ、もう片方でiPadのリアボディーを押さえます。
-
デジタイザーケーブルを引かないように注意しながら、テープをはがすためLCDをスピーカーから徐々に引きます。
this was a pain to remove but the two pieces of tape should be separated using your spudger so that you can remove the lcd.
absolutely. lift the screen 45 degrees before pulling it too
The screen was a tight fit in the recess. Whilst maneouvering it out, it flexed a little. Once reassembled, there are now feint stress marks visible when the screen displays a uniform background. With photos it's not noticeable, but on solid backgrounds, it is very noticeable. :-(
Be careful when pulling the LCD out. Any hints for pulling it out safely should be added to this step.
This step is bad advise. Once you get the LCD unglued top and sides, drop those plastic tools behind it to keep it up and apply heat to the front bottom of the LCD where the tape is applied on either side, use your spudger to push the tape away before you attempt to pull or flip the LCD over. It is very easy to break if you don't get the tape loose enough, so do yourself a favor and free the LCD from the tape before you attempt to maneuver it.
I have seen countless comments about the LCD breaking when trying to remove it from the LCD shield with adhesive. I have found a simple solution. Once the 4 screws have been removed take a piece of fishing line (longer than the iPad) and simply run it beneath the top of the LCD from one side to the other. Once it's in place, gently pull it down applying equal pressure from both sides. The fishing line will break the adhesive in the process, freeing the LCD. It has worked for me every time.
As others have said this step is rather problematic and following the tuturial instructions will most definitely lead to damaging the LCD. One problem is that the two adhesive tapes are not indicated in the photo: they are large and black and they are partly covered by long strips of thicker material that looks like padding. To remove them it helps to heat a little with the opener and then one can slowly peel them away by alternating the sharp and flat tips of the spudger.
This must be the most difficult part. I took the advice of using fishing line and it worked a treat. However, due to lack of knowledge - I managed to slice straight through the LCD ribbons (all of them). I figure it was glue so kept going! Please take not that fishing line is only good for the sides, not the top where the LCD is attached! New LCD on order for round 2.
Well. I cracked the LCD during this process, so another $100. But, it’s the journey that counts, right? There is adhesive keeping the LCD attached to the aluminum shield. As I was prying the LCD up (I didn't know about the adhesive), I did hear feint cracking. Also it is too tight to try to flip the LCD over as shown. I did heat the bottom strips, but still tried to do it as shown, more cracking. It seems best to heat it and push the adhesive strips back and separate them prior to lifting. As well as the sides of the LCD for lifting!!
I separated the small tape in the middle (5mm), and the large upper tape (20mm), but left the lower tape at the connector in place. That way, the LCD was much easier to pull away gently and to tilt over.
I used a needle nosed tweezers to remove the tape on the bottom left and right. I then used the plastic spudger and went between the LCD and the metal piece. I gently went down the left side about half way and then the right and slowly and gently worked both sides until they separated.
This step is unclear and should be revised, but Abbot’s comment has the right idea. The tape holding the LCD in place should be highlighted in the image. This tape wraps around the lower edge of the panel and extends onto the front face, then a piece of cushion is attached on top. Heat that tape to soften the adhesive then peal it up. The connector for the LCD is on the back side of the panel in the lower right hand corner, it is not near the tape you are pealing away from the panel. Once the tape is separated very little force is required to shift the panel toward the top of the device as depicted. If you attempt to ‘pull the LCD away from the speakers’ with two hands as shown, it will almost certainly be broken. Also, all the youtube explanations (at least the ones I could find) of how to remove the LCD make it look like you lift up on the top which would only cause the LCD to break. So youtube failed this step as well. It’s not easy, be careful.
P.S. as these steps are replicated between more than one device –– I’m working on an iPad mini 3 LTE, the tape may be in different places on other devices?
ciradrak -
The LCD is extremely fragile, DO NOT allow it to bend or you will break it. The adhesive near the speakers that connect to the LCD are a danger spot and if you pull wrong you could break the LCD. Be careful.
It is MANDATORY to loosen the 3 tapes as well (step 36), don’t even try to lift it without loosening them first!!!! After you did it you can turn the screen without any resistance! Should be added in this guide!!!!
Like other commenters I found this step inadequately treated. The LCD didn't want to fold over like it ought to and It took me a while to decide how to proceed. I would suggest that one first identify the plastic hinge strips. Zoom in on the pics: there's a lot going on at that edge, it's all black, and you don't want to mess with any of the cable strips, etc. I used a hair dryer to loosen the hinges (I suspect one could heat up a small piece of metal bar and place it on the hinges to loosen) and gradually stretched it. I also think that using gloves instead of holding the LCD with bare fingers would help avoid smudging (I spent a bunch of time getting rid of finger marks.)
-
-
-
ディスプレイを分離するためスパッジャーの先端をLCDと接着タブの間に差し込んでスライドさせます。
-
2つの接着タブの間を軽く押します。付近のケーブルを損傷しないように注意してください。
This was harder than it looks. The adhesive tape covers a lot of area and has stuck to it tiny wires that go to the speaker. I had to use the tweezers to very carefully separate the wire from the adhesive, and to then pull the adhesive off the circuit board area in one spot before it would finally come away.
-
-
-
7つの1.8 mm #00プラスネジ をLCDシールドプレートから取り外します。
My LCD shield plate had many more screws than this. You have to remove them all.
My plate had 8 on the upper line, 6 + 2 at bottom. 16 total.
There are strong magnets on the sides and they keep catching the screws as you take them out. Tweezers are helpful to fish them.
At the assembly stage I found it is easier to use Philips PH000 screw driver bit than PH00. It helped me to get these minuscule screws in place, catch the head holes and drive them into their tight position. While using PH00 the driver would not catch the holes in their head and I was risking scratching the display since the screws refused to settle in the openings.
-


デバイスを再組み立てする際は、これらのインストラクションを逆の順番に従って作業を進めてください。
デバイスを再組み立てする際は、これらのインストラクションを逆の順番に従って作業を進めてください。
2 の人々がこのガイドを完成させました。
以下の翻訳者の皆さんにお礼を申し上げます:
100%

これらの翻訳者の方々は世界を修理する私たちのサポートをしてくれています。 あなたも貢献してみませんか?
翻訳を始める ›


Need some extra instruction on how to handle a truly shattered glass. There was only one spot that the suction cup would even hold on the whole screen - top right, and even with tape there is very little structure to drive a pick under. how do you handle that?
Greg Crawford - 返信