この翻訳は、ソースガイドの最新の更新を反映していない可能性があります。 翻訳の更新に協力してください。 または ソースガイドを参照してください。
はじめに
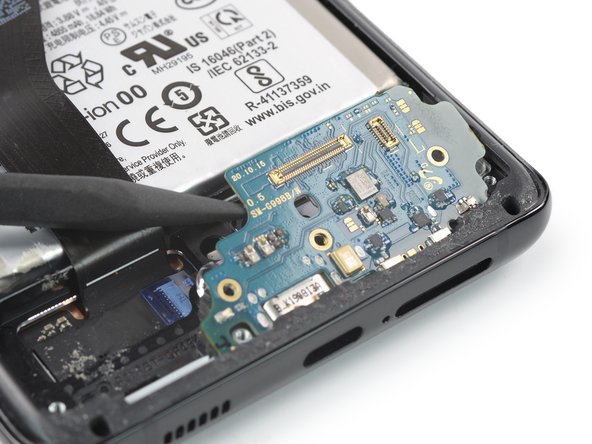
このガイドを参照して、Samsung Galaxy S21 Ultraの USB-C 充電ポートとドーターボードを交換します。
作業を始める前に、安全情報についてSamsungセルフリペアドキュメントを参照してください。
ご注意: 修理後の防水性能の維持は、接着剤の再塗布の仕方にもよりますが、IP(防水防塵性能)等級を失うことになります。
必要な工具と部品
-
-
バックカバーの下端、できるだけ端に近い位置に吸盤ハンドルを固定します。
-
バックカバーを吸着ハンドルで持ち上げ、バックカバーとフレームの間にわずかな隙間を作ります。
-
作った隙間にオープニングピックを差し込みます。
-
オープニングピックを左下にスライドさせ、粘着剤をスライスします。
-
接着剤の再装着を防ぐため、開口部のピックはそのままにしておきます。
-
-
-
開口ピックをデバイスの下側端に差し込みます。
-
開口ピックをデバイスの下部端に沿って前後にスライドしながら、接着剤を切開します。
-
接着剤の再装着を防ぐため、隙間に開口ピックを差し込んだままにします。
-
-
-
デバイス右下隅に3つ目の開口ピックを挿入します。
-
開口ピックをデバイス右端に沿ってスライドして、接着を切り取ります。
-
接着剤の再装着を防ぐため、右上に開口部のピックを残しておきます。
-
-
-
-
-
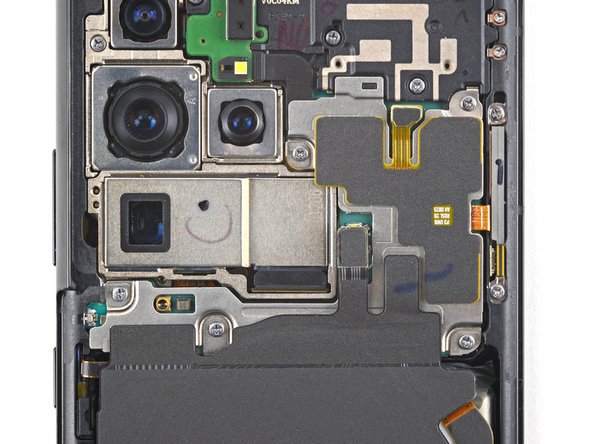
NFCアンテナと充電コイルアセンブリの左下端の下にオープニングピックを挿入します。
-
オープニングピックをアセンブリの左下端に沿って慎重にスライドさせ、バッテリーから切り離します。
-
-
-
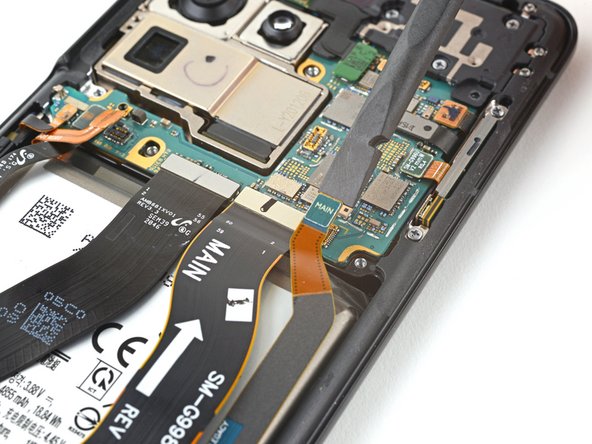
スパッジャーを使って、セカンダリ相互接続ケーブルをドーターボードから上向きにこじ開けて、まっすぐソケットから接続を外します。
-
指もしくはピンセットで慎重にセカンダリ相互接続ケーブルを取り出します。
-
-
-
ドーターボードからメイン相互接続ケーブルを外すにはスパッジャーで下のコネクタをソケットからまっすぐ上に引き抜きます。
-
指やピンセットを使って、メイン相互接続ケーブルを慎重に取り外してください。
-


デバイスを再組み立てする際は、逆の順番に従って作業を進めてください。で例えば、"取り外す "の代わりに "再装着する"というように、逆の動作を行います。加熱やこじ開ける作業はスキップし、📌の箇条書きに注意しながら作業してください。
修理が完了したら、Galaxy Store または Play Store から Samsung Members App をダウンロードし、 Samsung セルフリペアドキュメント (10ページの始め) を参照して、デバイスが完全に機能することを確認します。
e-wasteを処理する場合は、認可済みリサイクルセンターR2を通じて廃棄してください。
作業がうまく進みませんか?このモデルのアンサーコミュニティを参照してください。
6 の人々がこのガイドを完成させました。
以下の翻訳者の皆さんにお礼を申し上げます:
60%

Midori Doiさんは世界中で修理する私たちを助けてくれています! あなたも貢献してみませんか?
翻訳を始める ›


9 件のコメント
Hi,
One month ago I dropped my phone in pool and I took it to the service center where they have dried out the phone. Everything was working fine but later only I was able to find out that the primary microphone is not working and also sim doesn't get detect. So couple of times I did resetting the phone pressing the volume down and power button and that fixed the SIM related issue. After couple of weeks again there was an error saying SIM can't be detected and I tried the same solution , after several attempts it detected again. Then again after two days the issue pops up once again. So I was able to find out that primary microphone and SIM card slot is in the same daughter board and thought of replacing it by myself. I got the new board and replaced it yesterday and still my microphone is not working. What would be the solution ? Is there anything I need to check/replace further like flex cables and all ? Please advise. Appreciate your help.
Thanks
Hi Rahul!
If your speaker still isn't working after you replaced your daughterboard, then I would suggest replacing the loudspeaker itself. Unfortunately, we don't sell the loudspeaker currently, so you would have to find it from a different source. I wish you the best of luck in your repair!
Hi
Everytime i put my phone on charge sometimes it works fine but if i take it out and put it back in again it keeps coming up with the moisture detected but theres no water inside there i dried it out and left it alone but before i didnt realise my lead was a little wet would that cause i massive problem charging
The tools kit for this job is inadequate you're better off saving your money and getting the correct one's. The gel heat pad doesn't produce enough heat to loosen the adhesive. The suction cup is worthless as it just pulls right off pretty easily. And the included picks are just not thin enough to slide in. I tried setting the gel heat pad on just the bottom edge to try and put as much heat as possible and then tried to get the pick into there but all that happened was the back glass started to shatter. So now I've got to buy a new back glass piece. You'll need to use a heat gun or hair dryer, find a strong suction cup and some kind of thin enough blade/tool to get in there. I'd make future purchases from IFIXIT if they'd just say hey get and use these tools instead of selling a kit that doesn't work just wasting their customers money.
Blaze Long - 返信
Thanks for the guide. The only suggestion I have is to make sure to separate the camera glass from the back cover while the glue is still warm. I tried to separate them when putting things back together and needed to add the new glue tape and broke the back cover. ifixit shows they are out of stock but luckily "A" online retailer had them in-stock, awesome price, and next day delivery.