このバージョンは誤った内容を含んでいる可能性があります。最新の承認済みスナップショットに切り替えてください。
必要な工具と部品
-
-
スマートフォンの電源を切ります。
-
Note8の裏面に留められた接着剤を柔らかくするために、iOpenerを用意します。
-
電源ボタンの側面に沿って、Note8の裏面にiOpenerを置きます。
-
-
-
この手順は未翻訳です。 翻訳を手伝う。
-
Prepare an iOpener and apply it to the display for at least two minutes to loosen the adhesive beneath the battery. Reheat and reapply the iOpener as needed.
-
Alternatively or when the battery is blown up, you can apply some isopropyl alcohol under each corner of the battery and allow it to penetrate for several minutes to help weaken the adhesive.
-
-
この手順は未翻訳です。 翻訳を手伝う。
-
Prepare an iOpener and apply it to the bottom part of the phone to loosen the adhesive beneath the microphone flex cable.
-
Use a pair of tweezers to carefully lift the microphone out of its recess and loosen it from the mid frame.
-
-
この手順は未翻訳です。 翻訳を手伝う。
-
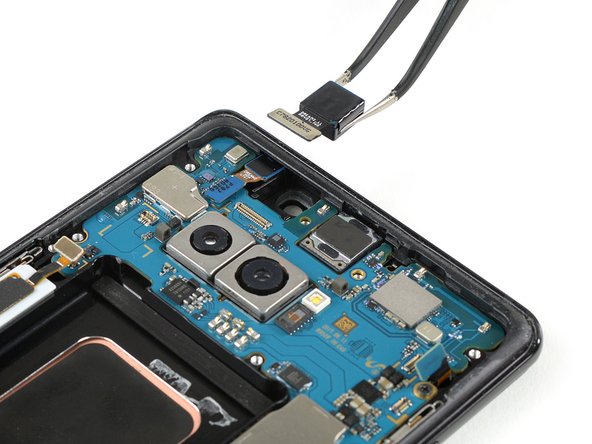
Prepare an iOpener and apply it across the phone to loosen the adhesive beneath the vibration motor at the bottom and the earpiece speaker at the top.
-


42 の人々がこのガイドを完成させました。


10 件のコメント
i would like to suggest a time of (52) Minutes and (36) Seconds plus thanks for the guide
check, plus you’re welcome :)
great guide!
Very excellent guide. Great pictures. Pictures must have been done in some sorta studio setting or edited for only what is needed for the illustration of every step. This was my first attempt at self repair on a cellphone, but I’m no slouch. I repair and refurbish all sorts of electromechanical devices and was once employed to do brain surgery on massive water cooled mainframe computers. Some of the same rules apply; have proven procedures, follow instructions, control your work space, and invest in the best tools. Since this was my first, I was not in a hurry. It took me all of 6 hours, but I was meticulous, repeated many steps to increase my confidence, and had all the time needed to do what I needed to do. Grateful for no longer being a slave to phone repair/insurance scams!! DIY forever!
Rex Burrus - 返信
Thanks for the great guide. Unfortunately, ifixit does not stock Note 8 parts in Australia. When I went to purchase the display assembly with frame from a parts supplier, they refused to sell me the part as they said that a number of customers have experienced the LCD not working on the new assembly after repairing their phone. The wholesaler would not honour the warranty as all screens are tested before dispatch, therefore, the LCD must have been damaged in the repair process. I could understand if the repair included installing a new screen into an existing frame but because all parts are being transferred into the new assembly and the parts available for sale all come with adhesive, is there any step where it is likely that the LCD could be damaged even if extremely careful?
Ian Bishop - 返信