メインコンテンツにスキップ

Nokia G22 Battery Replacement

必要な工具と部品

  1. Nokia G22 Battery Replacement, Eject the SIM card tray: 手順 1、 3の画像 1 Nokia G22 Battery Replacement, Eject the SIM card tray: 手順 1、 3の画像 2 Nokia G22 Battery Replacement, Eject the SIM card tray: 手順 1、 3の画像 3
    • Insert a SIM eject tool, bit, or a straightened paper clip into the small hole on the SIM card tray on the upper left edge of the phone.

    • Press firmly to eject the tray.

  2. Nokia G22 Battery Replacement, Remove the SIM card tray: 手順 2、 3の画像 1 Nokia G22 Battery Replacement, Remove the SIM card tray: 手順 2、 3の画像 2 Nokia G22 Battery Replacement, Remove the SIM card tray: 手順 2、 3の画像 3
    • Remove the SIM card tray.

    • When installing either a SIM card or a microSD card, make sure they're in the correct orientation and sitting completely flush with the edges of the tray before reinserting the tray into the phone.

  3. Nokia G22 Battery Replacement, Insert an opening pick: 手順 3、 3の画像 1 Nokia G22 Battery Replacement, Insert an opening pick: 手順 3、 3の画像 2 Nokia G22 Battery Replacement, Insert an opening pick: 手順 3、 3の画像 3
    • The back cover of the phone is held in place by plastic clips.

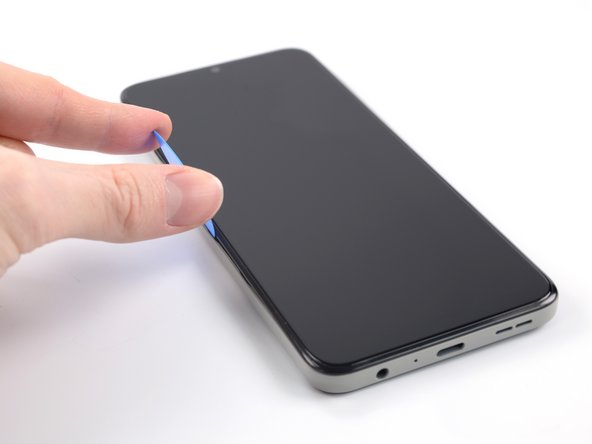
    • Insert an opening pick under the small notch in the SIM card tray slot.

  4. Nokia G22 Battery Replacement, Release the plastic clips: 手順 4、 3の画像 1 Nokia G22 Battery Replacement, Release the plastic clips: 手順 4、 3の画像 2 Nokia G22 Battery Replacement, Release the plastic clips: 手順 4、 3の画像 3
    • Position the opening pick at a steep downward angle between the back cover and the screen assembly.

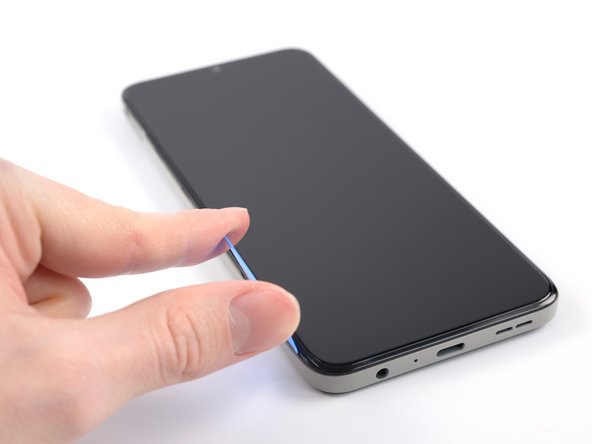
    • Slide the opening pick down the left edge of the phone to release the plastic clips.

  5. Nokia G22 Battery Replacement: 手順 5、 3の画像 1 Nokia G22 Battery Replacement: 手順 5、 3の画像 2 Nokia G22 Battery Replacement: 手順 5、 3の画像 3
    • Turn the opening pick around the corner and continue to slide it along the bottom edge to release the plastic clips.

  6. Nokia G22 Battery Replacement: 手順 6、 3の画像 1 Nokia G22 Battery Replacement: 手順 6、 3の画像 2 Nokia G22 Battery Replacement: 手順 6、 3の画像 3
    • Slide the opening pick up the right edge to continue releasing the plastic clips.

  7. Nokia G22 Battery Replacement: 手順 7、 3の画像 1 Nokia G22 Battery Replacement: 手順 7、 3の画像 2 Nokia G22 Battery Replacement: 手順 7、 3の画像 3
    • Slide the opening pick along the top edge to release the remaining plastic clips.

    • Don't try to fully remove the back cover just yet, as it's still connected to the phone.

  8. Nokia G22 Battery Replacement, Flip open the back cover: 手順 8、 3の画像 1 Nokia G22 Battery Replacement, Flip open the back cover: 手順 8、 3の画像 2 Nokia G22 Battery Replacement, Flip open the back cover: 手順 8、 3の画像 3
    • With the phone laying screen-side down, carefully lift the right edge of the back cover, opening it like a book.

    • Take care not to strain or tear the attached fingerprint reader cable during this procedure.

    • Lay the back cover next to the phone.

  9. Nokia G22 Battery Replacement, Unfasten the fingerprint reader bracket: 手順 9、 1の画像 1
    • Use a Phillips screwdriver to remove the 3.8 mm‑long screw securing the fingerprint reader bracket.

  10. Nokia G22 Battery Replacement, Remove the fingerprint reader bracket: 手順 10、 2の画像 1 Nokia G22 Battery Replacement, Remove the fingerprint reader bracket: 手順 10、 2の画像 2
    この手順で使用する道具:
    Tweezers
    $4.99
    購入する
    • Use a pair of tweezers or your fingers to remove the fingerprint reader bracket.

    • Take care not to puncture the battery with your tool—a punctured or bent battery may leak dangerous chemicals or cause a fire.

    • During reassembly, make sure to align the fingerprint reader bracket correctly and push the small metal edge back into its recess under the motherboard cover.

  11. Nokia G22 Battery Replacement, Disconnect the fingerprint reader: 手順 11、 3の画像 1 Nokia G22 Battery Replacement, Disconnect the fingerprint reader: 手順 11、 3の画像 2 Nokia G22 Battery Replacement, Disconnect the fingerprint reader: 手順 11、 3の画像 3
    • Use the flat end of a spudger to disconnect the fingerprint reader by prying the connector straight up from its socket.

    • To re-attach press connectors like this one, carefully align and press down on one side until it clicks into place, then repeat on the other side. Do not press down on the middle. If the connector is misaligned, the pins can bend and cause permanent damage.

    • Remove the back cover.

  12. Nokia G22 Battery Replacement, Unfasten the motherboard cover: 手順 12、 1の画像 1
  13. Nokia G22 Battery Replacement, Pry up the motherboard cover: 手順 13、 3の画像 1 Nokia G22 Battery Replacement, Pry up the motherboard cover: 手順 13、 3の画像 2 Nokia G22 Battery Replacement, Pry up the motherboard cover: 手順 13、 3の画像 3
    • The motherboard cover is further held in place by plastic clips.

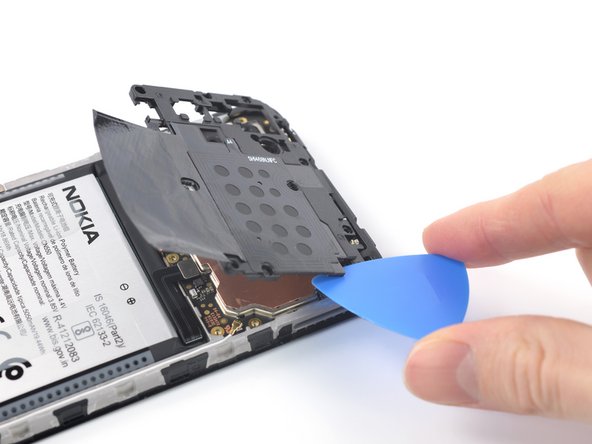
    • Insert an opening pick under the right edge of the motherboard cover to release its plastic clips.

    • Flip the motherboard cover over the top edge of the phone.

  14. Nokia G22 Battery Replacement, Remove the motherboard cover: 手順 14、 3の画像 1 Nokia G22 Battery Replacement, Remove the motherboard cover: 手順 14、 3の画像 2 Nokia G22 Battery Replacement, Remove the motherboard cover: 手順 14、 3の画像 3
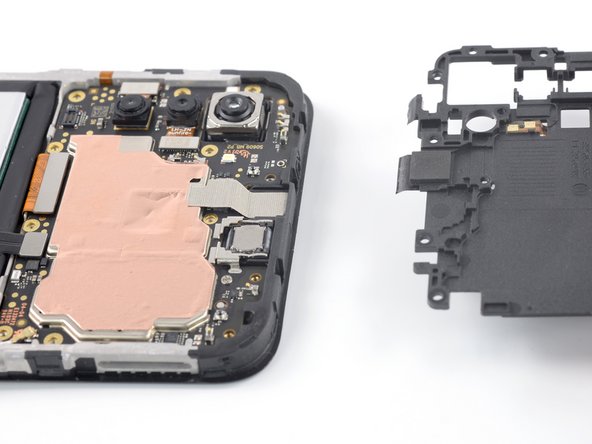
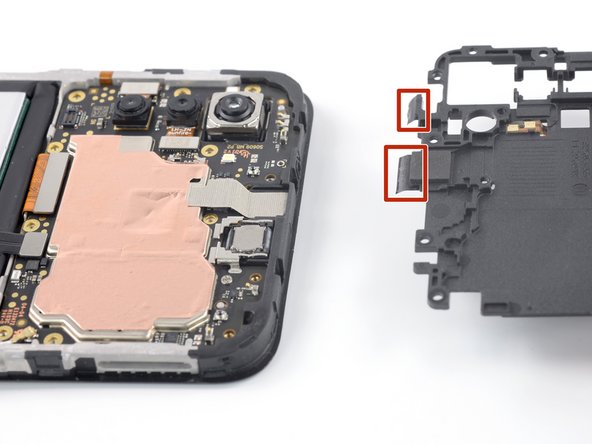
    • The motherboard cover has two short adhesive tapes wrapped around the top edge and onto the frame.

    • Pull the motherboard cover away from the frame to separate the adhesive tape and remove it.

    • During reassembly, fold the adhesive strips onto the frame after snapping the motherboard cover back in place.

  15. Nokia G22 Battery Replacement, Disconnect the battery cable: 手順 15、 2の画像 1 Nokia G22 Battery Replacement, Disconnect the battery cable: 手順 15、 2の画像 2
    • Use the flat end of a spudger to disconnect the battery cable by prying the connector straight up from its socket.

  16. Nokia G22 Battery Replacement, Loosen the battery tabs: 手順 16、 2の画像 1 Nokia G22 Battery Replacement, Loosen the battery tabs: 手順 16、 2の画像 2
    • Be extra careful to not puncture, bend, or deform the battery during the next few steps—a damaged battery may leak dangerous chemicals or cause a fire.

    • Use your fingers to peel the two outer adhesive tabs off of the battery.

  17. Nokia G22 Battery Replacement, Lift out the battery: 手順 17、 3の画像 1 Nokia G22 Battery Replacement, Lift out the battery: 手順 17、 3の画像 2 Nokia G22 Battery Replacement, Lift out the battery: 手順 17、 3の画像 3
    • The battery in the Nokia G22 is secured with mild adhesive. Pull tabs are provided to separate the adhesive and remove the battery.

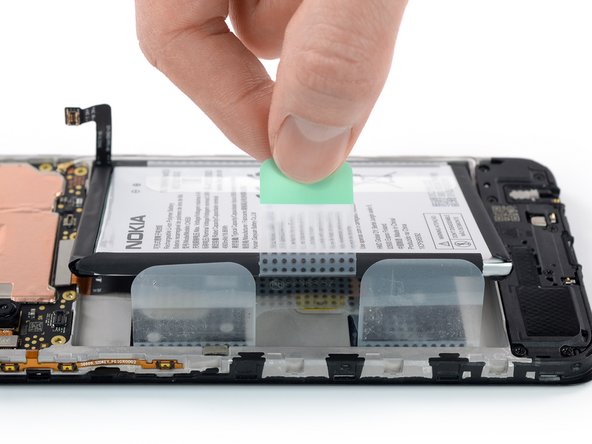
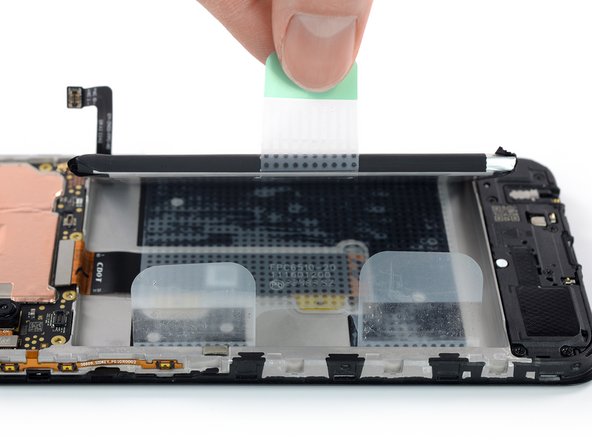
    • Use your fingers to peel the center green pull tab off of the battery.

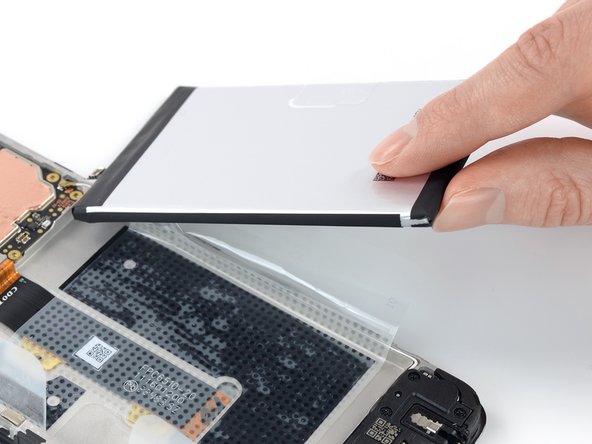
    • Using one hand to hold the phone down, use your other hand to slowly and steadily lift the center green pull tab up to separate the adhesive securing the battery underneath.

    • If the green pull tab should rip, you can use the outer tabs to pull out the battery including the adhesive film underneath. Be aware that therefore this will take more time and probably some heat to soften the adhesive.

    • If you have any difficulties with stubborn battery adhesive, you can contact Nokia phones support.

  18. Nokia G22 Battery Replacement, Remove the battery: 手順 18、 3の画像 1 Nokia G22 Battery Replacement, Remove the battery: 手順 18、 3の画像 2 Nokia G22 Battery Replacement, Remove the battery: 手順 18、 3の画像 3
    • Peel the battery off of the adhesive film and remove it.

    • Don't reinstall a damaged or deformed battery, as doing so is a potential safety hazard. Replace it with a new battery.

  19. Nokia G22 Battery Replacement, Remove the battery adhesive film: 手順 19、 2の画像 1 Nokia G22 Battery Replacement, Remove the battery adhesive film: 手順 19、 2の画像 2
    • Grab the bottom right edge of the leftover adhesive film and pull it towards the top of the phone with steady force to remove it.

    • If your battery adhesive (the adhesive directly on the frame) is still sticky, you can reuse it. Otherwise, follow these steps to replace it:

    • Apply isopropyl alcohol (>90%) to the old adhesive and use the flat end of a spudger to scrape it off.

    • Remove the clear liner on the pre-cut battery adhesive and apply the sticky section to the battery well. Remove the opaque liner before continuing reassembly.

    • To install a replacement battery:

    • Remove the battery adhesive film from its liners and apply it to the battery.

    • Align the bottom edge of the battery (the edge without adhesive) with the bottom edge of the recess.

    • Lower the battery down and press firmly to secure it in place.

終わりに

To reassemble your device, follow these instructions in reverse order.

For optimal performance, calibrate your newly installed battery after completing this guide.

Take your e-waste to an R2 or e-Stewards certified recycler.

Repair didn’t go as planned? Try some basic troubleshooting, or ask our Answers community for help.

3 の人々がこのガイドを完成させました。

作成者

6人の作成者と共同で作成されました。

Manuel Haeussermann

メンバー登録日: 07/13/22

15,592 ポイント

71のガイドは作成済み

チーム

iFixit iFixit人のメンバー

Staff

136 メンバー

17,410のガイドは作成済み

4 件のコメント

Good step-by-step details for changing the battery. I used it right now as a great intro to see what to expect from the [soon] offered C-22. Looks good to me to go for one. :) Thanks for this report.

Hans M.

Hans M. - 返信

10.03.2023 Acquistabile oggi in Italia. Chi compra una batteria quando il telefono è nuovo? Nessuno. Tra due, massimo tre anni, la batteria originale sarà da sostituire; voglio proprio vedere se nel 2025 o addirittura 2026 non sarà OUT OF STOCK. Tutti i produttori offrono le batterie solo il primo anno. Voglio proprio vedere se Nokia e IFIXIT manterranno la loro promessa oggi - reputazione domani. In fede. Cordiali saluti

Laura Piras - 返信

As a tip, there is the option to do this without removing the mainboard cover. You can lift up the black flap at the bottom of the mainboard cover to see the the plate that protects the battery flex cable connector. Just unscrew the screw, insert the flat end of the spudger under the plate and quickly twist clockwise about 45 degrees to pop off the plate. MAKE SURE YOU KEEP YOUR FINGER ON TOP OF THE PLATE SO THAT IT DOESN'T FLY OFF.

Petri - 返信

Despite Nokia says it was designed with maintainability in mind, it seems overcomplicated for a regular person. Why not just make the whole battery replaceable without tools, like the venerable 3310?

Pa R - 返信

コメントを追加

統計データ:

過去 24時間: 8

過去 7 日: 60

過去 30 日: 367

今までの合計 12,108