はじめに
このガイドでMotorola Moto G5 Plusのディスプレイアセンブリを取り出して、交換する方法です。
このガイドは完全体のディスプレイアセンブリを交換するためのものです。すなわち、ホームボタンを含みます。交換用パーツは 、このように見えるはずです。ディスプレイのみを購入した場合は、このガイドでは取り扱っていない、追加の解体手順に従わなければなりません。
デバイスを再組み立てする前に、バッテリーの残量を25%以下まで放電してください。充電されたリチウムイオンバッテリー は引火の原因となったり、アクシデントで穴を開けてしまうと爆発の恐れがあります。
必要な工具と部品
-
-
-
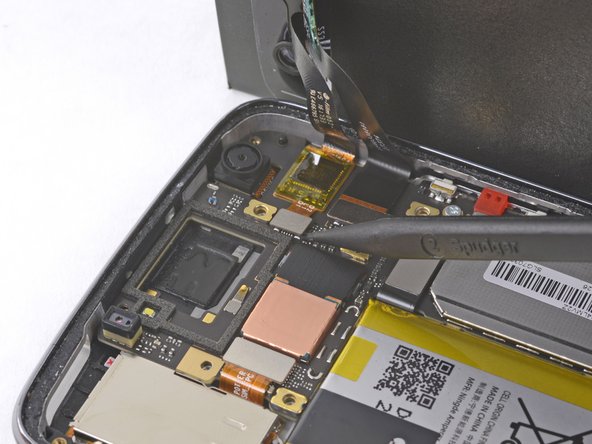
デバイスからディスプレイアセンブリを外します。
-
交換用のディスプレイにタッチ機能が付いていない場合、また付いているかどうかわからない場合は、データーをバックアップ保存して、ファクトリーリセットをしてください。
-


デバイスを再組み立てする際は、これらの手順を逆の順番に従って作業を進めてください。
交換用のパーツとオリジナルのパーツを見比べてください。残りのコンポーネントを移植する必要があるか、パーツを装着する前に接着剤の裏張りを取る必要があります。
e-wasteを処理する場合は、認可済みリサイクルセンターR2を通じて廃棄してください。
修理が上手く進みませんか?トラブルシュートのヘルプには、アンサーコミュニティを参照してください。
デバイスを再組み立てする際は、これらの手順を逆の順番に従って作業を進めてください。
交換用のパーツとオリジナルのパーツを見比べてください。残りのコンポーネントを移植する必要があるか、パーツを装着する前に接着剤の裏張りを取る必要があります。
e-wasteを処理する場合は、認可済みリサイクルセンターR2を通じて廃棄してください。
修理が上手く進みませんか?トラブルシュートのヘルプには、アンサーコミュニティを参照してください。
37 の人々がこのガイドを完成させました。
以下の翻訳者の皆さんにお礼を申し上げます:
100%

Midori Doiさんは世界中で修理する私たちを助けてくれています! あなたも貢献してみませんか?
翻訳を始める ›

20 件のコメント
Thank you for the explainations. I followed the whole tutorial and I manage to fix the phone with no surprise.
Thank you. Instructions are great.
After replacing the screen, touch is offset by 125 pixels on Y axis (meaning that first registration from the top edge is at 125 px). Is there a way to get the phone to recalibrate?
Thanks
Thanks. These tips, plus the Moto G5 LCD guide solved my problem. The replacement I purchased was only for the LCD (needed to heat and remove the glass after disassembling the whole phone). Again, thanks.
does the silver plastic on back of digitizer need to be removed in order for the screen to light up on the display??
I assume there are two pieces to the screen - the glass front/digitizer/touchscreen and the LCD display itself. Is this correct? On mine I believe only the glass/digitizer is cracked since the phone works fine and has only a minor crack. This tutorial doesn’t show how to separate them. Is my understanding correct? I also need to buy the correct part and it is a bit confusing.
Ken Woolfe - 返信