はじめに
本ガイドを使って、Microsoft Surface Pro 5の劣化したり使えなくなったバッテリーを交換しましょう。
安全に作業を進めるため、Surfaceを分解する前にバッテリーの充電量が25%未満になるように放電しましょう。これにより、修理中に誤ってバッテリーを破損した際に危険な発熱事故が起きる危険性が少なくなります。
バッテリーが膨張している場合は、こちらの手順に従って適切に処分してください。
バッテリーの交換を完了するには、バッテリーを取り付けるための交換用接着剤が必要です。Tesa 61395のような強力な両面テープを使うことをお勧めします。
再組み立ての際にCPUに新しい放熱グリスを塗布すると、Surfaceのパフォーマンスが向上する場合があります。その場合は、新しい放熱グリスと高濃度イソプロピルアルコールまたは専用の放熱グリスクリーナーを用意してください。
本ガイドの作業は、補強がなく壊れやすいディスプレイパネルを破損する危険性が高いです。ディスプレイパネルをこじ開ける際は、しっかりと温めるとともに極めて慎重に作業を行って下さい。
必要な工具と部品
-
手順1 スクリーンを温めます
注意: 手順 1-22 は、作業進行中としてマークされている ガイド から引用されています。
-
スクリーンのガラスが破損している場合は、ダメージが広がって、作業中怪我をしないように、表面に保護テープを貼ります。Surfaceのスクリーン上に透明な梱包テープを貼ります。完全に表面を覆ってください。
-
iOpenerを温めて、Surface右側端に載せます。少なくとも2分間当ててください。
-
-
-
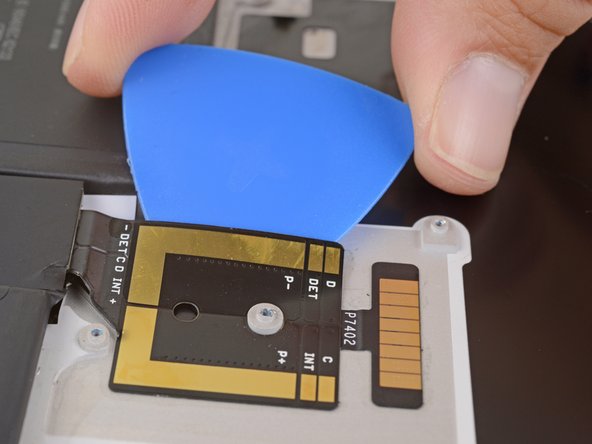
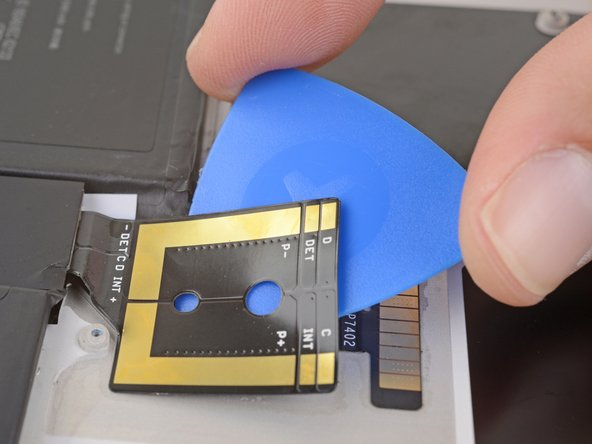
接着剤が使用されているレイアウト図を確認してから、次の作業に進んでください。
-
この部分は接着剤のみで、切開’しても問題ありません。
-
ディスプレイボードとフレックスケーブルが端に近い位置に装着されています。そのため開口ピックはディスプレイの深くまで差し込まないでください。
-
この部分の下には壊れやすいアンテナケーブルが横たわっています。破損しないように慎重に作業してください。また、接着剤もここが一番厚くなっています。
Be careful at the bottom of the screen also. If you put the picks in too far, you can severe the screen ribbon cables which happened to me. I successfully removed the screen without breaking it but severed those cables.
-
-
-
オープニングピックをスクリーンのスピーカー開口部に差し込み、ピックをガラスの下に滑り込ませます。スピーカーグリルは破れやすいので、ピックを押し込まないでください。
-
-
-
ピックをSurfaceの右端にスライドさせて、スクリーンの下の接着剤を切開します。
-
この開口ピックをデバイス右端に残しておきます。接着剤の再装着を防ぐことができます。
-
-
-
新しい開口ピックをデバイス右下に挿入し、コーナーを中心に下側に向けてスライドさせます。
-
ピックをSurface下端に沿ってスライドさせ、スクリーンの接着剤を切り取ります。
-
この開口ピックを下端に残しておくと、接着剤が再度装着するのを防ぐことができます。
Avoid pressing the pick more than 5mm into the lower edge. Driving the pick in as far as the edge of the bezel on the lower edge will damage ribbon cables.
Bill Mills - 返信
-
-
-
ゆっくりと慎重に、スクリーンアセンブリをSurfaceケースから持ち上げます。抵抗感を感じたら作業を留めて、接着剤が全て切開してあるか確認してください。
-
開口ピックを使って、残りの接着剤を全て切開します。
-
-
-
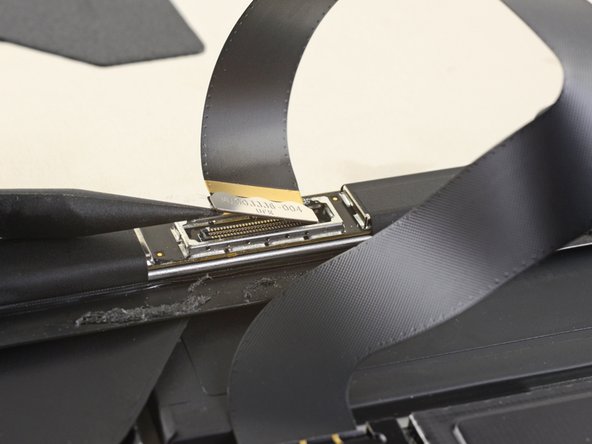
スクリーンアセンブリの上部を持ち上げてケースから離し、スクリーンの下部をマザーボードのディスプレイコネクタに近づけます。
-
コネクタが上向きになるように、スクリーンをケース上に慎重に載せます。ディスプレイのケーブルに折り目がつかないように注意してください。
No llega el cable derecho de la pantalla, al voltear la Tablet y este se romperá, lo ideal sera levantar la pantalla un poco y desconectar el cable de la tablet no de la pantalla.
-
-
-
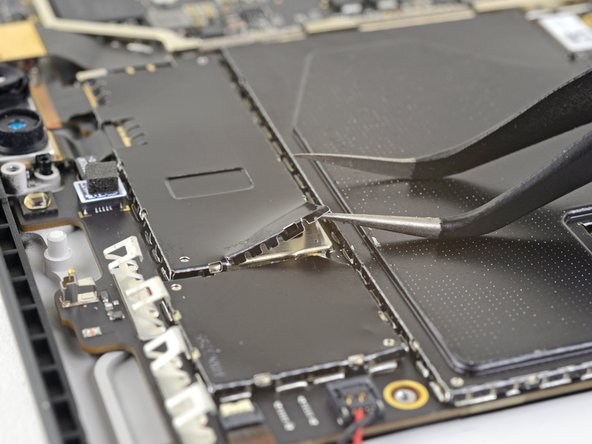
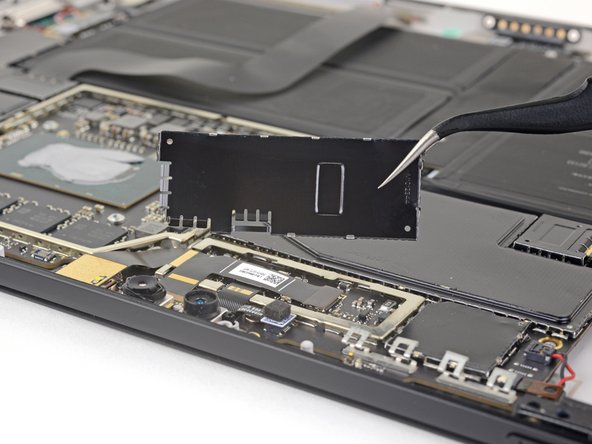
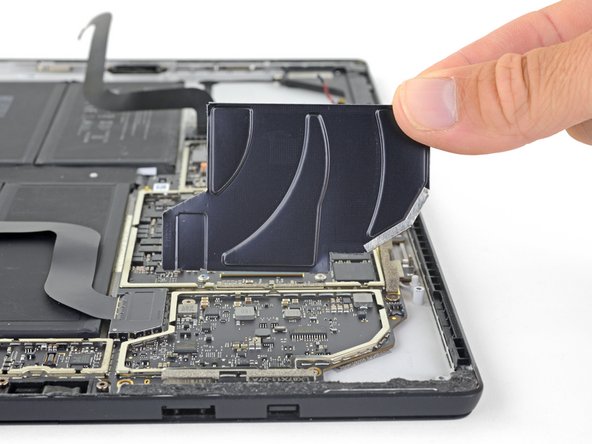
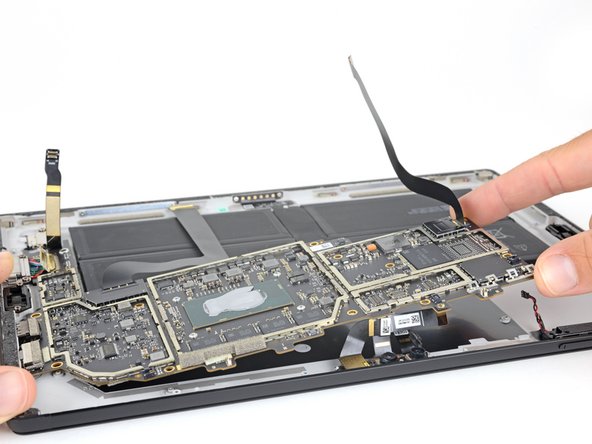
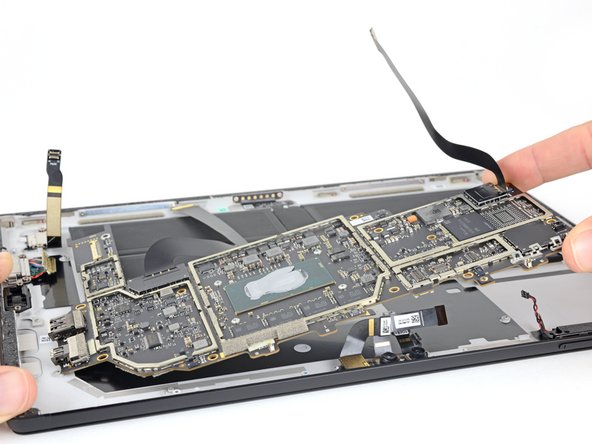
ディスプレイ基板を覆っているEMIシールドの片方の端を、開口ピックでこじ開けます。
-
この手順を、シールドの周囲いくつかの地点で行い、完全に乖離するまで繰り返します。
I had better results using the black spudger to free the shields without damaging them.
-
-
-
-
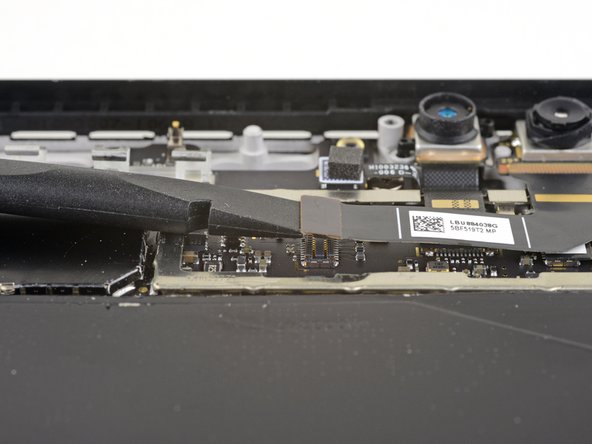
スパッジャーの先端を使って、音量ボタンと電源ボタンの接続ケーブル先端にあるZIFコネクタを固定している、小さなロック用つまみをめくり上げます。
-
マザーボード上のソケットから音量ボタンと電源ボタンの接続ケーブルをまっすぐ引き抜きます。
-
-
-
スパッジャーを使って右スピーカーの左側を持ち上げて、スピーカー周辺の部品に引っかからないようにします。
-
左側を持ち上げたらスピーカーを左にずらして、筐体のくぼみからまっすぐ引き抜きます。
-
-
-
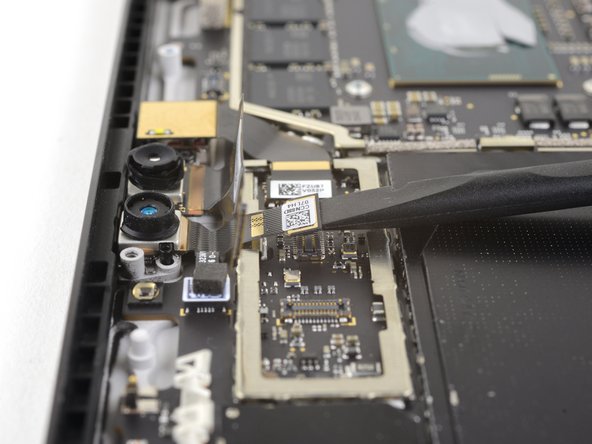
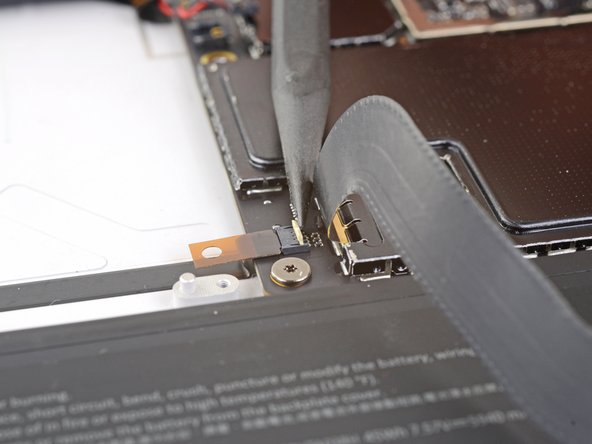
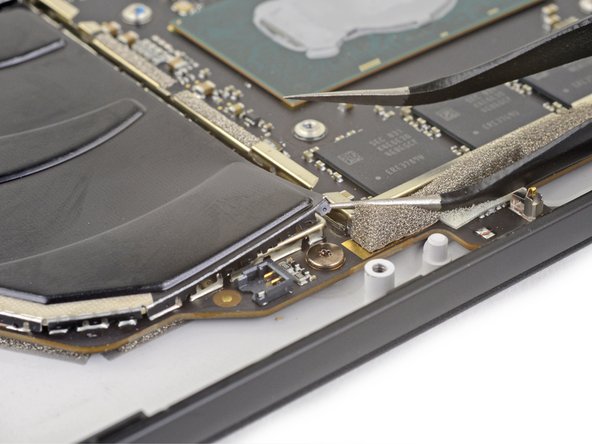
先の尖ったピンセットの片方の先を、カメラ接続コネクタを覆っている電磁シールドの角の隙間に差し込みます。
-
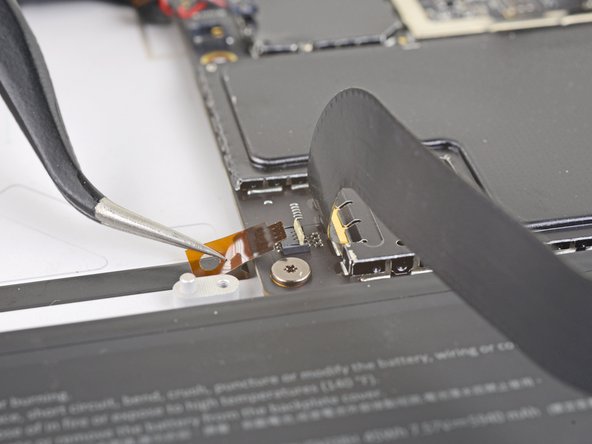
ピンセットを使って電磁シールドをマザーボードから剥がしていきますが、電磁シールドを曲げないでできるところまでにして下さい。
-
上記の作業をシールドの他の角に対しても繰り返して、マザーボードから完全に剥がして下さい。剥がれたらシールドを取り除きます。
-
-
-
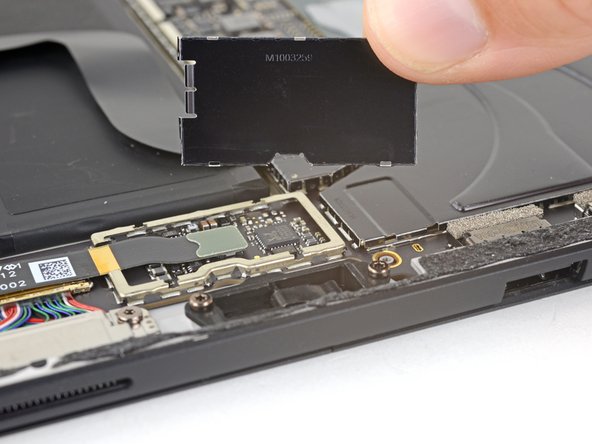
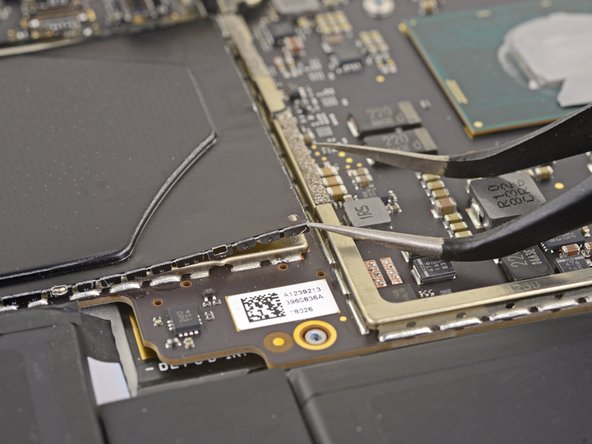
先の尖ったピンセットの片方の先を、microSDカードリーダー接続コネクタを覆っている電磁シールドの角の1つの隙間に差し込みます。
-
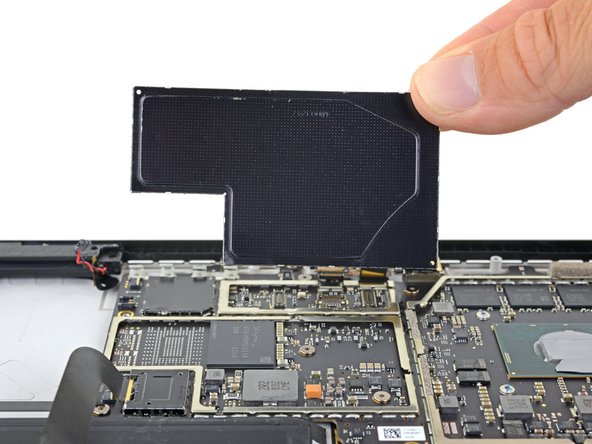
ピンセットを使って電磁シールドをマザーボードから剥がしていきますが、電磁シールドを曲げないでできるところまでにして下さい。
-
上記の作業をシールドの他の角に対しても繰り返して、マザーボードから完全に剥がして下さい。剥がれたらシールドを取り除きます。
-
-
-
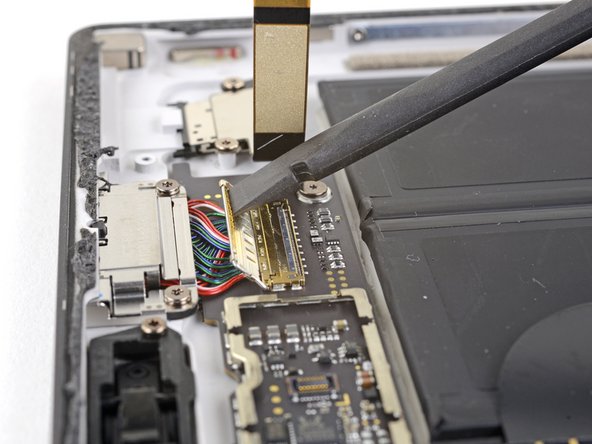
スパッジャーの先端を使って、ヘッドホンジャックの接続ケーブル先端にあるZIFコネクタを固定している、小さなロック用つまみをめくり上げます。
-
マザーボード上のソケットからヘッドホンジャックの接続ケーブルをまっすぐ引き抜きます。
-
-
-
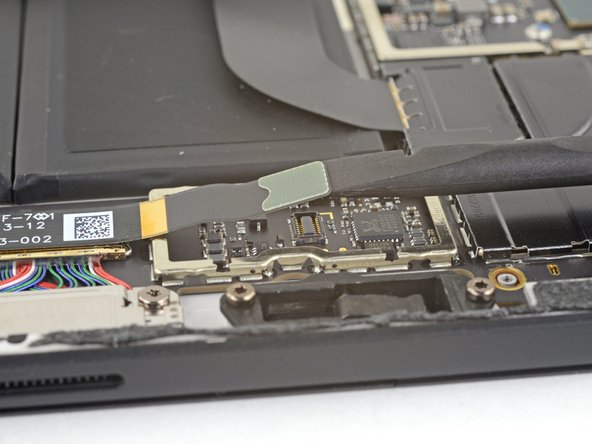
先の尖ったピンセットの片方の先を、残っている中で一番左にある電磁シールドの角の1つの隙間に差し込みます。
-
ピンセットを使って電磁シールドをマザーボードから剥がしていきますが、電磁シールドを曲げないでできるところまでにして下さい。
-
上記の作業をシールドの他の角に対しても繰り返して、マザーボードから完全に剥がして下さい。剥がれたらシールドを取り除きます。
-
-
-
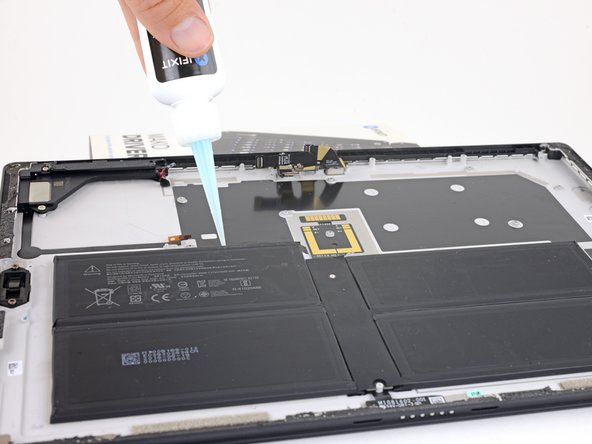
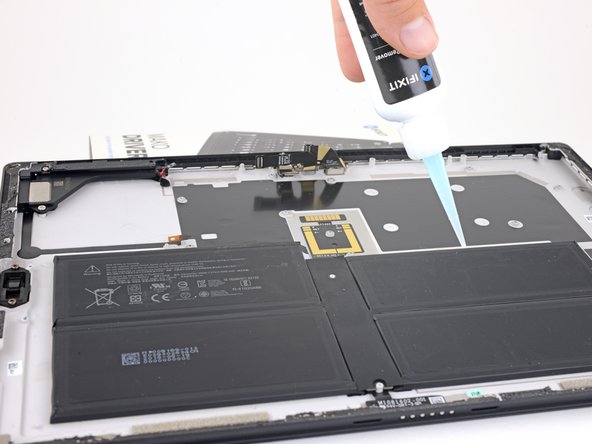
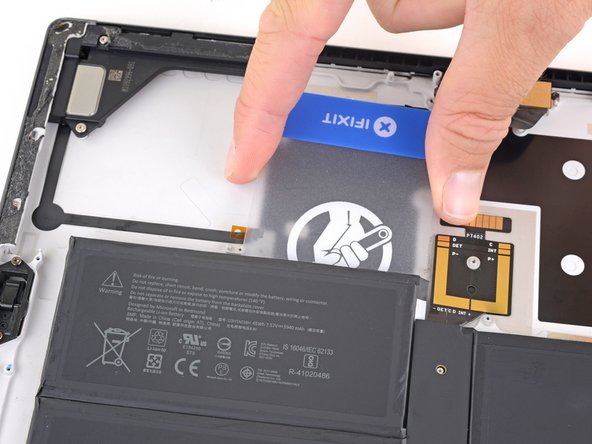
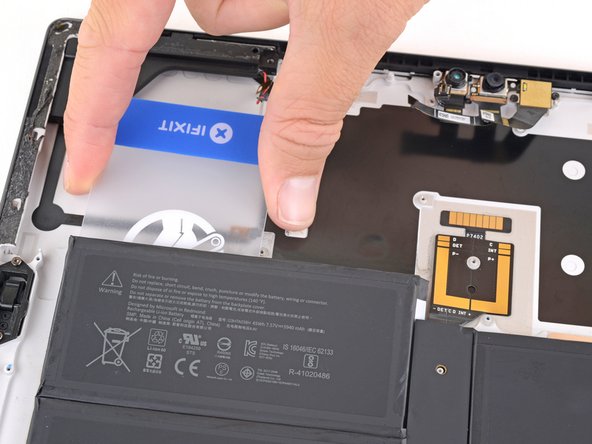
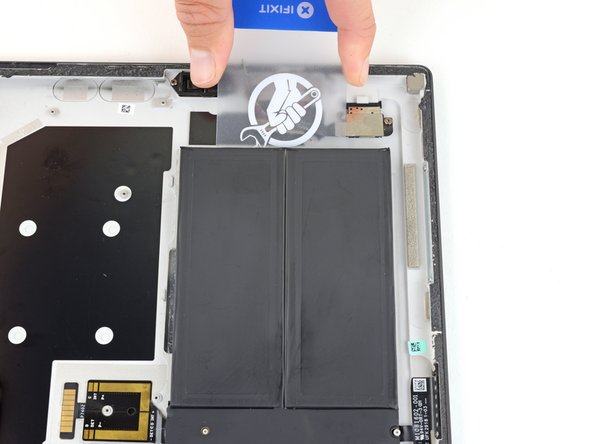
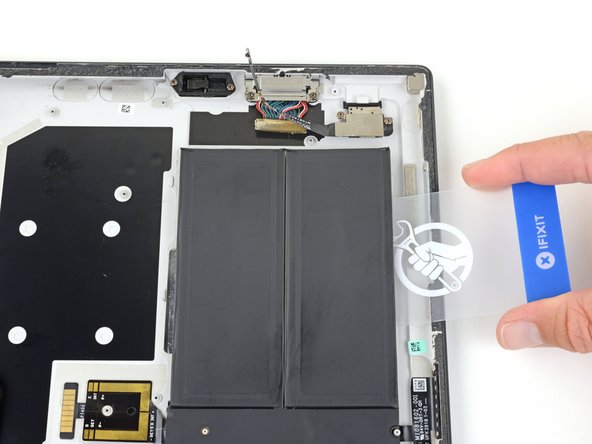
Surfaceの上端の下に支えを入れて5cm程度持ち上げて、Surface全体が下端に向かって傾斜するようにします。
-
接着剤リムーバーもしくは高濃度(90%以上)のイソプロピルアルコールをバッテリーの上端に塗布します。
-
接着剤リムーバーを接着剤に十分染み込ませるため、次の作業に進む前に2〜3分ほど待ちましょう。
-


バッテリーの性能を十分に引き出すため、本ガイドの作業完了後にバッテリーのキャリブレーション を行なってください。
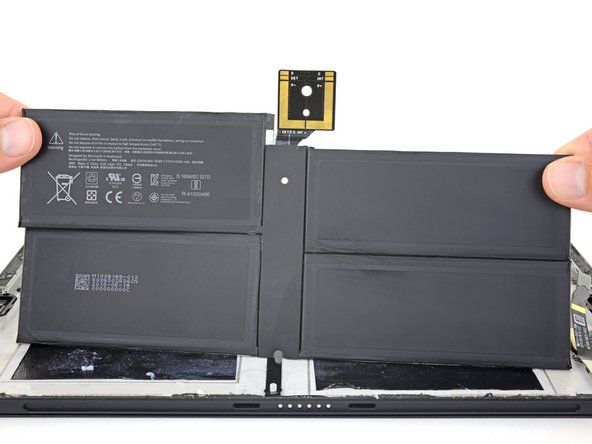
交換用の部品と元々付いていた部品を見比べて下さい。新しい部品を取り付ける前に元の部品に付いていた部品を移植したり新しい部品の接着剤についている保護シートを剥がなければいけない場合があります。
組み立て直す場合は、上記の手順を逆の順番で進めて下さい。
電子機器廃棄物(E-waste)は地方公共団体が定めるガイドラインに従って、適切な方法で処理をしてください。
修理がうまくいきませんでしたか?修理後のトラブルシューティングを試してみたり、アンサーフォーラムで相談してみてください。
バッテリーの性能を十分に引き出すため、本ガイドの作業完了後にバッテリーのキャリブレーション を行なってください。
交換用の部品と元々付いていた部品を見比べて下さい。新しい部品を取り付ける前に元の部品に付いていた部品を移植したり新しい部品の接着剤についている保護シートを剥がなければいけない場合があります。
組み立て直す場合は、上記の手順を逆の順番で進めて下さい。
電子機器廃棄物(E-waste)は地方公共団体が定めるガイドラインに従って、適切な方法で処理をしてください。
修理がうまくいきませんでしたか?修理後のトラブルシューティングを試してみたり、アンサーフォーラムで相談してみてください。
30 の人々がこのガイドを完成させました。

17 件のコメント
This looks like the most stressful repair possible. It’s criminal how sealed up these devices are. Microsoft seems to be going in the right direction with repair, but this was really atrocious.
Or one can use the Surface Pro without a battery by simply cutting the battery connector pictured in step 51. To do this follow the steps until step 22, then remove the single screw for the heat sink branch that lies over the battery connector, cut the battery connector with a pair of needle-nosed snips while gently lifting the heat sink branch out of the way, continue with steps 52 through 56, and finally seal the cut end of the battery connector with some non-conductive tape and reassemble.
And BTW, you can find replacement antennas on eBay or Amazon if you damaged either while removing the screen.
New battery is in and it seems to charge but windows wont recognize a battery as being installed(even after reinstalling acpi drivers for it). The install itself went pretty flawless so I have no idea how to get it to recognize it. It wont show any battery statistics/status/%. Research seems to show this is a common thing but I have found no solutions. If one is known, adding it to this tutorial would be awesome.
Hello Community,
I replaced my bloated battery in the Surface Pro 5 today using the ifixit guide. Everything went great so far. The device turns on, recognizes the battery. Only the battery does not charge. The charger does not light up when the Surface is turned off. When the Surface is turned on, the charger blinks dimly. The error is not due to the charger, because it behaves identically with the docking station. What have I overlooked? Here a Screenshot of the windows battery report : Battery Report
Thanks!
I have been using my surface daily for the last 4 years. Now with a fresh battery it is good for few more. Apart from an iPhone SE battery, I had no experience with fixing electronics. Took me 10 hours to complete the whole operation. I wouldn't have even attempted the repair if it wasn't for the detailed guide. Thank you.
i fixed it today and it worked very well.
Thanks for the detailed guidance! :)
what i was missing were some parts to order and maybe a full list of things i need to order. Getting the Stripes for rebuilding it was a little complicated in germany.
After finishing (without gluing it together) the manual keyboard can't get recognized from the surface.
Did i make a mistake? there was no step where the connection was explained.
Great guide. Full repair in 5 hours, my trickiest one yet. No issues with the battery.
New problem arose....
I have a thick black line in the centre third of my screen. I don't see any damage to the screen, and have tested the screen connectors. Is there another connector I may have missed?
I also have a thick black line directly lined up with the digitizer connection. If I press around on the connector the lines change in appearance. I can't find any physical damage to the screen, ports, or cable. I don't know what's wrong and I'm thinking of replacing the screen.
An update - I ordered a new display cable to see if I had damaged the original one. The problem has persisted with the new cable, so it looks like I'll be replacing the screen. Luckily I have not adhered the screen back to the body so I don't have to get it open again.
I just did this repair on my Surface Pro 5 with no issues. I had previously changed the battery on my wife's Surface Pro 4 last year so was familiar with the process, but for hers I used a heating pad to remove the screen and for mine I used the iOpener. The iOpener is definitely the way to go! With the heating pad heating up the whole device, I think I overheated her digitizer and separated it a bit from the screen so hers now has faint backlight fingers protruding from the edges of the screen. With the iOpener, heat is only applied to the very edges of the screen and is much safer. Well worth the money. Also purchase the precut screen adhesive strips while you're at it!!
And for anyone outside the US searching for batteries, iFixit doesn't ship batteries outside the US (I'm in Canada), so I took a chance with a Canadian aftermarket supplier and ordered Cameron Sino branded batteries for both mine and my wife's Surface's. Both are working fine and are registering slightly over 100% rated capacity.
It's very hard job to remove the display without damaging the display (is it even possible at the first time?) or the 2 cables that connect to the motherboard. I'm normally very skilled doing this repairs but the Surface it's an exeption.
do i need to add new connectivity paste between the battery and the motherboard connection
Hi, after I replaced the battery. The wifi adapter was missing. Should I replace the wifi antenna or should I check something else that I forgot to connect? Thanks
I have had my Surface Pro 5 for about 6 or 7 years, and it now only holds a charge for 15-20 minutes. I was going to attempt the repair, but after looking at how delicate it is and all of the problems encountered above with many that have attempted it, I think I’ll just use it plugged in and purchase another computer for portability. I’m a bit miffed that Microsoft considered such an expensive piece of hardware disposable. It could have been designed such that the battery was user replaceable without having to spend 5 hours doing it and likely cracking the screen in the process. Even a local repair shop that said they do this battery replacement noted that they charge up front for a new screen due to the likelihood that they will break it as well as I would. Poor design.
I attempted this as my second ever repair and ended up cracking the screen. Definitely me not being careful and this being a really difficult repair. Godspeed for everyone who did this and succeeded! I did really love my surface but, wow, Microsoft did not want me to open this thing hahaha
I am grateful I have all these iFixit tools for when I need to repair other things
Replaced the battery, no visible damage to the display (I was very, very careful!) but when I turned it back on the screen had various issues. Replaced the screen and now it's like new again! Would recommend being prepared to spend another £100 or so on buying a replacement screen if replacing the battery - worth it to be able to use the laptop for longer than half an hour off charge though!
The guide Surface is not equipped with a fan. I had to remove two additional screws in opposite corners of the fan assembly. No need to remove the tiny screws on top of the fan itself. The fan is integrated with the heatsink pipes, so this step is needed for lifting off the heatsink pipes. Thank you for a great guide and an awesome initiative!
You may want to discharge the battery completely as I found it quite easy to accidentally bump the power button and turn the surface on while cutting through the screen adhesive.
Emma Strainis - 返信