この翻訳は、ソースガイドの最新の更新を反映していない可能性があります。 翻訳の更新に協力してください。 または ソースガイドを参照してください。
はじめに
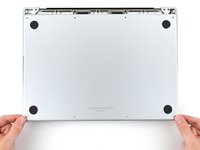
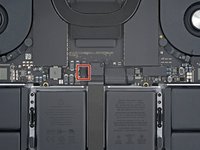
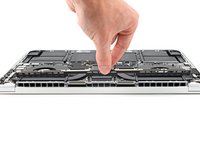
このガイドを参照して、MacBook Pro 14インチ 2021 スクリーンを交換します。
警告: このガイドに従ってスクリーンを物理的に交換することはできますが、交換したスクリーンに 非純正のパーツ と表示されることが知られています。現在のところ、利用可能な修正方法は Appleが使用するシステム構成ツールのみです。(Appleから純正交換用スクリーンを購入した場合のみ入手可能です) または、スクリーンコントローラーのボード間で2つのハンダ付けされたチップを移植することでも対応できます。
安全のために、MacBook Proのバッテリー残量を25%以下まで放電してください。アクシデントで充電したリチウムイオンバッテリーに穴を開けてしまうと、危険な火災事故を起こすことがあります。バッテリーが膨張している場合は、 適切な方法で処分してください。
本ガイドの一部の画像は別機種のものであり、外観に若干の相違がある場合がありますが、ガイドの手順には影響ありません。
ご注意: スクリーンを交換すると、True Tone機能を失います。
必要な工具と部品
-
この手順で使用する道具:FixMat$36.95
-
P5ペンタローブドライバーを使って、下部ケースを固定している次の8本のネジを外します。
-
9.3mmネジー4本
-
5mmネジー4本
-
-
-
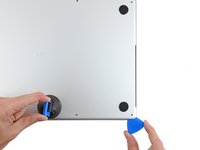
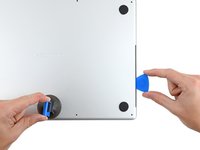
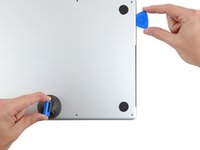
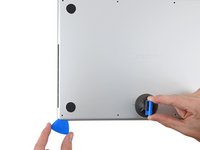
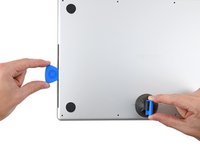
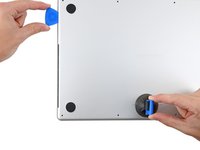
オープニングピックを作ったさ浮間の大に差し込みます。
-
オープニングピックをコーナー周辺までスライドして、それからMacBook Proの短辺側半分までスライドしながら移動させます。
-
-
-
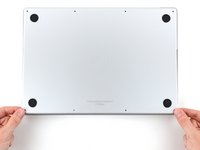
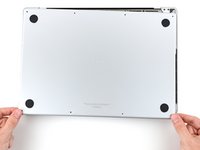
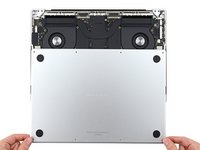
下部ケースを外します。
-
MacBookを横にし、スライドクリップをMacBookの後端に合わせます。下部ケースを押し下げ、後端に向かってスライドさせてクリップをはめ込みます。
-
下部ケースの背面側コーナーが固定され、フレームと同じ高さになったら、下部ケースの中央に沿って押し下げ、残りの4つのクリップをかみ合わせます。
-
クリップがカチッと装着する音と感触がわかるはずです。
-
-
-
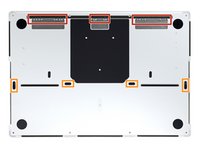
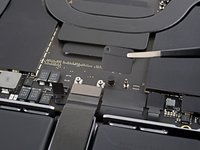
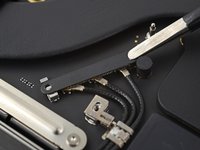
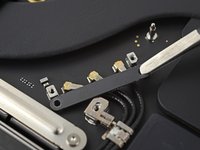
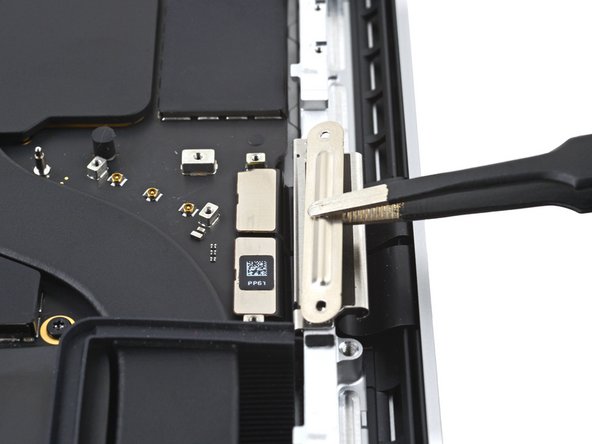
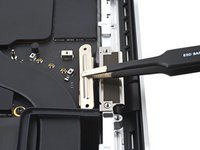
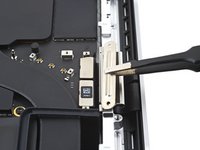
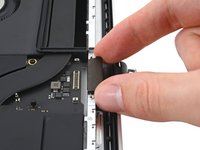
ロジッボード上のバッテリーボードのデーターケーブルコネクタを覆っているテープがあれば、ここで剥がしてください。
-
-
-
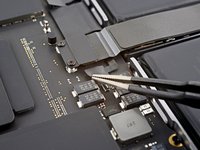
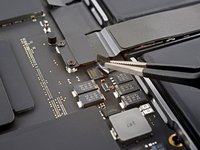
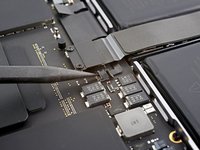
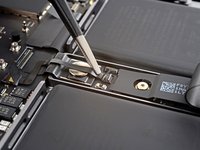
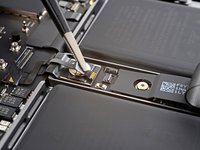
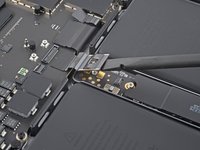
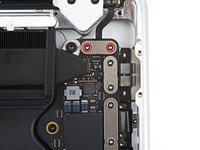
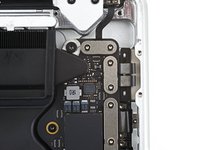
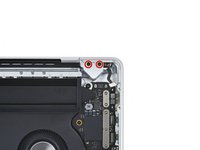
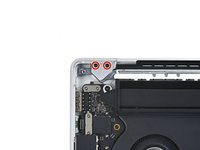
T3トルクスドライバーを使って、トラックパッドケーブルのブラケットをロジックボードに固定している、長さ2.1mmのネジを2本外します。
Sorry but this is not correct Apple procedure.
There is power running through the device still whilst you are unscrewing this plate/bracket and disconnecting the trackpad if you do it this way. This is why Apple put the small flex cable next to this, free to reach before touching anything else.
You must disconnect the battery flex cable next to the trackpad connector before you touch anything else.
Thanks
Is that not what steps 7-9 are doing? You cannot actually access the battery connector until you remove this cable as it's underneath. Which battery flex cable are you referring to?
-
-
-
-
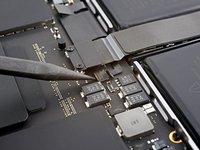
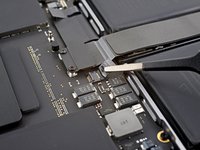
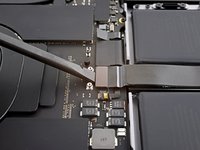
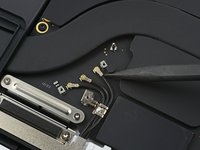
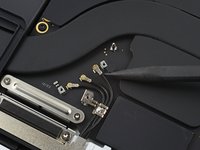
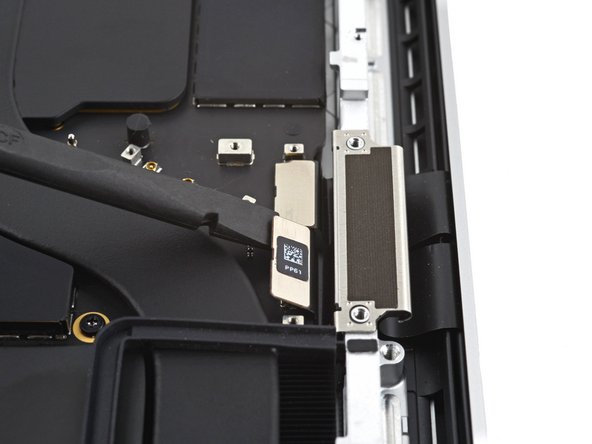
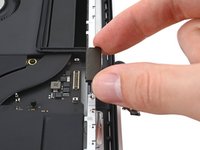
バッテリーボードのデータケーブルをバッテリーボードのソケットからスライドさせて外します。
Ich hab dieses Datenkabel zerstört. Ist das der Grund warum es nicht mehr lädt?
Welches Kabel bräuchte ich denn? Das hier Item # IF464-018-1?
MacBook Pro 14" (A2442, A2779, A2918, A2992) and 16" (A2485) Battery Daughter Board Cable -
-
-
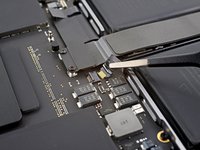
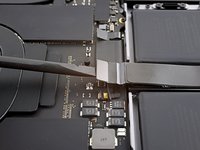
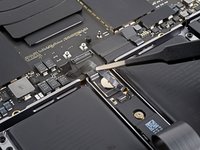
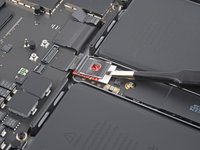
先端が鋭利でないピンセットを。接着剤のある部分の下に滑らせ、ケーブルとデバイスを切り離します。
-
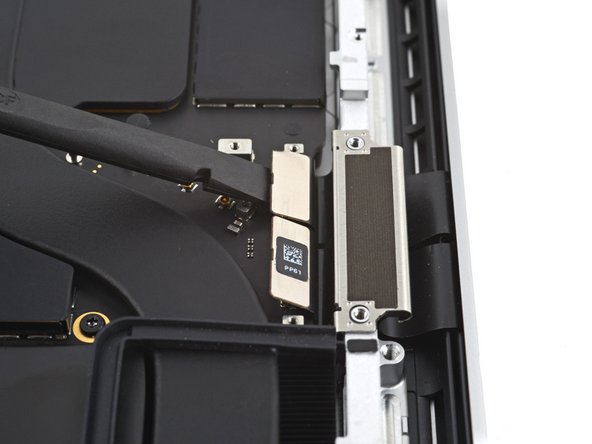
バッテリーボードのデータケーブルを外します。
Removing is easy. We cant reinsert the battery data cable connector. It wont push in properly. Any helpful solution???
Paul Smith - 返信
-
-
-
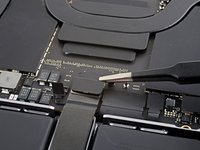
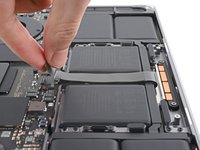
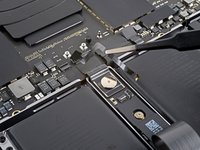
スパッジャーの平面側先端を使って、バッテリーボードからバッテリーコネクタの接続部分を持ち上げて外します。
I have a question, could you please clarify, if the battery connector is damaged, is it replaceable or I have to replace the whole logic board?
-
-
-
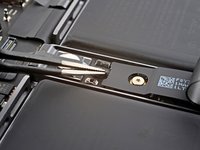
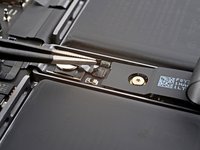
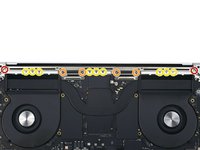
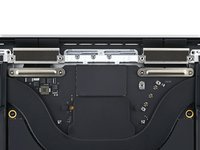
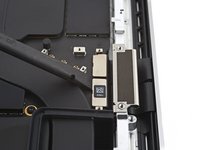
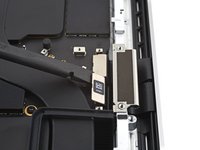
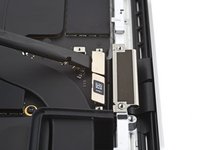
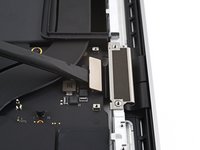
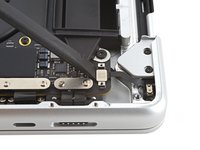
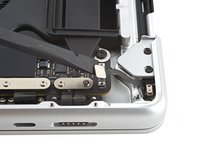
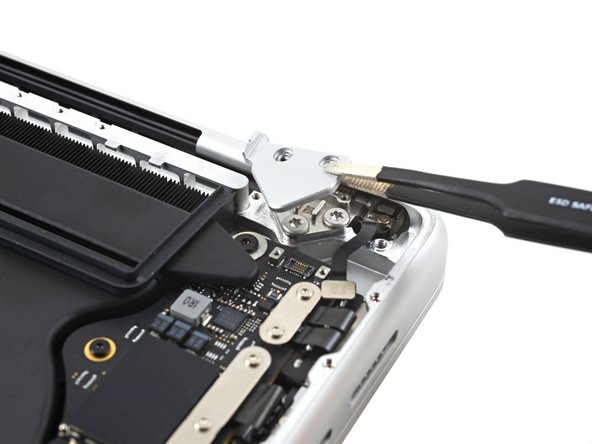
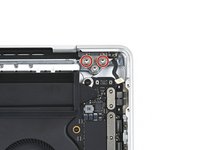
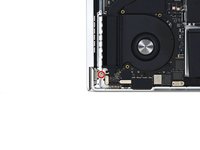
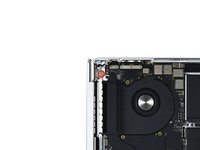
T3トルクスドライバーを使って、アンテナボードのブラケットと同軸ケーブルカバーをフレームに固定している、長さ2.1mmネジを3本外します。
-
-
-
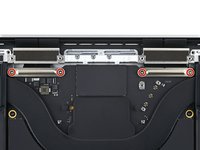
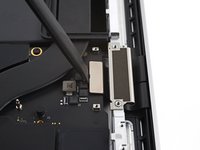
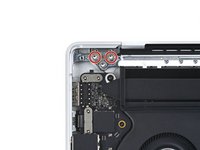
T5トルクスドライバーを使って、フレームにアンテナバーを固定している6本のネジを外します。
-
7.5mmネジー2本
-
3.2mmネジー4本
-
P2ペンタローブドライバーを使って、フレームにアンテナバーを固定している1.5mmネジを9本外します。
-
-
-
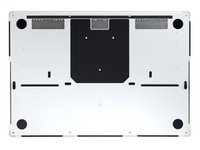
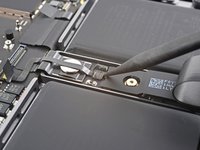
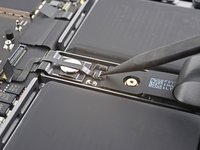
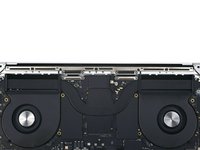
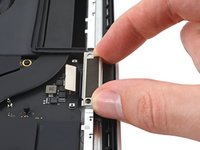
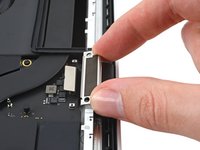
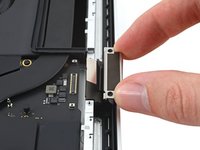
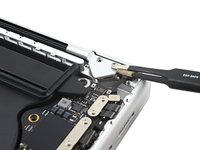
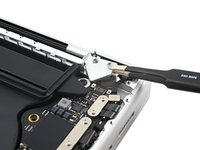
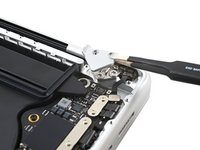
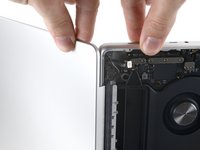
フレームにスクリーンのケーブルブラケットを固定しているクリップを引き上げて外します。
-
スクリーンケーブルのブラケットを外します。
-
他のスクリーンケーブルブラケットにも同じ作業を繰り返します。
During disassembly, I found it easiest to disengage the bottom/connector side of the cable bracket clips first, then pivot up and pull away from the frame of the laptop.
If reassembling with a new display, the ribbon cables can be very stiff on the connector end. I found it easiest to first install the press connectors (step 28), then use the flat end of a spudger to gently coax the ribbon cables around the curve on the top edge of the screen cable bracket buffers until I could engage the top clips of the cable bracket. While holding the top edge of the cable bracket, I used the flat end of a spudger to gently push the connector end of the ribbon cables down into the gap, then engaged the clips on the bottom edge of the cable bracket. -
-
-
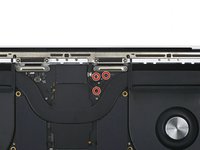
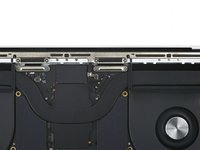
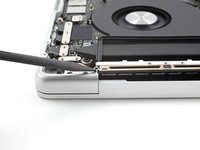
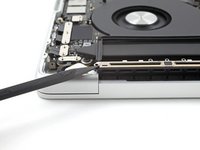
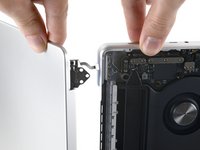
T8トルクスドライバーを使って、各ヒンジから6.4mmネジを2本外します。(両側合わせて4本)
I found that these were very, very tight, and a T9 worked better for me than the T8.
ischmal001 - 返信
-
-
-
スクリーンを再利用する場合は、スクリーンを開き、各ヒンジの真上のガラスにマスキングテープを貼ってください。これは、次の3つの手順でガラスに傷がつくのを防ぐのに役立ちます。
-
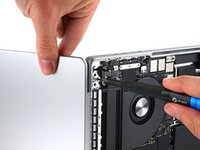
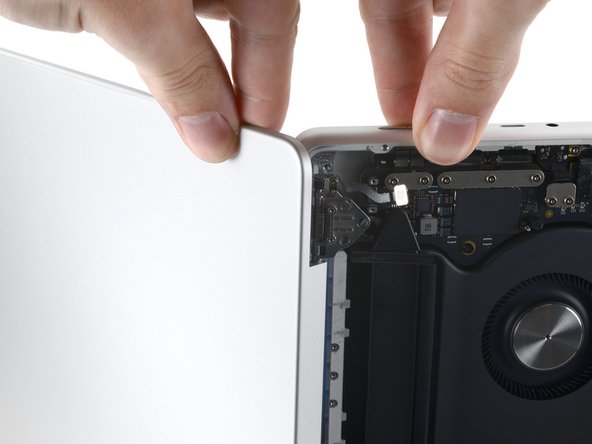
スクリーンを全開にして、MacBook Proを片側だけ立てます。
-
-
-
T8トルクスドライバーを使って、5.2mmネジを外します。(各ヒンジから1本ずつ)
-
一番上のネジを最後に外し、MacBook Proが分離して不意に倒れないように、片方の手でMacBook Proの両半分を固定します。
Loosening these two final screws while the computer was flat made this step much easier. When I initially got to the last screw, I literally couldn't get it to budge while the machine was on its side.
ischmal001 - 返信
-
-
-
ヒンジのネジを完全に締めずに取り付けます。ヒンジの中心を合わせ、左右に隙間や擦れがないか確認します。
-
ヒンジのネジを完全に締めます。
-
スクリーンの開閉時にカチッと音がする場合は、ネジを緩めてスクリーンの位置を調整してください。
Hallo,
ist jemanden bekannt dass nach Display Austausch oberhalb des Display Karos zu sehen ist?
Muss dieser Display nach Tausch programmiert werden?
Vielen Dank für Beiträge!
ja, ohne alte MCU oder Apple Software funktioniert es nicht wirklich sauber, nur mit Pixelfehlern. Ich mag solche "anleitungen" - nie wirklich selbst probiert, aber so viele schöne Bilder, yay.
-


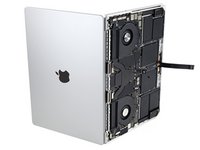


このデバイスを再組み立てするには、インストラクションを逆の順番に従って作業を進めてください。
オリジナルのパーツと交換用パーツをよく見比べてください。交換用パーツに付いていない残りのコンポーネントや接着シールなどは、インストールする前に新パーツに移植する必要があります。
修理がうまく進みませんか?ベーシックな トラブルシューティングを試してみるか、MacBook Pro 14インチ 2021 アンサーコミュニティを参照してください。
このデバイスを再組み立てするには、インストラクションを逆の順番に従って作業を進めてください。
オリジナルのパーツと交換用パーツをよく見比べてください。交換用パーツに付いていない残りのコンポーネントや接着シールなどは、インストールする前に新パーツに移植する必要があります。
修理がうまく進みませんか?ベーシックな トラブルシューティングを試してみるか、MacBook Pro 14インチ 2021 アンサーコミュニティを参照してください。
13 の人々がこのガイドを完成させました。
以下の翻訳者の皆さんにお礼を申し上げます:
88%

Midori Doiさんは世界中で修理する私たちを助けてくれています! あなたも貢献してみませんか?
翻訳を始める ›


21 件のコメント
Hi Ryan.
We actually sell the screen, a.ka. "display assembly" here. I apologize that the part wasn't linked in the parts section at the top of the page. I will update that for future repairers.
Did you completely remove the hinge? Just wondering since I may do a hinge replacement in the future.
Hi Jacko.
We don't completely remove the hinge with this guide, as it's already attached to the replacement screen.
Does this require programming to enable True Tone?
Tim Woodie - 返信
Doesn't Apple record all of the components' IDs/fingerprints to a chip and use that list to reject the replacement display?
Did you really try it? You CANT replace screen on 2021+ models without authorized software to fix distorted image issue. This is misleading and useless.
If you want to replace the screen, either do it by apple or transfer MCU chip from old screen to a new one which is a bit harder than your 0 repairability score.
So you can't use a M2 Pro MacBook Pro display on a M1 Pro/Max display just by swapping them?
When is this coming back instock?
but it from apple its 579 from them and there are no artifact issues
Has anyone tested the QianLi iphone display programmers on the Apple M1 14 inch display replacement?
The fundamental problem (as I understand), is that the replacement screen has a serial number which does not match what the Apple logic board is expecting. So we must recode the replacement screen serial number with the original screen serial number. Then everything should be fine.
Hi for all looking to purchase a display. It actually seems wiser to buy the part from apple:
They sell it for
$672.32
and give a rebate on the returned damaged part
$579.04 Price after credit
Hello bro, is the screen already programmed? And don't shadows come out in your notch?
Hi. I got a quote for doing this in MacOnline in Chile. They want a lot more than $2000 USD for the job, including replacing the motherboard. I think I am getting very ripped off. If I use HDMI with my TV, everything works perfectly. So why do I need to replace the motherboard?? Thieves and liars. I am used to it here.
hello , can a tutorial also be added on how to do the soldering and transferring of the chips to avoid the visual effects
Hello! Has anyone figured out how to calibrate the Display to the serial number? Since the MCU chip is for a different computer there's loads of distortion making it a bit unusable unless in clamshell mode using an external display.
is there a way to just swap the LCD panel from another screen into the one I have on currently? glass is fine
Corey Noll - 返信
About the problems that can arise with the replacement screen. Have you verified that 144hz is available and no artifacts show, when using macOS 15.2, regardless of the specific version of the a2442?