このバージョンは誤った内容を含んでいる可能性があります。最新の承認済みスナップショットに切り替えてください。
必要な工具と部品
-
この手順は未翻訳です。 翻訳を手伝う。
-
MacBook Air Late 2010 - Working - High Sierra, Catalina, M2 Samsung Evo 860, Adapter
-
MacBook Air 2011 - Unknown
-
MacBook Air 2012 - Unknown
-
MacBook Air 2013 - Unknown
-
MacBook Air 2014 - WD_black 500 + Sintech adapter, running MacOS Big Sur
-
MacBook Air Early 2015 - WORKING- Mojave 10.14.3 to Big Sur 11.0.1- Crucial P1 SSD NVME, Adapter.
-
MacBook Air 2017 - WORKING - High Sierra, Catalina and Big Sur - Samsung Evo 960, Adapter.
-
MacBook Air 2018 and forward - will not work, No removable drive
-
-
-
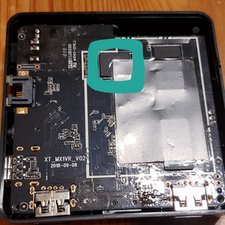
P5ペンタローブドライバーを使って、下部ケースをはずしてください。ネジは次の長さに分かれます。
-
9mm ネジー 2本
-
2.6mm ネジー 8本
-
-
-
この手順は未翻訳です。 翻訳を手伝う。
-
Carefully insert the new SSD into the adapter, using the length of old drive as a reference for when the SSD is fully in the adapter. The lengths should be the same.
-
Insert the SSD and the adapter into the Socket, pushing inward in a straight fashion.
-
When reinstalling the SSD, be sure it is properly seated before reinstalling its retaining screw.
-


18 の人々がこのガイドを完成させました。
16 件のコメント
Please advise ! I installed the Crucial P1 ssd with the adapter, i booted with the option/alt key and the ssd is not present, only the bootable usb ! On a MacBook Air early 2015
The disk will not be seen by the Disk Utility. But if you boot from a USB disk (option_r during boot) and start the Disk Utility program you’ll be able to see the new unformatted disk. Erase the drive. Then you can restore from a Time Machine backup or restart without the USB….This worked for me.
I also have the same problem, do i need latest operating system to detect these new drives?
Why does the guide recommend 5 hours?
After reading, I think this should take 30-45 minutes or possibly a bit less. Maybe I overlooked a step, or something in particular takes extra long? I’m interested to hear how this went for others who have tried.
excellent write up tho, I didn’t know there were NVME adapters available for these, awesome!
The hardware only takes about a half hour, the installing the OS is what takes the time! To speed it up setup an external OS installer drive the faster the drive & interface the faster the install! A thunderbolt RAID’ed SSD is about as fast as you can get it takes just about an hour with it.
Dan -