はじめに
このガイドを参照して、MacBook Air 13インチ Late 2020 トラックパッドを交換します。
必要な工具と部品
-
この手順で使用する道具:Magnetic Project Mat$19.95
-
MacBookにBig Sur v11.1以降がインストールされている場合、オートブートを無効にできないかもしれません。通常通りに作業を進めることができますが、裏蓋を開けたらすぐにバッテリーを外すようにしてください。
-
P5ドライバーを使って、次のネジを外します。
-
7.9mmネジー2本
-
7.3 mmネジー2本
-
2.6 mmネジー6本
-
-
-
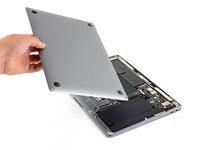
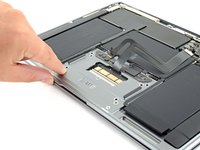
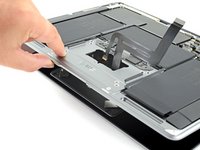
指先をディスプレイと下部ケースの間に挟んで、下部ケースから上向きに引き上げます。
-
下部ケースを取り出します。
-
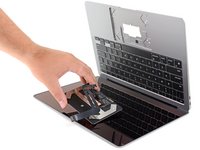
本体を正しい位置に揃えてしっかりと押し込み、下にある2つの隠しクリップをはめ込みます。カチッと装着音がして固定されます。
-
-
-
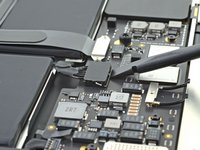
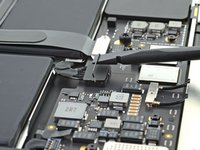
バッテリーコネクタ上のメタル製ロッキングアームを、スパッジャーの平面側先端でこじ上げてラッチを外します。
-
メタル製のロッキングアームを真上に持ち上げて、バッテリーコネクタをロジックボードのソケットから外します。
-
上手く接続できない場合は、コネクタの後ろ側、ケーブルがついている方を先に所定の位置に押し込んでから、コネクタの先端をコネクタが平らになるように押し込んで所定の位置に収めて下さい。
If having difficulty in flipping the bar up, place the machine vertical and not that there is a small “locking nib” that the bar has to clear. You may have to give the bar honest persuasion to clear the nib.
The bar can lock backwards making it very hard to even see let alone move. Great care is needed to shift it. I had to use two thumbnails, one on each side, then once flipped forward it takes more push than I expected to clip it in place. Ensure the plug is fully seated first !
As others commented, it can be hard to click the battery connector back into place. First make sure the bar is not underneath the connector. Then, turning the computer so the connector pins are facing you (LCD hinge end closer to you) can also make it easier to position the connector on top and then click it into place.
Some replacement batteries have a retainer bar that differs from OEM batteries. I had to swap the retainer bar to properly secure it under the "locking nib" to ensure it didn't release on its own (before it could freely swing).
-
-
-
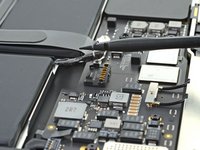
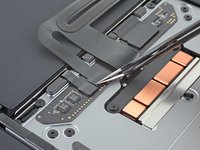
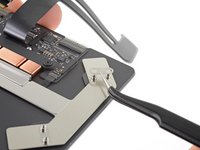
T3トルクスドライバーを使って、トラックパッドケーブルカバーを固定している1.4 mmネジを2本外します。
-
T3ビットが少し緩く感じる場合は、代わりにT4ビットを使用することもできます。
-
-
-
-
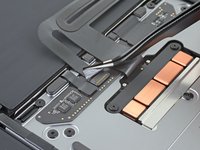
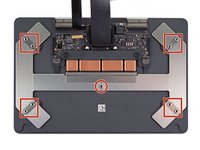
T5トルクスドライバーを使って、トラックパッドを固定している9本のネジを外します。
-
フルコートされた3.1mmネジー8本
-
半分コートされた3.1mmネジー1本
-
-
-
トラックパッドアセンブリを取り外す際には、ネジポストに取り付けられている5つの小さなメタル製ワッシャーを紛失しないように注意してください。少しの刺激でも飛び散って紛失してしまいます)。
-
トラックパッドを外します。
Yes, watch out for those little spacers. They are silver and blend right in with the bottom of the trackpad until you turn it upside down.
Anyone know where to find replacement washers? I lost mine and can't find a source online. The trackpad doesn't click very well without them.
-
-
-
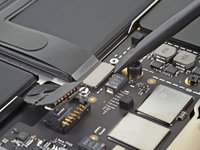
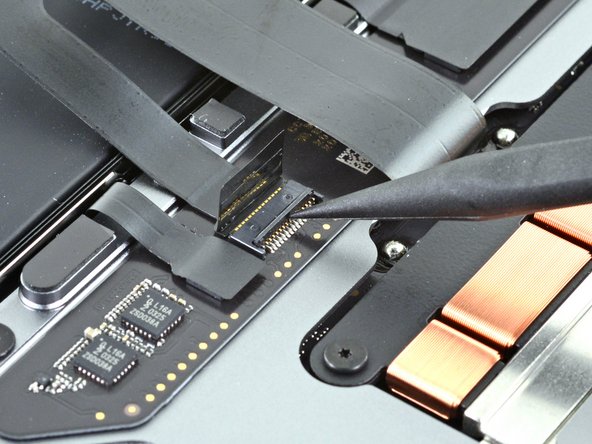
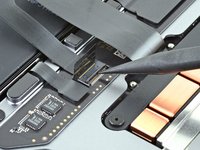
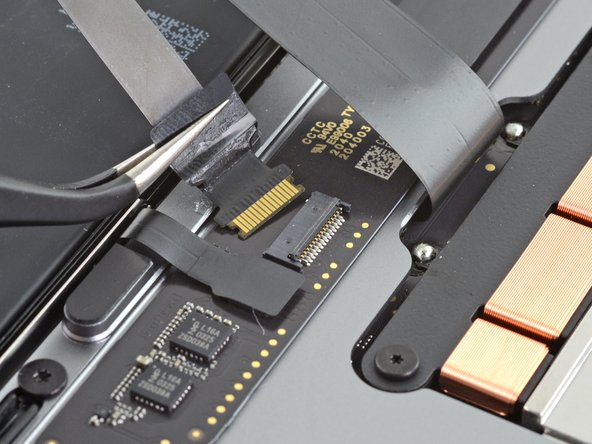
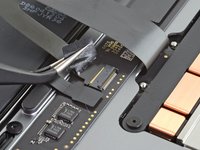
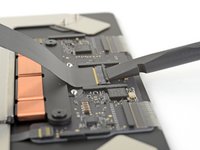
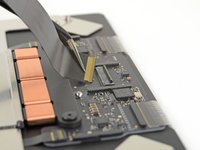
スパッジャーの平面側先端を使って、トラックパッドのZIFコネクタ上の小さな固定フラップを持ち上げます。
-
トラックパッドケーブルをZIFコネクタから、スライドして外します。
-


オリジナルのパーツと交換用パーツをよく見比べてください。交換用パーツに付いていない残りのコンポーネントや接着シールなどは、インストールする前に新パーツに移植する必要があります。
デバイスを再組み立てする際は、これらの手順を逆の順番に従って作業を進めてください。
修理が完了しても、電源に接続するまでノートパソコンの電源が入らないことがあります。
e-wasteを処理する場合は、認可済みリサイクルセンターR2を通じて廃棄してください。
修理が上手く進みませんか?まずはベーシックなトラブルシューティングを試してみるか、このモデルのアンサーコミュニティに尋ねてみましょう。
オリジナルのパーツと交換用パーツをよく見比べてください。交換用パーツに付いていない残りのコンポーネントや接着シールなどは、インストールする前に新パーツに移植する必要があります。
デバイスを再組み立てする際は、これらの手順を逆の順番に従って作業を進めてください。
修理が完了しても、電源に接続するまでノートパソコンの電源が入らないことがあります。
e-wasteを処理する場合は、認可済みリサイクルセンターR2を通じて廃棄してください。
修理が上手く進みませんか?まずはベーシックなトラブルシューティングを試してみるか、このモデルのアンサーコミュニティに尋ねてみましょう。
11 の人々がこのガイドを完成させました。
以下の翻訳者の皆さんにお礼を申し上げます:
100%

これらの翻訳者の方々は世界を修理する私たちのサポートをしてくれています。 あなたも貢献してみませんか?
翻訳を始める ›


14 件のコメント
Hi! So I successfully replaced my trackpad (the center screw got stripped so I had to use the superglue technique and threw it away), and the trackpad works perfectly well but without haptics. My replacement didn’t come with a new cable so used the old one after cleaning of the end (it had some blackening on the portion connected to the trackpad). Is my trackpad a bad unit or should I try replacing the cable first?
Hi! Considering the blackening on the old cable, I’d recommend thoroughly cleaning its contacts with high concentration (90%+) isopropyl alcohol and a Q-tip. Let it dry before reinstalling it. If that cleaning doesn’t help, replace the old cable before considering your replacement trackpad a bad unit. Good luck on your repair!
Hi Carsten! I tried cleaning it but didn’t work. Picked up a new cable from here, and now works flawlessly. Highly recommend anyone reading this to just buy a replacement cable too when you do the repair to rule out a faulty part. Thanks!
Hi, I replaced trackpad following the guide and trackpad seems to work but very slow and lagging. and when I log in, mac is showing message waiting for bluetooth trackpad to be discovered. Could this be cable issue?
Hi team,
I follow this guide to replace my trackpad and now strangely my “a” and “d” keys no longer work on my keyboard. Any thoughts on how this could have happened?
Cheers
Zac,
Check that the cables you disconnected during the repair are fully seated in their ZIF connectors. You could also check surrounding cables to ensure all look normal, that none are inserted at odd angles, etc.
Good luck!
I am having the exact same issue. Were you able to figure it out?
I have a custom configuration M1 MacBook Pro 13” Late 2020, and sadly this is not the same system. My system has two fewer screws on the top, and no screws on the sides. Opening it, the layout of things and the types of connectors also differ. Any recommendations on what is wrong here?
Allen Nemo - 返信
This is the guide for the Late 2020 MacBook Air. Sounds like you have a MacBook Pro of the same year — here's that trackpad guide!
Hello, I replaced the trackpad but now macbook air won't turn on. Any thoughts? I checked the battery connector already.
- Figured it out. I plugged in the charger in, and macbook air powered on.
The track pad works great. Thank you. Instructions were easy to follow.
Please note that if you're here looking at this due to water damage, you can try some simpler things first.
My wife spilled water on the keyboard/trackpad and did not turn the laptop off, just let it sleep. It was not much water and it was just water - not coffee, soda, etc., so YMMV. I took the whole thing apart, removed the trackpad (using this guide), and removed all the connectors between the trackpad and everything else. I dried laptop with a hair dryer with the back off and the trackpad out - maybe about 5 minutes moving around the keyboard area front/back and a bit around the logic board. I used some IPA all over the connectors and cables and let that dry. I reassembled the laptop and on first boot, it was acting odd - every touch of the trackpad resulted in a click. I shut the laptop down (there's no PRAM/SMC on an M1, so power cycle is the option here) and it now works fine. I'm also now letting it sit in an oven at 130F (heated to 200F - lowest setting, then let the oven cool to 130F). So far so good
How do you actually replace Trackpad Connector Board I don't see any screws I just Don't want to break it my guess is just glue thanks in advance
After a coffee spill on my niece's MacBook she took it to a shop and they replaced the keyboard, but the trackpad and A and D keys didn't respond. I first tried cleaning the trackpad cable connectors without luck. Once I replaced the trackpad cable and the trackpad now works fine, but A and D keys still don't work. I'll recheck the seating of the cable connectors but they looked good. I'm guessing maybe there is spillage on one of the pins inside the zif connector still. Any ideas how to clean those on the board?
ESD safe mat, plugged into ground, with a wrist strap, also grounded, are the best best to protect the logic board.
Robin Ray - 返信
Re-Assembly Tip: Before putting the screws back in, snap the lower case on and test to make sure the MacBook powers up. When I first re-assembled, I became very nervous I did something wrong because it would not power on. It turns out I just needed to plug the laptop into a power source for it to power up (despite having a good charge before disassembly). It was the perfect way to test the new USB-C ports!
Austin - 返信
Big points to this one, especially for mentioning needing to plug the laptop in. The bottom case needs to be screwed in and laptop needs to be plugged in before it will boot.
Bayden Yazalina -
Wiha 4PL driver for these screws.
Greg Worrel - 返信
Printing out all the images from this Ifixit guide prior to starting and using duct tape help me keep track of screws.
raju midjdeya - 返信
This Guide has a high chance of not working if an aftermarket display is used as MAC serialization was introduced post ~2023. Likely you will need an original MAC screen replacement and to serialize the display for it to work.
Tron Computers - 返信