メインコンテンツにスキップ

Asus ROG Ally SSD Replacement

必要な工具と部品

  1. Asus ROG Ally SSD Replacement, Prepare your device for disassembly: 手順 1、 3の画像 1 Asus ROG Ally SSD Replacement, Prepare your device for disassembly: 手順 1、 3の画像 2 Asus ROG Ally SSD Replacement, Prepare your device for disassembly: 手順 1、 3の画像 3
    • Let your device's battery drain below 25% before starting this repair—a charged lithium‑ion battery may catch fire if damaged.

    • Completely power off your device and unplug all cables.

    • Consider laying your device on a soft cloth to prevent scratching or damaging the screen during your repair.

  2. Asus ROG Ally SSD Replacement, Unfasten the back cover: 手順 2、 2の画像 1 Asus ROG Ally SSD Replacement, Unfasten the back cover: 手順 2、 2の画像 2
    この手順で使用する道具:
    FixMat
    $36.95
    購入する
    • Throughout this repair, keep track of each screw and make sure it goes back exactly where it came from.

    • Use a Phillips #0 screwdriver to remove the five 17.2 mm‑long screws securing the top edge and bottom corners of the back cover.

    • Use a Phillips #0 screwdriver to fully loosen the remaining captive screw at the center of the bottom edge. This should create a small gap between the back cover and chassis.

    • Don't try to remove this screw.

  3. Asus ROG Ally SSD Replacement, Insert an opening pick: 手順 3、 3の画像 1 Asus ROG Ally SSD Replacement, Insert an opening pick: 手順 3、 3の画像 2 Asus ROG Ally SSD Replacement, Insert an opening pick: 手順 3、 3の画像 3
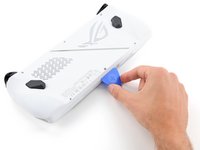
    • Insert the flat edge of an opening pick between the bottom edge of the back cover and chassis, near the captive screw.

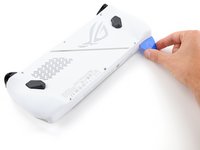
    • Angle the pick upward and push it under the back cover.

  4. Asus ROG Ally SSD Replacement, Release the back cover's clips: 手順 4、 3の画像 1 Asus ROG Ally SSD Replacement, Release the back cover's clips: 手順 4、 3の画像 2 Asus ROG Ally SSD Replacement, Release the back cover's clips: 手順 4、 3の画像 3
    • Plastic clips secure the perimeter of the back cover. You should feel and hear them release during this step.

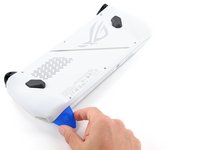
    • Slide the opening pick along the bottom edge and around the corners of the back cover to release the clips securing it.

    • Keep the pick at an upward angle under the back cover to help release the clips.

  5. Asus ROG Ally SSD Replacement, Remove the back cover: 手順 5、 3の画像 1 Asus ROG Ally SSD Replacement, Remove the back cover: 手順 5、 3の画像 2 Asus ROG Ally SSD Replacement, Remove the back cover: 手順 5、 3の画像 3
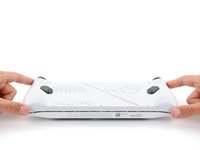
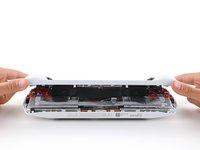
    • Lift the bottom edge of the back cover off the chassis to release the remaining clips.

    • Remove the back cover.

    • During reassembly, lay the back cover onto your device and firmly push down around the perimeter to engage the clips.

  6. Asus ROG Ally SSD Replacement, Remove the plastic cover: 手順 6、 3の画像 1 Asus ROG Ally SSD Replacement, Remove the plastic cover: 手順 6、 3の画像 2 Asus ROG Ally SSD Replacement, Remove the plastic cover: 手順 6、 3の画像 3
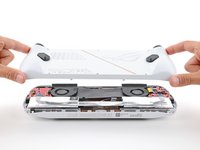
    • Use your fingers to peel up and remove the black plastic cover between the fans.

    • Put the cover aside—you'll use it during reassembly.

  7. Asus ROG Ally SSD Replacement, Unlatch the locking bar: 手順 7、 3の画像 1 Asus ROG Ally SSD Replacement, Unlatch the locking bar: 手順 7、 3の画像 2 Asus ROG Ally SSD Replacement, Unlatch the locking bar: 手順 7、 3の画像 3
    • A metal locking bar secures the top edge of the battery connector

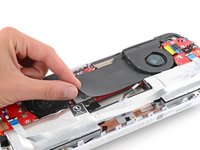
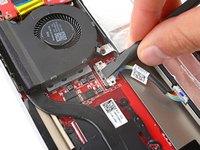
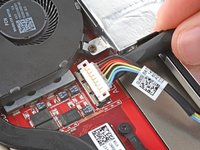
    • Use the flat end of a spudger to gently push the locking bar away from the connector to unlatch it.

  8. Asus ROG Ally SSD Replacement, Disconnect the battery: 手順 8、 3の画像 1 Asus ROG Ally SSD Replacement, Disconnect the battery: 手順 8、 3の画像 2 Asus ROG Ally SSD Replacement, Disconnect the battery: 手順 8、 3の画像 3
    • Make sure the locking bar is not covering the battery connector at all, or you may damage the socket and the locking bar.

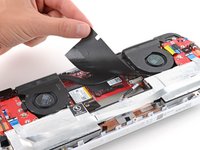
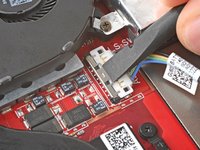
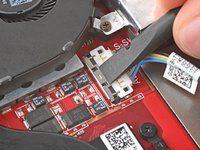
    • Insert the flat end of a spudger under the center of the battery connector.

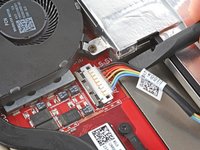
    • Lift the connector straight up and out of its socket to disconnect the battery.

    • During reassembly, use your fingers or the flat end of a spudger to firmly push the connector onto its socket until it clicks into place.

  9. Asus ROG Ally SSD Replacement, Unfasten the SSD: 手順 9、 2の画像 1 Asus ROG Ally SSD Replacement, Unfasten the SSD: 手順 9、 2の画像 2
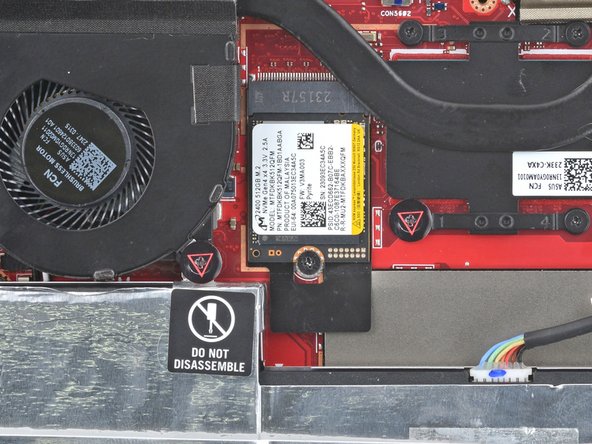
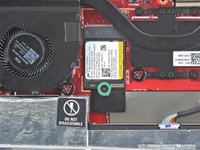
    • Use a Phillips #0 screwdriver to remove the 3.4 mm‑long screw securing the SSD.

  10. Asus ROG Ally SSD Replacement, Remove the SSD: 手順 10、 2の画像 1 Asus ROG Ally SSD Replacement, Remove the SSD: 手順 10、 2の画像 2
    • If you have trouble removing the SSD, you can remove the battery for easier access.

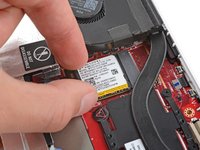
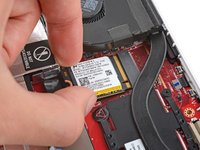
    • Grip the bottom corners of the SSD and slightly lift until it clears the screw post.

    • Do not lift more than this or you may damage the SSD and its socket.

    • Pull the SSD straight out of its socket and remove it.

  11. Asus ROG Ally SSD Replacement: 手順 11、 2の画像 1 Asus ROG Ally SSD Replacement: 手順 11、 2の画像 2
    • Once you've reassembled your device:

    • Plug your device in and turn it on. It should boot into the BIOS menu.

    • Navigate to the Advanced tab and click ASUS Cloud Recovery.

    • Follow the prompts to finish setting up your device.

終わりに

To reassemble your device, follow these instructions in reverse order.

Take your e-waste to an R2 or e-Stewards certified recycler.

Repair didn’t go as planned? Try some basic troubleshooting, or ask our Answers community for help.

ある他の人がこのガイドを完成しました。

作成者

2人の作成者と共同で作成されました。

Spencer Day

メンバー登録日: 09/14/22

54,795 ポイント

407のガイドは作成済み

チーム

iFixit iFixit人のメンバー

Staff

135 メンバー

17,269のガイドは作成済み

0 件のコメント

コメントを追加

統計データ:

過去 24時間: 26

過去 7 日: 149

過去 30 日: 680

今までの合計 1,598