メインコンテンツにスキップ

この翻訳は、ソースガイドの最新の更新を反映していない可能性があります。 翻訳の更新に協力してください。 または ソースガイドを参照してください

Apple Watch Series 4 スクリーンの交換

必要な工具と部品

  1. Apple Watch Series 4 スクリーンの交換, ディスプレイを開口します。: 手順 1、 2の画像 1 Apple Watch Series 4 スクリーンの交換, ディスプレイを開口します。: 手順 1、 2の画像 2
    • 修理を始める前に、デバイスをチャージャーから外して、電源を切ります。

    • タッチスクリーンが破損していて、電源を切れない場合は、こちらの代用方法で電源を切ります。

    Hi. I changed the screen on an apple watch series 4, now the screen works, whcih is great, but when I charge it, the green snake comes on but never charges. It heats up the bottom, gets very warm. Could it be the battery itself? Maybe needs a new one? Is rthere anything else that woudl be causing the battery to not charge and or heat up on the bottom when chaging the screen?

    Derrick Brewer - 返信

  2. Apple Watch Series 4 スクリーンの交換, 安全要件: 手順 2、 3の画像 1 Apple Watch Series 4 スクリーンの交換, 安全要件: 手順 2、 3の画像 2 Apple Watch Series 4 スクリーンの交換, 安全要件: 手順 2、 3の画像 3
    この手順で使用する道具:
    Safety Glasses
    $3.19
    購入する
    • スクリーンとWatch本体の間の隙間は非常に狭いため、鋭利なブレードを使ってこの二つを乖離させなければなりません。作業を始める前に、次の注意書きをよく読んでください。

    • 作業中、ナイフから完全に指を離して指先を保護してください。不安な方は、ナイフを持っていない側の手をレザーグローブやガーデニング用グローブを着用してください。

    • 強いプレッシャーを本体に与えないようにご注意ください。ナイフがスリップしてしまい、怪我をしたりWatchにダメージを与えてしまうことになります。

    • 保護メガネを着用してください。ナイフもしくはガラスが割れてしまうと、破片が飛び散ることがあります。

    • Watch用ハンドの有無によってコントロール加減が変わる場合は、作業がやりやすい様に着用する、もしくは外してください。

  3. Apple Watch Series 4 スクリーンの交換: 手順 3、 1の画像 1
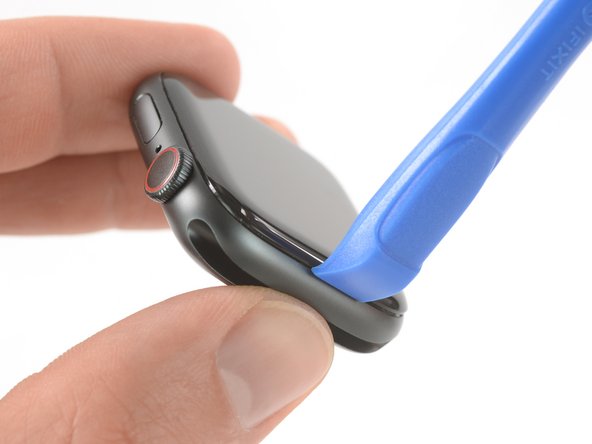
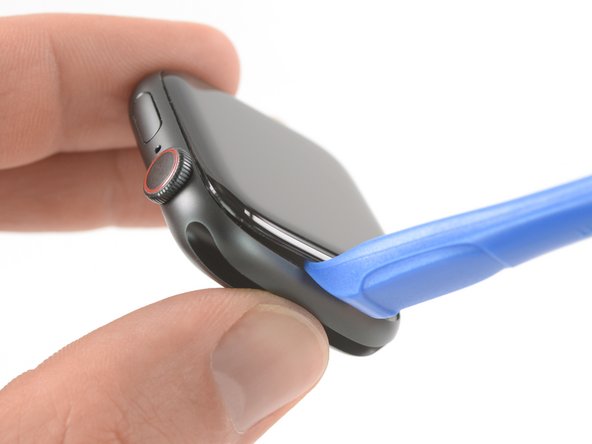
    • iOpenerを準備して(もしくはヘアドライヤーやヒートガン)Watchのディスプレイに留められた接着剤を柔らかくするため、ディスプレイ表面にのせて温めます。

    • スクリーンが完全に温まり、ケースを固定している接着剤が柔らかくなるまで、iOpenerをデバイス上に少なくとも2分間置きます。

    • ディスプレイの接着剤を十分に柔らかくするには、iOpenerを複数回に渡って温めて、作業を繰り返す必要があります。

  4. Apple Watch Series 4 スクリーンの交換: 手順 4、 3の画像 1 Apple Watch Series 4 スクリーンの交換: 手順 4、 3の画像 2 Apple Watch Series 4 スクリーンの交換: 手順 4、 3の画像 3
    • ディスプレイと外ケースの間の薄い隙間にカーブしたブレードの先端を載せます。 デジタルクラウンに最も近いディスプレイの短辺側から始めます。

    • 隙間にしっかりとまっすぐ押し込みます

    • 差し込んだら、ブレードを傾けながらディスプレイを少し持ち上げます。

    • Force Touchセンサーへのダメージを防ぐため、ナイフを2 mm以上挿入しないでください。

  5. Apple Watch Series 4 スクリーンの交換: 手順 5、 2の画像 1 Apple Watch Series 4 スクリーンの交換: 手順 5、 2の画像 2
    • カーブしたブレードで小さな隙間が開いたら、ブレードを取り外して開口ツールの先端を隙間に差し込みます。

    • 親指をピボットのようにして、開口ツールを隙間に押し込み、ディスプレイを少し持ち上げます。

    • まだディスプレイを完全に開いたり切り離したりしないでください。

  6. Apple Watch Series 4 スクリーンの交換: 手順 6、 3の画像 1 Apple Watch Series 4 スクリーンの交換: 手順 6、 3の画像 2 Apple Watch Series 4 スクリーンの交換: 手順 6、 3の画像 3
    • Force Touchタッチセンサーは、Watch本体ではなく、ディスプレイフレームに装着しているものがあります。 この場合、ディスプレイの下に開口ピックを挿入し、Force Touchガスケットをディスプレイから慎重に離してください。

    • Force Touchガスケットを再利用するには、ディスプレイ端の下を慎重にこじ開けます。 ディスプレイを持ち上げた際に、Force Touchガスケットが剥がれてしまう場合や、ガスケットのレイヤーが外れる場合は、Force Touchガスケット自体を交換しなければなりません。

    • Force Touchガスケットとディスプレイ間の接着剤を剥がすため、ディスプレイ周辺に開口ピックをスライドします。

    • コンポーネントにダメージを与えないように、開口ピックを2 mm以上差し込まないでください。

  7. Apple Watch Series 4 スクリーンの交換: 手順 7、 3の画像 1 Apple Watch Series 4 スクリーンの交換: 手順 7、 3の画像 2 Apple Watch Series 4 スクリーンの交換: 手順 7、 3の画像 3
    • ディスプレイケーブルを引っ張らないようにするには、ディスプレイを完全に開かないことです。

    • ディスプレイを45度まで最大限に開きます。ピンセットを使ってディスプレイとForce Touch ガスケットの間の接着剤を剥がします。

    • ディスプレイケーブル周辺と裏に貼られた接着剤を綺麗に剥がします。接着剤は交換しなければならないため、作業を簡単にするために接着剤を切断することも可能です。

    • Watchの再組み立ての際は、この時点に戻ってきて、デバイスの再シール方法を参照して作業を続けてください。

  8. Apple Watch Series 4 スクリーンの交換, バッテリー: 手順 8、 2の画像 1 Apple Watch Series 4 スクリーンの交換, バッテリー: 手順 8、 2の画像 2
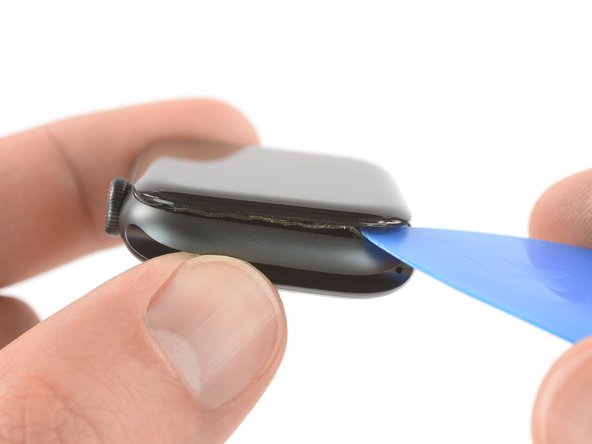
    • バッテリーを取り出すのに十分なスペースができるまで、慎重にスクリーンを後ろ側に開きます。

    • スクリーンを後ろに折りたたむときにディスプレイケーブルに張力をかけないでください。

    • 開口ピックをバッテリーとTaptic Engineの間に差し込みます。

    • 通常の開口ピックは、Apple Watch Series 4の44mmバージョンで対応できます。ただし40mmバージョンを作業中、十分なスペースがない場合は、ハサミで開口ピックをカスタマイズしてサイズを調整してください。

    If you are just replacing the screen then there is no need to remove battery.

    anonymous 1930 - 返信

    When removing the screen I tore the two outer cables attached to the lcd screen. What are their purpose? I read somewhere they are just some sort of shield. Will my watch function normally without them?

    thanks

    Mike Bahlman - 返信

  9. Apple Watch Series 4 スクリーンの交換: 手順 9、 3の画像 1 Apple Watch Series 4 スクリーンの交換: 手順 9、 3の画像 2 Apple Watch Series 4 スクリーンの交換: 手順 9、 3の画像 3
    • バッテリーの端に沿って開口ピックをスライドして、接着剤を緩めます。

    • バッテリーに使用されているのは柔らかい接着剤です。 ただし、バッテリーをこじ開けにくい場合、温めたiOpenerをWatchの背面に置いて、接着剤を柔らかくします。 iOpenerは、少なくとも2分間のせてください。

    • 一定の安定した力で、バッテリーをゆっくりと持ち上げ、システムボードに固定している接着剤から離します。

    • ディスプレイケーブル、特にバッテリーの一角を覆っているForce Touchケーブルに注意してください。

    • バッテリーを損傷した場合、発火する危険性があるため、バッテリーに穴を開けたり変形させないでください。

    • まだバッテリーを外さないでください。 Watchのアセンブリに繋がったままです。

  10. Apple Watch Series 4 スクリーンの交換: 手順 10、 2の画像 1 Apple Watch Series 4 スクリーンの交換: 手順 10、 2の画像 2
    • 75度の角度までバッテリーを慎重に持ち上げます。

    • ピンセットを使って、バッテリーコネクタを覆っているメタルプレートから黒いステッカーを剥がします。

  11. Apple Watch Series 4 スクリーンの交換: 手順 11、 1の画像 1
    • Y000(1.2mm)ネジを外します。

  12. Apple Watch Series 4 スクリーンの交換: 手順 12、 2の画像 1 Apple Watch Series 4 スクリーンの交換: 手順 12、 2の画像 2
    • ピンセットを使って、バッテリーコネクタを覆っているメタルプレートを外します。

  13. Apple Watch Series 4 スクリーンの交換: 手順 13、 2の画像 1 Apple Watch Series 4 スクリーンの交換: 手順 13、 2の画像 2
    • スパッジャーの先端を使って、バッテリーフレックスケーブルの接続を持ち上げて、外します。

  14. Apple Watch Series 4 スクリーンの交換: 手順 14、 2の画像 1 Apple Watch Series 4 スクリーンの交換: 手順 14、 2の画像 2
    この手順で使用する道具:
    Tesa 61395 Tape
    $5.99
    購入する
    • バッテリーを外します。

    • 新しいバッテリーを装着する前に、バッテリーについている保護ライナーを剥がしてください。

    • 破損したり変形したバッテリーを再インストールしないでください。潜在的な危険が潜んでいます。

    • 古いバッテリーを再利用する場合は、接着剤を再利用して、バッテリーを固定してください。あるいは、イソプロピルアルコールと糸くずの出ない布で古い接着剤を取り除き、Tesa 61395などの両面テープの小片、またはE6000などの液体接着剤を少量使用します。

  15. Apple Watch Series 4 スクリーンの交換, スクリーンの取り外し: 手順 15、 2の画像 1 Apple Watch Series 4 スクリーンの交換, スクリーンの取り外し: 手順 15、 2の画像 2
    • ディスプレイコネクタを覆っている黒いフォイルは大変デリケートで切断しやすいです。これを剥がすには、高濃度のイソプロピルアルコールもしくはiOpenerが必要です。

    • 高濃度のイソプロピルアルコール(濃度90%以上)を綿棒に少量含ませて、黒い接着フォイル上に塗ります。接着剤に浸透するまで約2分間待機してください。

    • あるいは、温めたiOpenerをスクリーンの上部にのせて、接着剤を柔らかくします。iOpenerを少なくとも2分間のせてください。

  16. Apple Watch Series 4 スクリーンの交換: 手順 16、 1の画像 1
    • ピンセットを使って、ディスプレイケーブルコネクタを覆う3本のテープを慎重に剥がします。

  17. Apple Watch Series 4 スクリーンの交換: 手順 17、 3の画像 1 Apple Watch Series 4 スクリーンの交換: 手順 17、 3の画像 2 Apple Watch Series 4 スクリーンの交換: 手順 17、 3の画像 3
    • ピンセットの片側を使って、スクリーンの背面側にある3つのZIFコネクタを慎重に開きます。

  18. Apple Watch Series 4 スクリーンの交換: 手順 18、 3の画像 1 Apple Watch Series 4 スクリーンの交換: 手順 18、 3の画像 2 Apple Watch Series 4 スクリーンの交換: 手順 18、 3の画像 3
    • 先が鋭利でないピンセットを使って、スクリーン背面側にケーブルを装着している黒いフォイルをサイドから剥がします。

  19. Apple Watch Series 4 スクリーンの交換: 手順 19、 3の画像 1 Apple Watch Series 4 スクリーンの交換: 手順 19、 3の画像 2 Apple Watch Series 4 スクリーンの交換: 手順 19、 3の画像 3
    • Watch本体を持ち上げて、スパッジャーをディスプレイのフラックスケーブルの下に差し込み、残りの接着剤を剥がします。

  20. Apple Watch Series 4 スクリーンの交換: 手順 20、 3の画像 1 Apple Watch Series 4 スクリーンの交換: 手順 20、 3の画像 2 Apple Watch Series 4 スクリーンの交換: 手順 20、 3の画像 3
    • ディスプレイのフレックスケーブルをZIFコネクタから慎重に引き抜きます。

    • この手順の間、Watchの本体だけを引っ張るのではなく、ディスプレイフレックスケーブルをしっかりと手で持ちながら引き抜いてください。ディスプレイケーブルを切断してしまう恐れがあるためです。

    • Wachのアセンブリとスクリーンを取り外します。

  21. Apple Watch Series 4 スクリーンの交換, スクリーン: 手順 21、 3の画像 1 Apple Watch Series 4 スクリーンの交換, スクリーン: 手順 21、 3の画像 2 Apple Watch Series 4 スクリーンの交換, スクリーン: 手順 21、 3の画像 3
    この手順で使用する道具:
    Adhesive Cleanup Kit (Set of 12)
    $4.99
    購入する
    • 次の手順では、Watchの再組み立てを始める前に接着剤を交換するための作業です。

    • 高濃度のイソプロピルアルコール(90%以上)を綿棒に少量含ませるか、クリーニングパッドを使って、Force Touchガスケット上部の接着剤を綺麗に除去します。

  22. Apple Watch Series 4 スクリーンの交換: 手順 22、 1の画像 1
    • ピンセットを使って、ブルーの保護フィルムを交換用接着剤から慎重に剥がします。

  23. Apple Watch Series 4 スクリーンの交換: 手順 23、 3の画像 1 Apple Watch Series 4 スクリーンの交換: 手順 23、 3の画像 2 Apple Watch Series 4 スクリーンの交換: 手順 23、 3の画像 3
    • ディスプレイケーブル上に交換用接着剤を対角に配置します。

    • Force Touchガスケット上部に交換用接着剤を装着します。

  24. Apple Watch Series 4 スクリーンの交換: 手順 24、 1の画像 1
    • スパッジャーの先端を使って、接着剤の位置を最終確認しながら、内側に押し込んで装着します。

    Don’t remove the blue protective film until you’ve got the screen connected to the ribbon cables. You’ll almost guaranteed to need a third hand to get the ribbon cable back in. Don’t forget to flip up the connector locks on the case side and flip them back down after inserting the cable.

    anonymous 1930 - 返信

終わりに

Apple Watch Series 4 を再組立する際は、これらのインストラクションを逆の順番に従って作業を進めてください。

e-wasteを処理する場合は、認可済みリサイクルセンターR2を通じて廃棄してください。

修理が上手くいきませんか?トラブルシュートのヘルプはアンサーコミュニティを参照してください。

34 の人々がこのガイドを完成させました。

以下の翻訳者の皆さんにお礼を申し上げます:

en jp

87%

Midori Doiさんは世界中で修理する私たちを助けてくれています! あなたも貢献してみませんか?
翻訳を始める ›

作成者

4人の作成者と共同で作成されました。

Dominik Schnabelrauch

メンバー登録日: 11/23/16

204,319 ポイント

682のガイドは作成済み

チーム

iFixit iFixit人のメンバー

Staff

135 メンバー

17,277のガイドは作成済み

17 件のコメント

Do not buy does not come with all the pieces needed to make the screen repair all the connections are not possible

jachs780 - 返信

Can you tell me what the black adhesive tape with flex ends that covers the flex ribbons is used for and can it be replaced ?

Sheila Blackwell - 返信

That is for shielding and grounding purposes. If you get a spare you can of course replace it. But be careful not to damage the display cables.

Tobias Isakeit -

Sheila, this you can purchase on Aliexpress. i tried to get it elsewhere, seems noone else stocks it. cost approx $10. i found it here: https://www.aliexpress.com/item/10050019...

palokiller -

I have replaced an original screen from another apple watch and everything seems to have gone well. But when I try to pair with the iphone it doesn't succeed. Is it because I didn't put the NFC chip from the original apple watch? What can be?.

It is an apple watch series 4 44 mm + cellular.

Thank you very much.

ihsack - 返信

I would like to change the screen of my smart watch series 4. Could you tell me all the tools I need? Will the battery I have stop working? Thank you.

Asiel AD - 返信

Do you have to replace the black flex ribbons when preparing the apple watch or can you leave them out?

Meghan McNeely - 返信

Very difficult repair, indeed. Be very careful about the side wires, they can be very easily be cut when opening the screen. I just hope having a contact supper to supper will be enough… Response in some hours.

This tutorial could be completed with an advice about how to bring the screen wires back to their connectors. That was the most difficult part for me. I was afraid to cut or destroy them.

Concerning the parts, I found the adhesive ring very thick compare to the adhesive I had to remove. What I had as parts did not correspond to what was shown in the repair tutorial. The watch is getting pressed now so I can’t judge if the adhesive is ok or too thick.

It was also very difficult to separate to only get the ring.

Anyway, thanks for this tutorial. Without it, impossible to repair the first time.

panazyde - 返信

Sorry for replying after such a long time: I have cut the smaller side wires (both, I'm very proud of myself ;) ), did you have any problems using the watch with such wires cut? It seems very difficult to find replacement parts for such components.

matbottin -

Replaced screen and testing before closing everything back up. Screen comes on, but it doesn’t respond to touch. Is this due to a cable not connecting properly, or is this a bad screen? Comes on and looks great, but not touch responsive. -dw

Andrew - 返信

Hi Andrew, yes, there might be a cable not sitting correctly in its connector. Those tiny cables are hard to handle and need to be inserted all the way in their connectors. Hopefully that solves the issue.

Tobias Isakeit -

Quick question: the two wire cables at the sides of the black foil (Step 18) are of any use? I have broken mine (both) while opening the watch, and I am wondering if I have to throw everything in the garbage (I was replacing the battery) or I can still use the watch after battery replacement (I have to order the battery yet)

matbottin - 返信

Pareil les 3 connecteurs impeccable mais un des deux stickers aux extrémités s'est cassé ... Est-ce pour cela que ma montre ne s'allume pas ?

Baptiste LUCK -

Bonjour, j'ai respecté toutes les étapes une par une ... Et rien ne se passe dans ma montre ... Montre non utilisée pendant plus d'un an du coup j'ai choisi de changer la batterie ... Rien de plus ... La montre "chauffe" donc la charge semble fonctionner mais l'écran est noir et aucun éclair ou autre a l'écran ^^

Baptiste LUCK - 返信

Are there any news on Apple Pay function after replacing the screen? As I can remember at some time there was a disclaimer at this guide that there is currently no easy fix to get NFC and Apple Pay working after replacement. I thought if only changing the screen it's 100% not working but now it sounds like it could succeed or not. Is that right?

Albert - 返信

We haven’t tested it recently. So all we can say is in the introduction:
"Replacing the display can cause issues with Apple Pay. If possible, to reduce the likelihood of problems, delete all your Apple Pay account info before the replacement, and then re-enter it with the new display installed."

Tobias Isakeit -

Oh boy I'm not exited for this repair... Hopefully it goes well...

Crosby Grim - 返信

コメントを追加

統計データ:

過去 24時間: 69

過去 7 日: 433

過去 30 日: 1,870

今までの合計 132,518