-
-
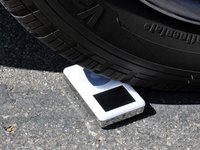
始める前に何を分解するか決めましょう。下の例は分解できませんのでご注意を!
-
ペットのプードル犬
-
おじいちゃんのペースメーカー
-
プラトニウムを含んだデバイス
-
映画トランスフォーマーにでてくるコンボイ
-
次に分解するものを入手しましょう。iFixitでは環境に優しい方法で(徒歩か自転車)でお店へ出向くことを推奨します。
-
もし必要であれば長蛇の列の最前列を確保できるようお店の端にキャンプテントを設置してもよいかもしれません。
-
-
-
-
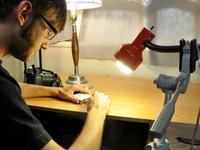
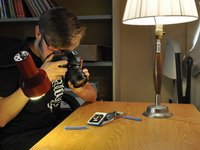
次に、撮影スペースとその環境を設置します。
-
照明はよい画像をとるために欠かせないものです。ランプを設置して、作業場周辺を照らしてください。
An example of my own lighting setup can be found here: An example of a lighting setup
I find that clear, hi-res PCB images are best achieved with a CCD scanner (not CIS).
There are numerous examples here:
http://www.hddoracle.com/viewforum.php?f...
I use a Canon MP370 multifunction printer/scanner/copier.
Hm. How might I write a how to. I kinda have other thoughts. Been doing this for a long time. Perhaps the first, a PDP-11, the mainframe of the day. Now days I take photos for myself with an EOS, Use a custom built bench. Start with the chip data sheets and manufacturer claims and test them. I will send a pic of my workbench if you would like. ; ) Thanks
tldr; Yes. Please do.
- How DO you get such clean bright light and crisp photos ?
- Is there an optimal lighting color(Kelvins) and or minimum flux recommended for taking good 'repair guide pics.'
- IMHO adding some photos of 'photo setups'(^u^) &/or including a lists of useful photopgraphy setup accoutrements would be welcome inline edits to the present 'guide-guide'.
Your humble reader,
TR.
-
-
-
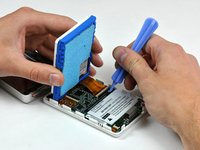
必要な装置が揃ったら、次に実際の解体作業に移ります。
-
解体作業の間、全ての作業をノートに書き留めてください。そしてiFixitコミュニティに共有するため、その作業の様子を撮影してください。
-
より良い作業画像を撮るには、作業台の下に白いシート状の紙を敷いてください。
-


デバイスを再度組み立てるためには、逆の順番に従って行なってみましょう。
デバイスを再度組み立てるためには、逆の順番に従って行なってみましょう。
227 の人々がこのガイドを完成させました。
以下の翻訳者の皆さんにお礼を申し上げます:
100%

Midori Doiさんは世界中で修理する私たちを助けてくれています! あなたも貢献してみませんか?
翻訳を始める ›

17 件のコメント
Why do I ALWAYS have one screw that strips and won't loosen or tighten, one that is obviously lost in a interdimensional black hole, and weird extra parts when I finish. Or the most vital, irreplaceable, Jesus part breaks, shorts out or disappears? LOL
Because lots of machines have more parts than they need. It was suggested by Japanese motor cycle designers and manufactures that the British motor bike industry failed because they just put too many parts in their products and when copiers start they take apart the item and try to reduce the total number and reduce the costs increasing the profits
Mark Fort Te Teko NZ
nashi -
Is a teardown of an old, broken device OK? (I have an LG Optimus L7II with a busted LCD)
Totally! A broken device is a safe pick, you don't need to worry too much about breaking it more, and you might figure out how to replace the broken components!
Absolutely! Tearing down broken devices is how we learn what makes it tick. Even if you will never never ever get the device working again, the exploration is so worthwhile! Just always be careful with sharp and/or pointy tools. Sometimes tools slip when applying force, so I wear mechanic’s gloves for a little extra protection for my hands, especially when glass or displays are being removed.
I have a evolve 2 one touch alcatel with only 4 screws to teardown.
While working on devices and prop replicas, I've found the following useful, even if NOT creating an iFixit teardown:
* Take pics of your steps and the screws, so that when you're faced with reassembly, you have a photo record of which screws went in which hole.
* Keep screws in separate containers, or little Ziploc parts bags (available at hobby and crafts stores, super cheap).
* Mark the individual parts containers or parts bags with a Sharpie, for what the screws are for (e.g. kybd, motherboard, palm rest).
As with dismantling anything, it's best to set them out as you taken them off in some sort of reference grid. Or at the very least a photo of what you took off so when you come to that last weird screw that doesn't seem to belong anywhere, all you need do is back track your photos or look at where it came from and where it was left on your reference grid when you took it off.
It pays to prepare, I have a drawer full of "extra" screws, left over prior to finally slowing down and noting where I was putting things and from where they had just been removed.
This is made of win. :D
Quick, cheap and easy tip: Take a fresh sheet off a lint roller, tape it tacky-side up to your work space or a clipboard. Now you have an easy place to put your screws! And they won't roll away! Group them and write the step number with a sharpie for reference.
A better use for the pill organizers you can get for a buck will work perfect for placing those tiny screws and keeps them separated, you can label the lids 1, 2, 3, etc. When ready for them open lid 1 when you need the screws for step 1 and so on.
por que meus parafusos parecem ser uma sujeirinha num piso extremamente branco
villaspark - 返信
I think a video tear down of various devices would be better. I don’t mind doing a tear down video of a toshiba laptop and uploading it here if possible
Hey shemzy20, you’re more than welcome to post a video teardown! The same photo and procedure guides still apply, you’ll just upload a video to the introduction of the guide instead of individual steps. Best of luck and happy fixing!
another solution for those pesky screws that tend to get lost is to use all those refrigerator magnets that your appliance repair men left behind from their last visit, you could glue several of them to a piece of cardboard, cloth, wood etc, or just buy the iFixit protech kit, it comes with a magnet plate
Do I have this right? The purpose of a teardown is to discover how to take a product apart and get inside without destroying it —and so you can put it back together. So the purpose of a teardown is not to troubleshoot a specific defect. That is what a repair guide is for. I’m seeing this as Part 1: Teardown. Part 2: Write a repair guide. What do you think?
Hey John, that’s about right!
We consider teardowns to be an exploration of the device—its design, repairability, and the procedures needed to get in. After a teardown you’ve got more experience to make guides to address hardware problems. Troubleshooting should start with software things (have you tried turning it off and on again) and then move into hardware replacements using the guides the teardown helped create!