はじめに
Sieben Jahre sind vergangen, und endlich hat die Sony Playstation die 4 auf die Verpackung bekommen. Begleite iFixit beim Zerlegen und Nachschauen, was sich geändert hat - und ob sich das Warten gelohnt hat. Wir machten einen Ausflug zu unseren Komplizen bei Chipworks und haben gemeinsam eine der ersten Konsolen in Nordamerika erwischt.
Erhalte die neuesten Nachrichten aus der Reparatur- und Teardownwelt via Instagram, Facebook und Twitter.
必要な工具と部品
ビデオの概要
-
-
Ne, wirklich, wir nehmen jetzt die PlayStation 4 auseinander. Wir hoffen auf folgende Teile zu stoßen:
-
8-Core AMD “Jaguar” x86-64 CPU
-
1.84 TFLOPS, AMD Radeon Graphics Core Next Engine GPU
-
8 GB GDDR5 RAM
-
500 GB entnehmbare und aufrüstbare Festplatte
-
802.11 b/g/n WiFi und Bluetooth 2.1
-
USB 3.0 + Ethernet 10/100/1000
-
1,21 Gigawatt Flux Kondensator (okay, das ist eher ein Punkt auf der Wunschliste als real)
-
-
-
Was muss das für eine Hardware sein, die sieben Jahre Entwicklungszeit hinter sich hat? Wir können die Verpackung nicht schnell genug öffnen. Zum Vorschein kommt:
-
Noch eine Schachtel. Wir graben weiter.
-
PS4 Konsole (wenn die bei dir fehlt, dann gehe zu deinem Sony Computer Entertainment Händler)
-
DualShock 4 Kontroller
-
Netzkabel
-
HDMI Kabel
-
Micro-USB Kabel
-
Mono Headset mit Mikrophon, Schalter und Krawattenclip
"Jim Washburn was an ex college coach. He'll get on his motorcycle and drive from Coast to Coast; and if he sees anybody that looks like a big, explosive pass rusher, he'll pull over and work em out."
- The Coach (Jon Gruden)
-
-
-
Wir bei iFixit sind starke Gegner der Black Box Mentalität. Was so im Inneren von Unterhaltungselektronik vorgeht sollte Allgemeinwissen sein. (Und kein irreparables Geheimnis. )
-
Sieben Jahre Entwicklungszeit bringen der PS4 ein unverwechselbares Gehäusedesign, eine Reihe von Leuchtanzeigen und ein etwas vornehmeres Markenzeichen wie bei der letzten Ausgabe.
-
Wir sehen auch:
-
Blu-ray/DVD Einzugsschlitz
-
Zwei aktive USB 3.0 Anschlüsse
-
Einige Aufdrucke preisen die Kumpel der PlayStation an — HDMI, DTS, Dolby und Blu-ray.
-
-
-
Jetzt, wo du deinen glänzenden neuen Monolith ausgepackt hast, möchtest du ihn auch an irgendwas anschließen. Auf der Rückseite sind ein paar Anschlüsse sichtbar:
-
Netzanschluss
-
Digitaler optischer Audioausgang
-
HDMI
-
Ethernet
-
Proprietärer AUX-Anschluss für einige externe Geräte, wie z.B. die PlayStation Kamera.
-
-
-
Aus der Gerüchteküche gibt es Berichte über einige Probleme der PlayStation 4s.
-
Kotaku berichtet über ein Hardwareproblem, bei dem die PS4 kein Signal an das Display ausgibt.
-
Wie Kotaku schreibt, sollte ein Metallstück im HDMI-Anschluss des Systems bündig mit der Unterkante des Anschlusses sein, war aber stattdessen nach oben gebogen und behinderte einige Kontakte im Anschluss.
-
Dieses Metallhindernis hat tatsächlich einige Kontakte aus dem HDMI Kabel beschädigt — genau das mit der PS4 mitgelieferte.
-
-
-
Wir sind froh, dass Sony "Power to the people" mit der Festplatte der PS4 gibt: sie lässt sich durch den Benutzer austauschen.
-
Wir werden demnächst eine Anleitung für diese unerschrockenen Gamer haben, die lieber eine größere Festplatte oder eine schnelle SSD haben wollen — bleib aber jetzt erst mal ruhig, alles was zwischen dir und dem Festplattennirvana steht, sind ein Plastikdeckel und ein paar Schrauben.
I don't have the part that you can open and there is no where else I could possibly open it
If it aint raining, boy, we aint training!
Am I right?
How bout it?
You ever wing-finger a wench? Buffalo style?
-
-
-
Die 5400 RPM, 500 GB, SATA II mechanische Festplatte kommt raus, zugeliefert von HGST (eine Tochter von Western Digital).
-
Mit nur einer Befestigungsschraube am Festplattenrahmen wird der Austausch zum Kinderspiel.
-
Diese Festplatte ist nicht nur austauschbar, es handelt es sich um eine 2,5" (also Laptop-Größe) SATA Platte, das bedeutet, dass du für den Ersatz zu einer beliebigen Platte aus dem Regal greifen kannst, so lange sie folgende Standards einhält: nicht dicker als 9,5 mm und nicht kleiner als 160 GB. Freue dich, Nutzer!
Yes you can use external storage now
-
-
-
Wir graben uns etwas tiefer hinein, die bösen Aufkleber mit ihren Drohungen gegen Reparieren übergehen wir einfach mit Hilfe unserer treuen Pinzette…
-
...nur um gleich mit etwas lästigen Torx Security Schrauben konfrontiert zu werden.
-
Spezialschrauben sind für uns zum Glück kein Thema, wir holen schnell unser Pro Tech Screwdriver Set raus.
-
Wir sind ja zufrieden, dass wir an dieser Fliegenfalle nicht hängen bleiben, der Übeltäter wird aber doch bemerkt und in die Reparaturbewertung eingerechnet.
Some PS4 models only have the two (stickered) screws I. The middle the top cover is held in place with 2 tor’s screws under the black plastic hard drive section cover that is removed near the start
You cracked the code
-
-
-
Wir unterbrechen unseren Teardown für folgende Durchsage:
-
Das üble anti-repair Imperium verbreitet Propaganda gegen dein Recht auf Zerlegen, Ändern, Verbessern, Individualisieren und was du sonst auch immer damit machen willst. Es gehört dir!
-
Es ist eine Falle! Diese Propaganda behauptet zwar umweltfreundlich zu sein, wir zweifeln aber sehr daran, wie gut sich dieses Gerät recyclen lässt.
-
Wir brauchen dich — steh auf für die Revolution! Reparieren ist die Zukunft. Es ist dein Recht. Hoch mit dem Manifest und rein in die Repair Allianz!
-
Und nun setzen wir unser normales Programm fort…
-
-
-
-
Wir ignorieren fröhlich das Verbot unserer Betriebsanleitung, und machen weiter..
-
…und entfernen die vier T9 Torx Security Schrauben. Nun können wir die Haube von der Sony Playstation der vierten Generation abnehmen. Unsere Augen weiten sich, als wir sehen, was diese Schönheit brummen lässt.
-
Wir sehen jetzt aber gar nichts, außer dicht gepackten Nostalgiegefühlen, schau mal was sich geändert hat.
-
-
-
In Sonys hauseigenem PlayStation 4 Teardown gibt uns der Chefingenieur Yasuhiro Ootori einen Überblick über den 85 mm Zentrifugallüfter:
-
"Der Luftstrom und der erzeugte Druck, wie auch die Richtung der Luft sind Teil des exklusiven PS4 Designs."
-
In diesem exklusiven Video erklärt unser Chefinformationsingenieur Miroslav Djuric seine eigene Sicht auf dieses Technik-Juwel.
Me said it! It must be true!
ME must be short for “Mechanical Engineer” , and they never do anything wrong. :)
S.N.A.
-
-
-
Unser ferngesteuerter Teardowntechniker löst Schrauben und lässt einige raffinierte Halterungen herauskommen...
-
…wobei er einen hochwillkommenen, eindeutig kanadischen Snack mit unseren Freunden bei Chipworks genießt.
OMG Tim Hortons!!! its been ages since i lay my hand on those...
Where's the birthday cake timbits?
Yes! Extra large triple triple w/ 3 shots please.
-
-
-
Halterungen und Donuts haben die richtige Behandlung erfahren, jetzt holen wir das Netzteil heraus.
-
Kein Stolperstein am Netzkabel — dieses Netzteil ist immer noch gemütlich im Gehäuse eingebaut
-
Dieses Netzteil verträgt eine Wechselspannung von 100-240 Volt. Das heißt, dass du deine treue PS4 rund um die Welt in Betrieb nehmen kannst, du musst nur die richtigen Adapterstecker mitnehmen.
I see it's multi voltage, but did your unit state on the back of the box and the unit that it was 100 ~ 240v ?
My unit only says 120v, both on the box and the unit,it could be that you had a multi voltage unit ?
Please confirm for us all
Many thanks
Mine say 110V. I also wonder if it is dual voltage.
Donald -
Can you specify the exact model you tested in the video and what it says on the rear side regarding the voltage?
I bought in US aunt model CUH-1001A. On the rear plastic it says "120V" only, and the manual for CUH-1001A specifications show also only 120V.
Is this the same model as you tested? If so, I can assume my internal power supply is 100-240V as in the tested unit, if not - I may have to buy a voltage transformer.
OK, I trusted some older posts and plugged it in - happy to say its working great and nothing burned :)
I have a model CUH-1001A saying at the bottom "120V 2.1A 60Hz". Working in Israel on 220V.
Amir -
mine says 100V 50-60Hz I bought it in Japan and using in Eurtope with 220/240VAC
I was really afraid before trying. but i managed thanks to this guide and willing to play!! it works! it is definetly dual voltage.
they make them all the same, i guess in the same factory in China, i am wondering about the Blue ray disc, does the region depends by the hardware or the software (i guess the second one) i haven't tryed it yet
Hey i just picked up a PS4 from Japan...CUH 1201B Model...on the box and on the back of the PS4 its clearly written 110v....pls can someone confirm if its actually duel voltage.....these posts are about 3 years old...has someone tried it recently......
hooghan -
i wouldn"t chance there are adapters out there this website is too concerned with canadian doughnuts to tell you there are two screws to remove the psu casing i don't think these people care if you are trying to affect you own repair rather than give money to sony or if your trying to cleanout your fan and any other area that is dust related which isn't fair to the (if you will "not so knowledgeable") consumers of the this website.
and to be clear by not so knowledgeable i meant people who aren't electronically inclined
-
-
-
Netzteil, noch bist du diesem Teardown nicht entkommen. Los, gib deine saftigen Geheimnisse preis!
-
Wir schälen das Netzteil aus seinem Gehäuse heraus und sehen, was wir erwartet haben: große Kondensatoren, aber keiner ist der erhoffte Flux-Kondensator.
-
Sieht so aus, als ob dieses Netzteil sich zeitlich nur nach vorne bewegen kann (Seufz)
-
Endlich, jetzt wo das Netzteil ausgebaut ist, kannst du den Lüfter reinigen.
There is a danger here for little kids. The 120 volts for the power supply readily accessible to little fingers and probing metal tools like coins in the hands of children. The ends of the 120 volt wires are exposed, the fuse is exposed which will have 120 volts on BOTH ends, the capacitor is right there along with the power transistors, choke coils, and other things, including the transformers. Many will still be live even when the console is turned off.
Make sure to unplug the unit when there are small children around and the unit is sitting out in the open. When using it, put the back away from where little fingers can reach it.
That’s one of the reasons so many products are “not user serviceable”. So you can’t fail against them when you electrocute yourself. ;)
John clark - 返信
I just got a little shock
jordan28.r - 返信
Name part ? That
-
-
-
Das Blu-ray/DVD Laufwerk steht als nächstes auf dem Programm, es ist mit einigen Schrauben befestigt.
-
Unglücklicherweise ist die PS4 NICHT rückwärts kompatibel zu PS3, PS2 oder PS1 Spielen. Dieses Laufwerk kann zwar deine alten CDs ins Rotieren versetzen, aber abspielen kann sie es nicht.
-
Komischerweise spielt es noch nicht mal Musik-CDs ab. Das scheint aber nur eine reine Softwareeinschränkung zu sein, die Sony in einem späteren Update beheben will.
-
Aber wer braucht eigentlich noch CDs, jetzt wo wir eine die Rechenleistung der Cloud zur Verfügung haben?
-
Weil das so ist, plant Sony einen Streaming-Dienst ab 2014 zu starten, betrieben unter Gaikai Technik, mit dem du PS3 Spiele auf der PS4 ausführen kannst. Alle Prozesse laufen in Sonys Cloud-Servern ab, nur das Videosignal wird auf deine Konsole übertragen.
-
Alles recht und schön, was uns aber wirklich interessiert: können wir Crash Bandicoot spielen?
-
-
-
Dies ist Geschichte eines optischen Laufwerks und seiner Leiterplatte... Sei dabei auf der Entdeckungsreise und finde heraus, woraus sie gemacht sind.
-
Wir fanden einige ICs auf der Leiterplatte des optischen Laufwerks:
-
Renesas SCEI RJ832841FP1
-
Mitsumi 312 3536A
-
ROHM BD7763EFV 325 T62 Motortreiber IC
-
STM8ED 9H A07 VG MYS 331Z
So, is the optical drive a custom-built Sony component, or is it manufactured by someone else?
Mylar connectors. I HATE Mylar connectors. They are flimsy, prone to popping out when shipping, and are great for making intermittent contacts. The are also hard to get in and out without destroying the wire, the socket, or both.
The pins in my optical drive were not aligned so I disassembled it and realigned the pins. However when I put it back together my ps4 is not turning on
I lost my screws to fix my
Laser deck do you know what screws I need?
Hey there, this is a teardown, not a repair guide, check out our repair manual for the PlayStation 4. You can follow the optical drive replacement guide to find out more about the screws you need, step 12 has the screws I think you're talking about.
I cant seem to find anyway to get new rollers from
-
-
-
Auf der Suche nach der Hauptplatine rupfen wir einige Schrauben raus, mit denen das Gehäuse zusammengehalten wird.
-
Wir lösen Schicht für Schicht ab, wie wenn wir an einer alten Bude von 1960 arbeiten würden.
-
Gleich kommt die Hauptplatine, gleich!
The top cover can be a little stubborn. There are locating clips on the edge opposite the screws that like to hang on. Use the force..
-
-
-
Hat lange gedauert, wir haben es aber geschafft das berühmte Aktenköfferchen mit Hirnpower zu knacken und den Schatz zu heben.
-
Nicht so wie in den immer dünner werdenden Handgeräten glänzt die PS4 mit einer aufgeräumten, hügeligen grünen Fiberglasebene.
-
-
-
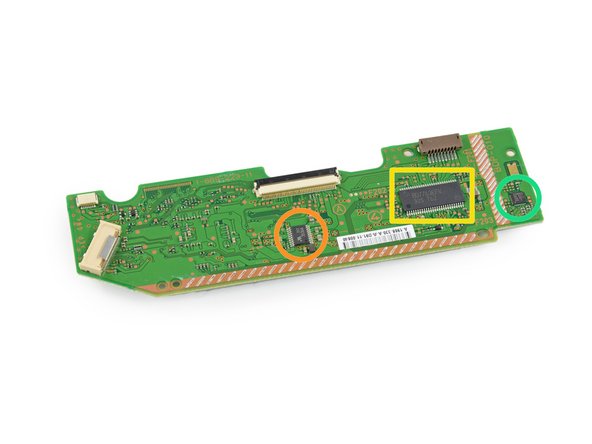
Felder voller frischer ICs warten aufs Gepflücktwerden:
-
SCEI (Sony Computer Entertainment, Inc.) CXD90026G SoC (mit AMD "Jaguar" Cores und AMD Radeon GPU)
-
Samsung K4G41325FC-HC03 4 Gb (512 MB) GDDR5 RAM (insgesamt 8 x 512 MB = 4 GB)
-
SCEI CXD90025G Zweit-/Low Power Prozessor für das Netzwerk
-
Samsung K4B2G1646E-BCK0 2Gb DDR3 SDRAM
-
Macronix MX25L25635FMI 256Mb serieller Flashspeicher
-
Marvell 88EC060-NN82 Ethernet Kontroller
-
SCEI 1327KM44S
Per Chipworks, the 2 Gb (256 MB) DDR3 is used by the dedicated network co-processor. That also seems reasonably apparent from the board layout.
Look at step 21, the other memory chips are on the board's underside.
Where is the temperature sensor?
Seems lime there a samsung fan and scei fan
There are little gray rubber-like things on the RAM… if one of these is missing will it affect anything??
-
-
-
Auf der anderen Seite sollen die ICs ja immer grüner sein...
-
Genesys Logic GL3520 USB 3.0 Hub Controller
-
Samsung K4G41325FC-HC03 4 Gb (512 MB) GDDR5 RAM (insgesamt 8 x 512 MB = 4 GB)
-
International Rectifier 35858 N326P IC2X
-
Macronix 25L1006E CMOS Serieller Flash Speicher
-
39A207 1328 E1 3FU
-
-
-
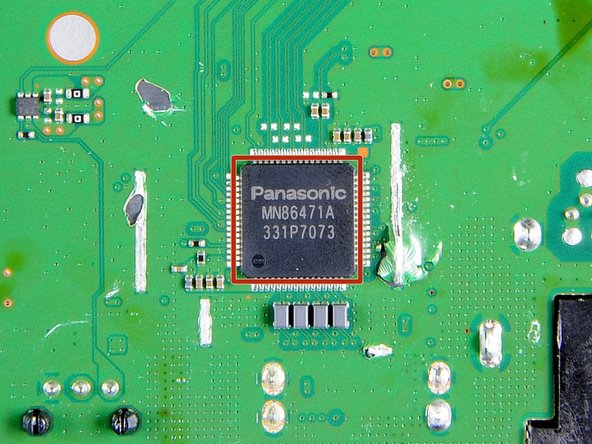
Du möchtest wissen, was hinter dem ersten Türchen ist?
-
Panasonic MN86471A HDMI Kommunikations-LSI
-
Und hinter Türchen Nummer zwei?
-
Marvell Wireless Avastar 88W8797 7 Integrierter 2x2 WLAN/Bluetooth/FM Single-Chip SoC
-
Skyworks 2614B 315BB
The Panasonic chip is the HDMI 1.4 transmitter. The HDMI 2.0 version is MN864777.
The linked details suggest that the Marvel chip supports Bluetooth 4, but PS4 specs only say 2.1. Possible for Sony to update this in a later software update?
I would suppose so. We'll have to see about that. So the Marvel chip supports BT LE (Low Energy). That's kinda interesting. Would be awesome for external accessories such as heart rate monitors and different sensors.
Rob Ban -
Look at picture n°1 ... is the board damaged ?? wtf ..
They had to take a metal shield off to see this chip, not surprising if that caused some damage.
frandom -
Sorry but there's a ton of damage around the Panasonic IC and on the Marvel daughterboard... In this condition, it looks like at the very least you'd have a hard time playing HDCP content and connecting the controllers wirelessly?
Is this damage from Chipworks or is this something that occurred during initial take-apart; that is to say, is this something that would happen if one tried at home?
Since they aren't identified previously, its hard to understand how they end up in this condition.
...I vote that iFixit demonstrate how the take-aparts posted affect the product functionality by documenting reassembly and restored function. Without that, the scores only represent how easy it is to disassemble a device.
As far as I can tell the damage is because metal shields that were covering the chips have been removed so that we can see what they are. These shields aren't intended to be removed and aren't relevant to repairability.
frandom -
frandom is correct. Chipworks removed the shields in a quick-n-dirty fashion because we wanted to identify what chips lurked underneath the metal covers. There is no way this PS4 will work afterwards since CW took all the main chips off the board in order to depackage the chips themselves. Consider this PS4 to be sacrificed at the altar of chip investigation.
You could’ve easily avoided all of the board damage if you simply had used a hot air rework station or maybe a soldering iron, some flux and desoldering wick. Sorry guys, but you did a crappy job of removing those shielding cans…
Under normal circumstances you’d be correct, but as Miro mentioned above, board damage is all but irrelevant here since the next step in the analysis is to depackage the individual chips—i.e. remove them from the board, slice them open for a cross-section, grind them down layer by layer, and analyze them under a scanning electron microscope. You can see what the process looks like in our Apple A4 teardown. Trying to keep the board pretty while you harvest all the chips is sort of like asking the demolition crew not to get mud on the carpet as they’re wiring up the building with explosives.
-
-
-
Nach Ausbau der EMI-Abschirmung fängt das Gehäuse an etwas leer auszusehen.
-
Die EMI-Abschirmung hielt sich zum Äußersten entschlossen am Kühlkörper fest. Sie war einfach nicht wegzukriegen.
-
Glaube uns. Wir haben es versucht. Sie hat sich gewehrt.
-
Heftpflaster geben nicht grade die schönsten Teardownfotos, wir tragen aber unsere Reparaturblessuren mit Stolz.
-
Unser ehrenwerter Teardownmärtyrer kommentierte dazu nur: "Diese EMI-Abschirmung ist super, zum Beispiel als Käsereibe."
-
-
-
Und endlich, der größte Lüfter der PS4!
-
Schönheit ist die eine Sache, aber dieser Lüfter ist entwickelt worden, um intelligenter und ruhiger zu laufen, als die keuchende Windmühle in der PS3, die langsam hoch und runterfahren musste, um die Lautstärke niedrig zu halten.
I wonder what the weight tolerances are if someone would press on the top of the console and possibly damage the fan. I wonder if that is what causes most blue light flashing issues? Any way someone could test that?
hi i recently bougth a ps4 slim 1tb CUH 2016B model. It camed with the cooler broken so i have to replace it. Ive been looking on ebay and i cant find that model of cooler (it looks the same as the one on the video) so im wondering if i could replace it with the cooler of the ps4 CUH-1215A. What do you recomend? What model of cooler will work with a ps4 CUH 2016B? Thanks
There's also the part you should note: The PS4 fan runs like a jet engine, and a boring 747 produces less noise
I need to replace the power supply of the fan (the 3 pin part from the motherboard), but I don't know the part number or how to search for it. My PS4 model is CUH-1004A. Can you please help me? Thank you
-
-
-
Jedes neue Elektrogerät von Rang muss sein eigenes Skandälchen haben. Gegen Ende des Teardowns möchten wir unsere eigene Sicht auf den Skandal, genannt Wobblegate, bzw. Rüttelgate geben.
-
Wir bestätigen: Jawoll, sie rüttelt wenn du draufdrückst.
-
Die Lösung: Drück nicht drauf.
-
-
-
Der Teardown ist zum Abschluss gekommen. Wir werfen alle Teile siegreich auf einen Haufen.
-
Aber dann ordnen wir das Ganze doch ein bisschen, da unsere Mütter zuschauen.
-
- Es gibt keinen Kleber, das macht das Zerlegen und Zusammenbauen einfach.
- Die nicht proprietäre Festplatte ist leicht zu erreichen und auszutauschen, der Ausbau verletzt nicht die Garantie.
- Sicherheitsschrauben und Originalitätssiegel halten Benutzer davon ab, ihre PS4 zu zerlegen und zu reparieren.
- Zum Reinigen des Lüfters muss ein Teil des Gerätes zerlegt werden, ein noch größerer Teil für den Komplettaustausch.
- Wenn du nicht aufpasst, kann die scharfkantige Mittelplatte deine Finger verletzen.


まとめ
リペアビリティのスコア


(10点が最も修理しやすい指標です)
以下の翻訳者の皆さんにお礼を申し上げます:
100%


これらの翻訳者の方々は世界を修理する私たちのサポートをしてくれています。 あなたも貢献してみませんか?
翻訳を始める ›

71 件のコメント
extra 256mB DDR3 chip eh? strange design. sat normally everything is upside down in the case.. and the way it sucks air through the power supply, then through the heatsink and up into the case.. guess the hot air blows out of the front? or is there something on the other side of the bottom cover to guide it towards the back? also saw that replaceable cr2032 battery... that will be dead in 4 years and I don't think anyone's gonna be replacing it.. wonder why they didn't stick in a rechargeable one like the dreamcast. or make it a user changeable one like the wii/wii u
Traditionally, blower fans blow air out of a system (hence the name). So no, it isn't drawing air in through the PSU, that wouldn't make much sense.
Also, I've seen plenty of 10+ year old systems with BIOS batteries that are still fine, so I've no idea where you've got that 4 year life from.
Figuring out the airflow of the PS4 is like doing origami. The air comes in from the top of the back and goes out the bottom of the back. There is a aluminum-mobo-aluminum sandwich about a half inch thick in between.
The air come in through the top slots, over and through the bottom of the sandwich as the mobo is upside down. The air cools the sheet, cools the memory chips by little dimples on the sheet and then is sucked through the sandwich by many small holes in the sheet metal and then through the mobo- yes, there are airholes strategically placed on the the mobo! Look by the battery for most of them that are directly over the fan intake.
Now the air comes to the fan intake via those small holes and a couple of vents over the hard drive. The cutouts over the fan intake are particularly strange, square holes, small round holes, L shaped holes. From there it is out the fan across the top sheet, then the CPU/GPU heatsink, again with memory dimples, and out through the hot parts of the power supply.
You may be right John - from the blower design I'd assumed there were vents on the bottom, but there don't appear to be, at least from the unboxing videos I've seen. Having the intake and exhaust right next to each other is traditionally a no-no for cooling, off the top of my head I can't think of any other piece of consumer electronics that does it like this.
the dreamcast DID have a cr2032, in both the console AND the VMU's
Yes, and the DC one was rechargeable. That’s my point.
King -
Can you tell us if the power supply is multivoltage.
Thanks
This just may be the Droid you're looking for.
can i use ps4 with vga port lcd tv ? (just with cable,no converter)
HDMI doesn't support VGA signals, so you're going to have to convert it.
Any determination on sata 2 vs sata 3?
This is I want to know also...
I see that sony are still leaving massive gaps down the side of the Heatsink which does nothing for airflow efficiency. Some models of the ps3 slim were like this and I did an experiment with a jailbroken one so I could see the temps, with the gap blocked off I got a decent drop in temps.
danguy2009 - 返信
Just a heads up.. I had an intercooler attached to my first ps3 and it burned up. On the second one i put a fan behind the system and it never over heated. I just gave it to my grandson after having it for six years and it still works fine. I am doing the same with my new ps4. Bill2208
Never buy a fan that attaches to your PS3 or PS4, i found that it burns your system up. Instead get a small fan and place it behind the unit and it will cool it just fine. I just gave my Grandson Dustin my 6 year old PS3 it still works great...
Is it something regarding about this?
4G is the density of the RAM. Desnity is in bits and not bytes, so 4G bits per chip = 512MB.
There are 8 chips on the top of the board and 8 on the bottom making a total of 16 giving 8GB of GDDR5 RAM.
For an explanation of part number see http://www.samsung.com/global/business/s....
Yes but it has 4 GB of RAM on both sides of the motherboard. 2 x 4 x 512 MB = 8092 MB (8 GB) of RAM.
This is a great picture guide on how to tear it down. I havent seen many places helping find the best hard drive until I found this guide here - http://boxclash.com/ps4-hard-drive-upgra... there are 5-6 hard drives that work with the PS4 that have high reviews
I wonder what the weight tolerances are if someone would press on the top of the console and possibly damage the fan. I wonder if that is what causes most blue light flashing issues? Any way someone could test that?
SONY does away with ALL conventional ways of pulling heat from the console chips. The first is that the CPU/GPU is facing DOWN towards the bottom of the console. The next is that the heatsink is NOT touching the CPU/GPU chip directly and is also facing down in the case. The high speed graphics chips need to be cooled and it is done by dimpling the two sheet metal panels, 16 dimples in all. The ONLY means by which these SEVENTEEN contacts are made is by some sticky stuff on the graphics chips, thermal paste, and TWO SCREWS. Two screws mounted diagonally from each other and the holes can been seen in the mobo. Give this thermal sheet metal sandwich a good twist, squeeze, or bump and some of these 17 contacts are going to be bent, squeezed, or separated. Any non or poor contact will cause the board to measure overheating, stopping the console.
SONY took a big risk in trying to innovate here and it may be the cause of many of the consoles problems. That and Mylar connectors ( I hate Mylar connectors!)
Uh, you might want to take another look at the teardown pictures. Step 23 very clearly shows the underside of the heatsink plate, along with the thermal paste. As with the Xbox One (and other AMD APUs), the GPU is on the chip, so is cooled by the same cooler. As for your concern over only 2 screws being used to secure the cooler, that's really not going to be an issue for a heatpipe-based cooler like this. Massive, heavy copper heaksinks (like some Zalman ones) are secured with similar 2 screw brackets in PCs without any problems.
For me, the real concerns are that the fan draws air in from underneath the console - I wonder how many of these will end up being used while on carpets, and how much dust will end up getting sucked up. Also, that radiator looks awfully small when compared to the one the Xbox has; that either means more airflow is needed (so potentially noisier) or coping with higher temperatures.
Right is the the other poster and wrong am I! The heatsink not only has a cutout for it AND is held down by the two screws but it also has a bump out that makes better contact with the ALU. I am still trying to wrap my head around a screw that goes through a aluminum sheet, the motherboard, another aluminum sheet and into the heatsink is going to prevent the sheets from moving or bending. I would have to play with it to figure that out. Still, not a single chip gets blown on by the fan on the mobo as they are encased in that very thin sandwich.
I find it interesting that it looks like AMD is going back to a (sort of) shim for both the PS4 and Xbox APUs rather than the heat spreader used on current desktop chips. Was this something specified by MS/Sony I wonder, or something AMD decided? Does it result in better heat transfer?
xtcrefugee - 返信
Where abouts are the light emitting diodes on the ps4? I assume they are Smds on the motherboard, but can't quite tell?
need a replacement power supply unit!!! where can i find one?
Our step by step repair guides will have more information about screw sizes than the teardown!
Quick Question, is it a T9 or T8? I see people on eBay selling T8 for the PS4.
Thanks in advance
The screws are T9 Torx Security.
I took mine apart to clean. It wont turn on now. I did my xbox 1 still works perfect
In step 18 you unscrewed the metal plating to get to the motherboard... unfortunately mine has some screws screwed in backwards, so i can only see the threaded parts of them! how can i get them out? is mine the only one with this problem? is it the fault of some chinese Foxconn worker?
Hi there! I suppose it's possible you have a different model with a different screw pattern, but before you panic, check the motherboard replacement guide, this is a teardown and is not meant to be followed as a repair guide!
Quite possibly the worst guide I've seen on here so far.
This is a teardown, not a guide. If you're looking for instructions, you can find them here.
Very good.
Thanks, you save my day.
I have a PS4 with that will not start when you push the on/off button. put it will start when you load a disk in the disk drive. Is it possible to get a replacement for the on / off button?
You guys use to be so good about showing all the locations of the screws. Well, better look elsewhere.... (I have extra screws, and I need to find out where they go!) Now, I see they replaced the time they took labeling the screws and instead tell us what they are snacking on! SMH! Please stop including USELESS information!
Edit: So I see in other comments, that this is a teardown, not a guide. But when I Google "PS4 disassembly" THIS is what comes up first thing. I guess...... MY BAD!
The screws on the back of the ps4 are NOT t9 screws nor are they t8 screws neither one fits both too big. After 2 trips to lowes home improvement to get the correct one at 20 miles each way twice.
Care to share which driver ended up working for you? There is more than one revision of the PS4; this teardown was for the launch version, which may have used different screws.
"This teardown is not a repair guide. To repair your PlayStation 4, use our service manual."
This might be late but - Does anyone know the dimensions of the RAM? Or any links to RAM heatsink on Amazon?
I have this little black gear with a spring I have no idea where it goes please help
Also it came from the disk drive
Looking thru have 4 black Security screws where shall those be placed?? I have bought a torn Down ps4
That bluetooth chip appears to support 4.0, while the pre-slim PS4s controllers only used 2.1 (and had a lot of interference)? Does anyone know if using the V2 DS4 would form a 4.0 link? Was it just controller side that didn’t support 4.1?
Does anyone have an idea of what the heatsink is made out of?
I’m interested in changing/improving the heatsink.
1. Add a “copper shim” between processor and heatsink with one drop MX4 on both sides.
2. Build out the heatsink with parts from a PC processor heatsink or replace it entirely with a PC heatsink and cut it to fit.
Anyone tried 2.?
My USB ports are not working
Hello, my PS4 Model CUH-1267 only has 2 screws on the back. Can you please explain how to open it. Since a few days it won’t start up again. Starting it, I only get a screen saying “connect the dualshock 4 with a USB-cable an next press the PS-key”, which doesn’t do anything. I got it once in safe mode and tried to reinstall everything, but then it crashed again and now I am stuck! Thanks for your support.
Bob
Sorry, I misread the model it should be CUH-1216B.
I wonder if the playstation 4 supports SSD hard disk.
Hello guys, i have a problem with my ps4, I bought a new hdd, it’s a seagate barracuda 1T and when I plug it in the ps4 it says “error CE-34333-6”. But when I start the ps4 without the hdd it says “error CE-34335-8”. I checked on the internet but no solution, it only says that my hdd is open. like the ps4 can do the difference when there is a hdd so it says “error CE-34333-6” and apparently the hdd is open and when there is no hdd and it says “error CE-34335-8”. if anyone here got the same problem please give me some advice :)
The system will always throw error CE-34335-8 if there’s no HDD inserted, it cannot boot without it. Your other error code indicates the new HDD is faulty.
Is the grounding shield necessary that's on top of the power pack
Hola buenas quería hacerles una pregunta yo desmonte mi Ps4 para limpiarla todo bien hasta aquí la volví a montar y funciona bien solo que el mando no funciona es decir si le pongo auriculares el audio no se escucha y en am los juegos el mando hace lo que quiere solo funciona todo si pego el mando a mi Ps4 literalmente tocándola a medio centímetro no funciona que puede ser? Si me pueden ayudar les agradecería les dejo mi mail por si me quieren escribir ahí. Manolitosoft1@hotmail.com muchas gracias de antemano
Some PS4 models only have a single screw on the back where you have 3 in Step 8.
There is a different method to remove the panel, and I don’t know what it is, but using this guide i was not able to complete the teardown
What model do you have? i think you can find it on the package for example, my ps4 (slim even if they don’t say so on the package) is cuh-2116b
best information
I remember the frustration!! Sitting in filth and diarrhea, trying to disassemble my PS4 without any help and it was impossible. Missing a few screws we lost to the filth but the PS4 runs great again. Thank you for all your help!
Tronald Dump - 返信