はじめに
正面カメラ、マイク、その他センサーを含むセンサーケーブルと正面カメラの交換をするにはこのガイドをご利用ください。
このガイドではイヤホンスピーカーが取り外されていますのでご注意ください。再組み立ての際には、忘れずに保管中のイヤホンスピーカーを、交換したケーブル集合体に移してください。
このガイドを使っって、次のパーツも交換できます:'
必要な工具と部品
-
-
青いハンドルをヒンジ側に引くと、リバースクランのアームを解除します。
-
iPhoneの左もしくは右側端に向けてアームをスライドします。
-
吸盤カップをiPhoneの下端付近に装着します。前面と背面に1つずつ取り付けます。
-
吸盤カップ両側をしっかりと締め合わせると、標的の場所にしっかりと装着させることができます。
I found that the single suction cup from the kit worked very well. It didn’t take that much force to separate the front panel from the phone. I think any suction cup that you are able to get a firm grip on will probably work as well. There isn’t any adhesive holding the front panel in. It just snaps in and out. If you have a cracked screen and no screen protector, it may be hard to get a good suction seal. If that’s the case, someone else here suggested applying clear tape to the front glass to get a good surface for applying the suction cup. In my case, I already had a screen protector that was still intact so the suction cup sealed easily.
WORKED PERFECTLY… easy, no harm at all…. thanks a lot
-
-
-
リバースクランプをお持ちでない場合は、シングルタイプの吸盤カップを利用してフロントパネルを持ち上げます。
-
ホームボタンの真上のスクリーン上に吸盤カップを押し当てます。
-
-
-
次のプラスネジをバッテリーコネクターブラケットから取り外します。
-
2.2 mm ネジー1本
-
3.2 mmネジー1本
-
-
-
-
フロントパネルアセンブリーのケーブルブラケットから次のプラスネジを5本取り外します。
-
1.2 mmネジー3本
-
1.7 mmネジー1本
-
3.1 mm ネジー1本
-
-
-
次のプラスネジをイヤホンスピーカー/正面カメラのブラケットから取り外します。
-
2.3 mmネジー1本
-
3.0 mm ネジー1本
-
2.2 mmネジー1本
Can changing the earpiece disable the Touch ID?
I read somewhere that if I change the earphone speaker. It will disable the Touch ID once I put the phone back together. Do I have to sacrifice one of these if I want my earphone speaker to work?
The earpiece speaker itself has nothing to do with Touch ID; a correctly performed repair will leave Touch ID perfectly intact. Touch ID will only be disabled if you damage the home button hardware or the ribbon cable that connects it to the logic board. That cable runs from the home button, behind the display shield, and up to the top of the phone near the earpiece speaker. So yes, if you are unfortunate/careless enough to damage it in the process of replacing your earpiece speaker, that could disable Touch ID, although Touch ID is no different from any other component in that respect! ;)
I completely ripped my home button ribbon, that being attached to the LCD shield/Front Panel (steps 36-38, step 38 to be more precise). I can confirm you CAN replace the shield\attached ribbon cable. This DOES NOT disable touch ID/you do not have to ask Apple to resync the button identifier.
Just to be clear, this is assuming that you do not damage the actual home button assembly steps 29-35.
(My replacement was from a supplier who reclaims parts from iPhones, so it would/should be an Apple original)
-
-
-
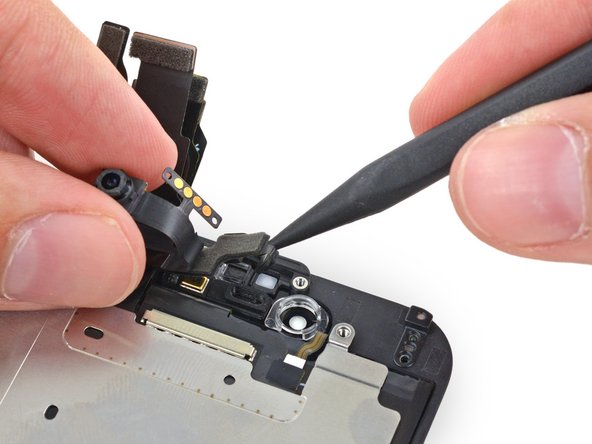
イヤフォンスピーカー/正面カメラのブラケットをフロントパネルから取り外します。
Be sure that the replacement part has a little black squared sponge facing the camera. I have purchased some replacement displays in the past (assembled with front camera) and some of them didn't had that sponge. The result is a front camera not pushed onto the display glass and this will cause backlight leaks into the front camera.
-
-
-
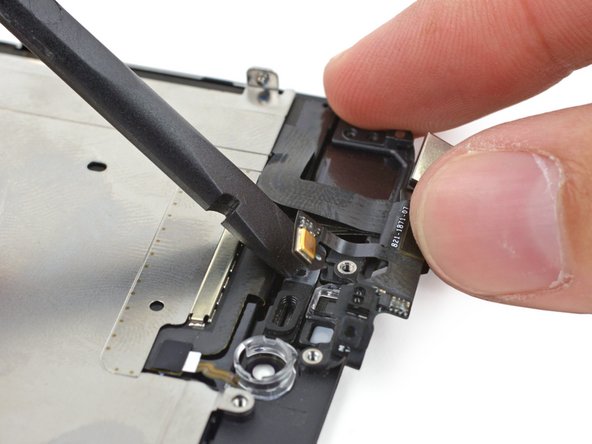
フロントパネルの奥から正面カメラを持ち上げます。
its better to slightly heat the display from front in order to loseen the adhesive which is glued with the strip to display
Be sure to remove the plastic bracket (clear piece) that holds the camera in place from the old screen and add it to your new screen, or else your camera won't seat the right way against the screen and you'll have to take everything apart to place it in.
Take note of where the cable is placed. When I put everything back together my cable assembly was behind the others (as I reassembled this ‘area’ into my new screen before continuing to the home button). As the cable was behind, the four connectors being attached to the main board were not in the right sequence, so I had to manoeuvre them (a bit more fiddly than you would imagine).
-
-
-
正面カメラを固定しながら、イヤホンスピーカーをフロントパネルから取り外します。
Like me, you may have accidentally touched the speaker, springs or 4 gold contacts on the cable. I used the tweezers to remove the speaker but it magnetically got stuck to the tweezers so I removed it with my fingers and accidentally touched the contacts. Use your own judgement, but I've had good results using a tiny amount of 70% isopropyl alcohol on a Q-tip and cleaning these 4 gold contacts and the springs on the speaker piece. Beats replacing the speaker for $25. Perhaps the #iFixitTeam can lend some advice on this step, in addition to the warning about not touching it. :-)
Man, great guide getting to the speaker, but I have to replace the mesh as well. Not sure why we couldn't just include that in the guide since we already went this far! Doesn't seem to be anything too good on google results for this last step either... bah!
I have had problems with two phones after replacing a screen. The sensor that turns off screen when talking does not turn off screen. May this be because i touched this contacts?
That's a problem with your proximity sensor (tiny thing with 2 'eyes'), which is on the same flex cable as the front camera.
Hi Ronny, im having the same problem. have you found a solution for it? if u have, please help me out
It may be that when it was time to remove it from the screen, you put a lot of pressure on the component and damaged it
Make sure the screen that protects the speaker is free of ear wax. It can be stopped up with ear wax and limit the output of the earpiece speaker. About 50% of the ones I have come across this was the cause of low earpiece volume. Use a small nylon hobby paint brush dipped in 91% rubbing alcohol to clean it.
After assembly my speaker didn’t function. However upon checking the flex cable was not snuggly snapped in place. After twice reassembly got it working again. So maybe before cleaning the contacts, check the flex cable connection first.
-
-
-
正面カメラが作業の邪魔にならないように脇へ寄せ、スパッジャーの先端を使いながら環境光センサーをフロントパネルの奥から持ち上げます。
i have a question.
my homebutton cable was broken. so i bought front plate.
and i have original home button too.
so, if i change broken plate and new plate, can i using touch id??
You should actually be commenting in a home button step (such as 30), so you get the right visibility. But if by front plate you mean the display (digitizer, lcd, and front glass) then no, this will NOT fix touch id problems. If the problem is damage to the home button out it's attached cable you are out of luck, as those are unique to each iPhone. However if the ribbon cable (the one attached to the large shield) is damaged, then that is replaceable. A new lcd shield should come with the home button ribbon attached, or you can buy the ribbon separately and just replace that. The shield is much easier to replace and about the same cost.
When replacing, make sure the proximity sensor is replaced correctly and seated fully inside the plastic bracket. Not doing so can cause loss of functionality in the sensor preventing the lcd from turning off when it's supposed to during calls etc.
Could you explain this any further? I recently replaced this because of a bad microphone and now the proximity sensor isn't working. I transferred the plastic/rubber gasket/bracket thingy over. I've disassembled and reassembled the thing 3 times to make sure the sensor is properly seated, no luck. The ambient light sensor for auto brightness works just fine, which I think is actually the one with the plastic part, unless I'm missing something?
Is it possible the new cable assembly just has a bad sensor?
I confirm what you say. Bought a phone with proximity sensor not working. Turns out it didn't have the plastic bracket where you put the sensor in.. :)
I think I’m having the same problem. When I removed the ambient light sensor, the black brick that seems to be the proximity sensor pulled off the cable and I had to pry it off the face. I had a great deal of difficulty lining up the two parts even after getting both of the little liners in place. I’m not sure what I could do to improve the alignment. The speaker, mic and camera are all working fine.
When reassembling, ensure that the plastic bracket for the proximity sensor is removed from your old cable assembly and that you put it with the new cable. I found that if you put the plastic bracket in the recess in the front panel first to ensure that you get it in correctly.
It is crucial that you make sure that the little black plastic bracket around the ambient light sensor is removed with it when lifting it out of the recess. It is very easy to not notice that it stayed in the recess and really difficult to make out any difference between the removed cable and the replacement cable. It took me a few tries to realize that the bracket was still in place and was why I couldn’t seat the replacement cable properly.
BLACK plastic bracket???? As this is crucial, I have been trying to locate a black bracket for the last hour or so, magnifying these images, watching different youtube videos etc … is there definitely a black bracket? Or could you be referring to the CLEAR plastic bracket that can be (just about) seen next to the white recess of the Ambient Sensor, in the pictures of this step?
I would also like contributors to comment on the WHITE recess of the Ambient sensor (a shown in the pictures of this step). I have a replacement screen that does not have a white recess, it is completely black (looks like it is ‘just a hole’ going through to the glass on the front). I can see no way of removing the white ‘cover’ from the original screen …does it matter?
Chris K -
-
-
-
正面カメラとセンサーケーブルを持ち上げて、片手で固定するとマイクにアクセスできます。
When I was replacing my cable, I had part of the old cable stay in the in the front panel and had to remove it before I could put my new cable in during this step.
-
-
-
フロントパネルに付けられたセンサーケーブル先端から接着剤を剥がして、マイクを持ち上げます。
oddly enough my replacement screen didn't come with the earpiece rubber or front-facing camera clear "recess" pieces. Prying them off my old screen was tedious and in the end I didn't have new adhesive to apply. What would you guys recommend?
I had to remove it completely and then apply some glue, very tiny just to keep it in place. However, my replacement part does come with an adhesive for the microphone.
Just pry gently with a small screwdriver in the upper right corner and the glue will drop
Thanks this helped a lot! Was really scared doing it how the picture described it.
My replacement part had a clear plastic that you need to remove so the microphone will stick. It is very thin so I pulled out the whole rubber part a few times before being able just to remove the clear plastic that shields the glue (part bought from ifixit.com)
I had the impression the double sided adhesive strip is thicker than normal under the microphone, and found it more difficult to lift than in other areas (other than the home button connector, which is adhered to a metal backing, making it extremely difficult). Fortunately, I did not rip the ribbon. Perhaps applying some heat would be advised.
Q Why is there a microphone in the ‘earpiece’? Surely there must be a microphone nearer the bottom (where your mouth would be). Are there two, perhaps for speaker/conference?
-
-
-
正面カメラとセンサーケーブルをフロントパネルから取り出します。
Before installing the new cable you might need to do the following. I just did this installation last night and I had to do these things. 1) There is a clear plastic piece that goes around the sensor. It might have stayed in the phone face or it might have come out. If it came out it needs to be installed around the sensor. 2) There definitely will be a little black plastic cover over the notification LED. That needs to be taken off the old cable and put on the new cable and in the right direction. 3) On my new cable there were 2 copper colored protectors that needed to be removed before installing the new cable. Remove those. 4) The cable to the front facing camera is too long. Notice where the excess cable was bunched up on the old cable. This was a difficult fix. The parts are so small. Assembling the area around the speaker is difficult. There are multiple places where the cables slip over little plastic bumps. Knowing about those little plastic points will help.
Thank you for posting such great pictures of detail parts and (those blasted little rubber gaskets!) and how they are situated. This is an excellent guide.. Yours is an example I wish others would follow. Pictures from the angle low and in close are so helpful finding where that little rubber thingy (Yes that’s a technical term) goes and which direction it should be in.
Kyler, the proximity sensor detects objects close to an active phone, so the touch screen can be shut off when the phone is in close proximity to your face (so your caller doesn’t get a bunch of “beeps” from keys being pressed by your face).,,
Next to the proximity sensor (below it, in the last picture) is a tiny, insignificant-looking piece of white tape. If I remember right, it’s only present on black screens. It’s important—transfer it. Without it, the ambient light sensor can’t work, and the phone can’t dim its screen automatically in dark rooms and brighten it in sunlight. It took me ages of doing this before I found a place where someone had pointed that out. I mean, it’s just a tiny white sticker. Seems to be true, though.
In re: Kent’s #2 above, I was fortunate to find new proximity sensor and camera frames on my new screens, and inside each proximity sensor frame is a small black piece over the notification LED (where it will be under the proximity sensor). Is that it, Kent? I hope so.
My new camera sensor isn’t folded like the one previously installed in the phone. I know these cables are very fragile and I don’t want to tear them. Where can I find a guide to properly fold the sensors so they fit correctly into their positions?
They are very resistant to be bent in certain positions, try to bend with your fingers making very slow movements and look at the position where the flex of the previous front camera was
-


デバイスを再組み立てする際は、このインストラクションを逆の順番に従って作業を進めてください。
デバイスを再組み立てする際は、このインストラクションを逆の順番に従って作業を進めてください。
410 の人々がこのガイドを完成させました。
以下の翻訳者の皆さんにお礼を申し上げます:
100%

Midori Doiさんは世界中で修理する私たちを助けてくれています! あなたも貢献してみませんか?
翻訳を始める ›


50 件のコメント
Perfect instructions, only confusion was where the sensor cable went. Would like a clear picture of sensor cable removed, as not to confuse viewer that the sensor cable is attached to the camera piece
I accidentally ordered the cable for the 6S plus. Would it still function or are they pinned differently?
Dave Pratt - 返信
I did same mistake on a iphone 6 , i ordered the i6S front camera flex, it worked and im starting to believe it improved my camera ! On my iphone 6
It looks better than before!!
We popped a 6s cable into an iPhone 6 to test. Everything fits and the camera does indeed work, although there is no improvement in resolution—the iPhone 6 doesn't seem able to use the extra pixels. We had mixed results with the other components on the cable assembly—the proximity sensor worked, but the ambient light sensor did not. We didn't test the microphone. Your mileage may vary, but I would recommend getting the correct part to avoid any unnecessary headaches. Cheers!
Hey thinking to install iphone6s or iphone7 front camera on my old iphone6 is it possible or they are differently designed conponents
Which one will work ???? Plz help
Slmanpro -
Well I just attempted this and now my phone won't boot up. Getting red screen and restarting during boot, then a dimmer apple logo indefinitely. Any idea what happened??? I was trying to replace the front camera cable because it stopped working; I found it torn (the phone previously had a screen repair done).
I'm afraid I took a phone with a slightly annoying problem and turned it into a paperweight..
Thanks,
-Mike
Best advise is to disassemble and reassemble. probably just a screen contact unless you ripped a ribbon. never a paper weight. just a learning experience
Did you resolve this by chance? I'm on my second new replacement and I get the same red screen and crash trying to boot. Thinking they must be sending me replacement parts that have been blocked by apple. Old cable works fine except the proximity sensor.
I had the same issue, solution please
Totally stuck the landing! Thanks for the great guide. One thing. Possible to use more colors in color coding screws? Before I started, I had read through the guide, but presumed I only had 3 different types of screws, when in reality, red and orange change throughout in terms of the length of the screws.
Unfortunately there aren't enough colors available to do it that way. :) The colors reset on each new step. So within a step, "red" screws should all be interchangeable—but once you move on to the next step, you have to assume they'll be different. That's part of the reason for providing screw lengths, so that you can still sort them out if they accidentally get mixed up.
Lost the one 1.7mm screw involved in step 13, is it absolutely necessary and if so where can I get them?
not necessary
krishan -
Well, if you're phone drops and a cable comes loose, you'll have to open it again. Dust might also enter this way. Rainbow marks / pressure marks might be another problem.
For a dollar or so you can order new screws ;)
can someone pls help me to fix the front microphone of my iphone 6plus? ok, so heres what happened, we actually change the screen it was damaged, aftr replacing the screen, everything has been perfect again! camera is working, sensor is working, except whenever im video chatting using front cam, or even recordng video using front cam, i cant hear my voice. even siri is not working or calls using spker phone. ive searched that this a a possible problem on my front microphone and i dont actually have an idea of how to fix this problem! ive even placed the orgnak front assembly on it inthought that this could solve the issue. but it didnt work. pls help!!
This repair was my first time doing anything kind of repair on electronics before. The instructions, comments and pictures really helped out. I had some difficulty on step 17 for reassembly but with the instructions and everyone's comments I was able to get my phone back together and working fully again!! Thanks for this guide. I tools that I used were the Pro Tech Toolkit + Magnetic Project Mat, the iSclack, and the Anti-Static Project Tray (this tray was a lifesaver on keeping the screws together by size and step!).
Perfect Tutorial! My Siri was broken. After I have changed the Sensor Cable (inkl. Mic) everything is working great again ;). Costs 7€ for the part and 3€ for the tools instead of 79€ at my local repair store.
SideEffect - 返信
How did you manage to set the light/proximity sensor in its right place? I've reopened my phone 3 times, but it's still not working. Everything else, including auto-brightness works fine; it just doesn't shuts off the screen and activate the front speaker when in calls and phone near my ear :/
What causes the boot loop after replacing the front camera flex? If I unplug it it works fine. New part boinked?
Maybe some dust is inside the connector and prevents it from correctly fitting. Or you may have bent the cable too much and now it is damaged. Or, as you say, the replacement was broken from the start :/
Does this change the quality of the picture
Nope, the quality should be exactly the same as when your camera was new, provided you bought a good replacement part.
first info I am mechanic not a grammar graduate.
quick comment for those that may have a issue with front camera working. i did the screen swap on my iphone6+ everything went flawless as far as the swap went. but for some reason my front camera would not work. my flash light and camera worked. i did all the resets and restarts and stuff like that. felt like i had a hardware issue, after i swapped my front camera from the oem broken screen, it worked so just a heads up if some have an issue.
raul uribe - 返信
Very good guide. The front glass opened easier than i thought, though it was changed and reassembled in a store and closed not so tightly. Cahnging the earpiece needed some accurance and was important not to touch bare fingers to sensitive parts. Rear camera metal hub won't come out in one piece, if you change rear camera glass. And that glass wont come without braking that glass completey. In my case i didnt want to wait that metal part but i put the camera back without it, just with black square rubber. Works ok. All works okay.
Got a problem, my camera sometimes works and sometimes doesnt. When i put pressure from the outside to the top of the phone, it comes and goes. What do you think is wrong?
Vedat Parc - 返信
Where do you apply force? Where the camera is or more towards the upper right side of the phone? In the first case, you may have a defective sensor cable, maybe the camera is not correctly soldered on the strip wire; in the second case, the cable sensor may not be correctly plugged into its connect for on the main board, even though the metal plate covering the 4 connectors from the front panel should apply enough pressure to keep it in. There may be some dust inside the plug that prevents the connector from completely fitting inside.
Hello everyone my front earpiece not working thinking to replace so i want to know its possible to install 6s front camrea on my iphone6 coz i will open the phone thinking better chnage the camera also .plz help
You can change the camera, but your iPhone 6 will get no benefit from that, since it's built up to use the original camera.
I had this problem as well but I solved it a different way. I accidentally didn't pay attention to how the front camera cable ran across the top of the speaker. I had placed it under the speaker with the bracket on top. Just double check to make sure the cable ribbons are put back exactly like the pictures in the guide.
I have followed all the instructions and finally my siri is now working without out crackling noise but now my front camera is not working any ideas why? I have tried going back trough my steps and starting again but it still doing the same thing.
Will a scrach in the cable affect the earpeice speaker from working?
My Siri doesn't work after the screen replacement (which is not done by me). And I've read that the front mic hole might be misplaced. So.. I'll try to open my iphone6 for the first time. (Yay!) What picture of which step should I look carefully not to misplace those holes?
hi im not sure if i need to do this i changed the screen on the daughters iphone 6 bought a complete screen ie with home button fitted it fine but her front facing camera isnt working and can only here on loud speaker i had another screen here tried that the same does anyone know what it could be
I replaced the broken screen and battery on the iPhone 6. Now the front camera and flash won't work. I replaced the front camera and proximity sensor w/ cable twice. I did make sure to power off the phone and disconnect the battery before replacement. I still can't get the camera and flashlight to work. Please Help
I just recently completed this repair. Everything works fine except the ambient light sensor. My auto dim feature does not work. I read that the 6 and 6s are interchangeable. except, if the 6s cable is used in the 6, that this could be an issue?
Is this confirmed?
Thanks for for your response.
My iPhone 6s camera is damaged by having water inside the camera, I was wondering how much it would cost to fix?
My I have bought this second hand Iphone 6 64GB, the previous owner told me that the Siri microphone wasnt working. After research, I’ve stumbled across an answer regarding the mic. It clearly stated that “Phone 6 Front Facing Camera and Sensor Cable” replacement was just what the Doc ordered, So I ordered myself the needed part from Ifixit and a toolkit, followed this guide and everything is working just like a brand new phone !
I think this is one case in which “follow the steps in reverse order” to reassemble is not quite enough when it comes to assembling the camera, earpiece, sensor, etc. I eventually worked it out and the repair was successful. This phone had been dropped in water and dried out by opening it and disconnecting the battery. Both the front camera and the ear speaker did not come back up and this repair/replace fixed it!
I bought the Pentalobe driver to use instead of the bit in the iFixit toolkit. It works a little better. I put in a new earpiece microphone in addition to the camera and sensor cable. Also, used the iFixit parts tray (very convenient). Total time for me was about 2 hours.
Thanks Sam, iFixit, and team!
devo per forza staccare la batteria? se non la stacco succede qualcosa?
ho provato a farlo senza staccare la batteria e ho bruciato lo schermo,pensavo di aver bruciato tutto. poi lo ho portato in riparazione mi hanno cambiato lo schermo e tutto e tornato come prima, ma il problema audio e siri è rimasto perche ha usato il vecchio sensore.
puo essere perche non ho staccato la batteria?
I had torn the cable when I replaced the battery. I bought the new front-facing camera and installed it. Everything but the camera works now. I've taken it back apart and reinstalled it twice now with no luck. :( What can I do now? It has been a very frustrating, disappointing experience. Perhaps the new camera is bad.
I just changed my antenna and Front facing Camera at the same time. The instructions were amazing. I just found out about this site and it has made a big difference. As other users, i contacted Apple and made appointments to work through problems with my iPhone 6. It was preconceived that they would not help as I would have wanted them to. They want me to purchase a new phone. Well now i can keep this iPhone 6 for that much longer. So until the next issue I will be back and letting people know about this site.
Replaced this today after tearing the cable during a battery replacement.
Getting the cable bends correct was a bit tricky and it took a few attempts to re-position the bracket from step 21.
Also used the iFixit Pro Toolkit instead of the cheapo screwdrivers I had lying around.
Hi my front camera and speaker were not working when i got it back from repair so i opened it and nothing was torn or broken so is there maybe a other explanation for them not working
cok güzell tavsiye ederimmmm
Doğuş Cici - 返信
When reconnecting be VERY careful not to over tighten. The connectors on the screen that these 3.6mm Pentalobe screws lock with are notorious for breaking off
Blair Tryba - 返信
what do i do if ive managed to tighten them too hard and now they wont come off?
kristian686 -
Before opening the phone, I gently warmed it using a buckwheat heating pad. This made removal of the adhesive strips (steps 20 to 24) easy.
Howard Bales - 返信
Exactly what I did as well, the gently warming made the adhesive removal work like a charm. The heat as well help to lift the screen easily, no need for the prying tools for me to open te phone.
For the adhesive removal just pull it slowly to the bottom of the phone and keep in under tension.
On reassembly, turn on the phone after getting all connectors back in place to verify all is working fine before putting all screws back in their spot.
Maarten Vergauwen -
Thanks for the suggestion! I heated up a hot/cold pack, and it worked great.
Linda Chandler -
I put mine back together but mine looks very different than this one. Why is it that when I make a call I cannot hear through the ear piece and have to put it on speaker. Also my screen doesn't go black when my face touches it
Bailey Wilson - 返信
Hey Bailey, which repair were you attempting? Is it possible you have a 6s, or maybe a 6 Plus? You may have better luck with faster troubleshooting if you post in our Answer Forum!
Sam Goldheart -
See its a long time ago you had this issue. You can try to remove the cable from front camera/sensor/earpiece from the motherboard port and gently push it back on. All the problems you relate to is thru the same cable. If this dont solve your problem, check if the earpiece is correctly placed onto the polarity poles, and that the proximity sensor is lying right down into the corresponding socket. If something is blocking the sensor, yeah then the screen wont turn on/off when you put it onto your ear.
Kenneth Hilstan -
I see in the preamble that when you replace your logic board, you would lose touch id functionality, so my question is what if you have the homebutton and thus the fingerprint reader for the logic board replacement, would touch id work?
socratesmens - 返信
The guide for the iPhone6 battery replacement needs to be revised. There are a couple of issues.
1) While the battery cover has two screws, they are different lengths. Since they are very small, it can be hard to see the difference (until one tries to screw the smaller one into the longer hole). The video needs to mention this.
2) The application of the adhesive strip if very different from what is mentioned. Also, there is a “one piece plastic” applique, and it is very unforgiving. The video should show this process in more detail.
I believe the attention to this detail would help folks correctly install their iPhone 6 batteries, and with the recent Apple disclosed battery problem, would continue to show that iFixit is very committed to the end-user.
Gary Long - 返信
I felt a bit silly getting stuck at the end of a long repair, unable to screw one of these last screws back in. What worked was gently pinching the phone above and below the screw, to make sure the screen and back were perfectly aligned.
Matt D - 返信
Apple edits posts on their Communities website that link to this fix page justifying as follows:
“We’ve edited your post because following the procedures at the site you provided may lead to damage to the user’s device.”
What is certain is that following Apple Support’s advice of resetting our phones again and again never works whereas this fix works. Apparently Apple does not want people to know that their hardware fails and can be fixed, because then they would need to explain why they don’t offer neither the fixing service nor the fixing advice by directing us to this website.
Brice - 返信
Before you get started, I suggest you confirm you are replacing the correct camera. If you are thinking of a camera, the front is the side of the device with the main lens. On an iPhone this is actually known as the rear facing camera. Once the phone is disassembled your orientation can be distorted and it is not that hard to fail to realize your are replacing the wrong camera. Doh!
William Miller - 返信
I found it very useful to use a magnet sheet when doing these repairs. I use electrical tape or a sharpie to make a grid, and place each micro screw in a separate box on the grid.
I work directly over the magnet sheet, so that if something drops I have a better chance at not losing it.
If you do lose a screw, go over the work area with a fridge magnet. It will pick it up if it hasn’t popped too far away.
Megan Telliano - 返信
I agree. The Magnetic Project Mat makes your project incredibly easier and keeps your screws/parts organized. Here is the link for anyone interested:
Magnetic Project Mat
Cooper -
or some masking tape with sticky side up and the ends folded underneath on a piece of paper, then you can write notes like
“1.4mm for FOO bracket →”
“7x2.3mm for EMI cover, different one by camera →”
The arrows point as appropriate.
If you drop something, put a flashlight on the floor & shine it across the floor — Turn off ceiling & other lights off to maximize the shadow from the flashlight.
Bass Clef -
These screws are tiny, and the first two are the biggest of the lot. Get a magnifying glass or good reader glasses.
Jennifer Porter - 返信
Which torx is this T?
klemenecanze - 返信
The screws are no torx screws they are Apple Pentalobe screws. You need to buy a Pentalobe screwdriver seen above.
Claes -
I have to use the P2 right?
Aman Singh - 返信
The best advice I can give is not to perform this operation over carpet.
Bruce codding - 返信
I'm an amateur, but I was able to replace the parts almost perfectly while looking at this explanation, thank you very much.
irichin.3.26 - 返信
was fairly easy more nerves than anything, one thing one should have on hand is alcohol just in case its needed. also if one doesn’t get the entire tape strips out, use the alcohol like suggested and lift the battery up. Then can grab the remaining tape strips with tweezers and pull it out. Easy to put back together just make sure the connectors are in. The screws are tiny so take your time. I plugged it in and it started charging and it worked. Great to have my 6 back for a trip as I wanted to use it for the camera, also my game phone so nice to have a battery that lasts. Yes having a flat place to put the parts and put them in separate area so they don’t get mixed up. It took about a hour with hunting for a spare bottle of alcohol.
Greg Wischmeyer - 返信
The first step should always to be to backup your phone as there is always a slim chance that even a simple battery replacement may render the phone inoperable and data on it lost.
Jim - 返信
Please do not forget to remove the SIM-Card tray!!
Steffen Albrecht - 返信
I didn’t need to remove my sim card tray when I did my iPhone 6 battery replacement. Why do you suggest to remove it?
Jim -
You dont need to remove sim card while battery replacement
bertan - 返信
Did mine today, with iFixit battery and iFixit tool kit. Did not need suction cup, to open case, as it had partially sprung open on left, as a result of a badly swollen battery. Supported base and screen with a bookend and rubber bands. This kept these parts at a 90 degree angle, so that screen did not need to be removed. IFixit screwdriver tips were perfect fit. Somewhat difficult to remove battery adhesive strips, but slow and steady got it done, after mild heating with hair dryer. Took about 3 minutes to reposition battery connector…just a wee bit tricky, to position correctly. Was careful to place top of screen in place first, and remainder snapped into place with light pressure, and replaced the 2 pentalobe screws.
Will highly recommend iFixit for such a repair. Repair kit and battery, are first rate. I give this an 11, out of 10.?
Len Drasin - 返信