メインコンテンツにスキップ

iPhone 3G Display Replacement

必要な工具と部品

  1. iPhone 3G Display Replacement, Broken Glass: 手順 1、 3の画像 1 iPhone 3G Display Replacement, Broken Glass: 手順 1、 3の画像 2 iPhone 3G Display Replacement, Broken Glass: 手順 1、 3の画像 3
    • If your display glass is cracked, keep further breakage contained and prevent bodily harm during your repair by taping the glass.

    • Lay overlapping strips of clear packing tape over the iPhone's display until the whole face is covered.

    • This will keep glass shards contained and provide structural integrity when prying and lifting the display.

    • Wear safety glasses to protect your eyes from any glass shaken free during the repair.

  2. iPhone 3G Display Replacement, Display: 手順 2、 1の画像 1
    • Remove the two Phillips #00 screws from the dock-connector end of the iPhone.

    • Make sure to keep all the screws organized as you are taking the phone apart. They are different sizes.

  3. iPhone 3G Display Replacement: 手順 3、 1の画像 1
    • Remove the metal handle from the suction cup. It's easier and safer to grip the suction cup's base instead of the metal handle.

    • Be very careful when opening the iPhone so that the cables under the display are not severed.

    • There is a rubber gasket between the silver front bezel and black display assembly. A bit of force is required in this step to separate the iPhone's display assembly.

    • Use a small suction cup near the Home button to gently pull up the lower portion of the iPhone's display assembly.

    • If the display assembly is too damaged to allow the suction cup to adhere, tape with a strong adhesive such as duct tape may be used.

  4. iPhone 3G Display Replacement: 手順 4、 1の画像 1
    • The display assembly is still connected to the iPhone by several cables, so don't try to remove it entirely just yet.

    • Rotate the display assembly up until it is at an angle of approximately 45 degrees.

  5. iPhone 3G Display Replacement: 手順 5、 1の画像 1
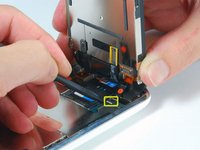
    • Continue to hold the display assembly with one hand, and use your other hand and a spudger to disconnect the black ribbon cable labeled "1."

    • Ribbon cable "1" is connected with a plug style connector. The block at the end of the cable is the plug which is simply pushed into a socket on the circuit board. No other locking mechanism is used.

  6. iPhone 3G Display Replacement: 手順 6、 1の画像 1
    • Rotate the display assembly up until it is roughly vertical. This will allow easier access for disconnecting the remaining cables.

    • Use a spudger to disconnect the black ribbon cable labeled "2."

  7. iPhone 3G Display Replacement: 手順 7、 2の画像 1 iPhone 3G Display Replacement: 手順 7、 2の画像 2
    • Ribbon cable "3" is held in place by a FPC style connector. You must unlock this connector before sliding the ribbon cable out. The locking mechanism is on the opposite side of where the cable is inserted - it swivels upwards 90 degrees. Use a plastic spudger to lift the locking mechanism.

    • The FPC locking latch is very delicate and is typically a different color than the body of the connector. (see the detail image of FPC connector open and closed)

    • Slide the ribbon cable out of the connector, and remove the display assembly from the iPhone.

    • It's impossible to properly reinsert a ribbon into an FPC connector unless the lock is disengaged. Make sure the locking latch is open when attaching/detaching the cable.

  8. iPhone 3G Display Replacement: 手順 8、 1の画像 1
    • Remove the single Phillips #00 screw from the corner of the display assembly.

  9. iPhone 3G Display Replacement: 手順 9、 1の画像 1
    • Remove the two Phillips #00 screws from the right side of the display assembly.

  10. iPhone 3G Display Replacement: 手順 10、 1の画像 1
    • Turn the display around, and if there is a thin strip of black tape on the edge of the display assembly, carefully peel it up.

    • Keeping the tape from sticking to itself can be tricky. We recommend placing the tape on a wax-coated piece of paper (any sticker backing will do).

  11. iPhone 3G Display Replacement: 手順 11、 1の画像 1
    • Remove the three Phillips #00 screws from the left side of the display assembly.

  12. iPhone 3G Display Replacement: 手順 12、 1の画像 1
    • Turn the display assembly over and again carefully insert a metal spudger between the two metal rails along the edge of the display assembly. Gently rotate the spudger to lift the LCD up from the glass.

  13. iPhone 3G Display Replacement: 手順 13、 1の画像 1
    • Separate the LCD and glass by sliding the LCD panel away from the ribbon cables on the glass.

終わりに

To reassemble your device, follow these instructions in reverse order.

377 の人々がこのガイドを完成させました。

作成者

31人の作成者と共同で作成されました。

iRobot

メンバー登録日: 09/24/09

1 ポイント

636のガイドは作成済み

9 件のコメント

does this void the warranty?

loganm - 返信

I did all this and my screen is completely white, from memory i can unlock it and when i connect to my pc i can hear that it connects i just can't see anything. please help i'm freaking out!

Tiffunny - 返信

loganmからの引用:

does this void the warranty?

Duh!

Pepper - 返信

Hi there, Just been reading these a lot and I think that people should not use a metal spudger inside the phone as this will potentially short out the phone inside as it is still connected to the battery pack. I also recommend that people observe some basic ESD precautions. Like earthing yourselves etc.

Dave G - 返信

I wrote up my notes, including the critical (missing) PFC lock directions in a separate blog post:

http://tech.kateva.org/2011/01/repair-of...

jfaughnan - 返信

コメントを追加

統計データ:

過去 24時間: 8

過去 7 日: 20

過去 30 日: 115

今までの合計 560,710