必要な工具と部品
ビデオの概要
-
-
iOpenerを30秒温めます。
-
修理作業中はiOpenerが冷めてしまいますので、使用毎に電子レンジに30秒入れて温めてからご利用ください。
DO NOT USE IN NON ROTATING MICROWAVE! It will pop a hole. I had it in for 45 seconds the first time. It wasn't very hot inside and I saw it started to leak on the paper towel I put under it. Just a fair bit of advice. I think I will just stick with the heat gun. Loud but useful.
I heated mine up for 30 seconds, tested, then again for 30 seconds. It felt adequately hot. Leaving it on the left side, per the instruction, for a minute did not loosen the adhesive. I ended up pulling the suction cup hard enough to shadder the old screen. Moral of the story, I don't think it gets hot enough safely to have an affect.
There is a clear problem here with the heating part using the iopener things....no details are given. Whoever is testing them needs to make it clear - What temperature does it need to be? And for which phone models, because they differ in what's needed. It's only £10-15 for a laser guided temp sensor unit, and the designers/repairers should have one of those already for doing these kinds of repairs. Explaining half a repair, is worse than not explaining at all :-(
All phones/devices differ it’s unrealistic and unsafe to put a exact time/temperature needed to soften the adhesive. It’s really quite simple you warm the device evenly and in a controlled manner just enough to enable pry tools and picks to begin separating. Best tool in my opinion but again this is because I have experience is a hot plate and heat gun both of which are used at nearly the lowest settings and I can handle flat palming the plate for almost 10 seconds I leave the device to conduct heat until approx it’s about 110 at most 120 ish this will be plenty to soften all the adhesive if any problem areas I use heat gun while prying. Again you need go slowly and learn with a throw away phone
If I may suggest include your microwave wattage so people can get an idea on time for there own
I agree with this.
I ended up using a hair dryer. That iOpener thing took forever.
30 seconds sure isn’t cutting it… 45 didn’t get the screen of my iPad air 2 to budge either… even after resting on the ipad for 4 minutes.
60 seconds in the microwave, the iOpener burst.
I’ll get a new one and try once more with heating it 45 seconds and repeat that for 30 minutes like others have said here. If that doesn’t work it’ll have to be the heat gun.
K
I can’t recommend the microwave. If the the iOpener becomes too hot, it bursts. Better put the opener in cooking water. Dry it and use it. Instead of an iOpener you can use hot/cool packs as well.
Great idea with using the heat packs. I will try that next time. Thank you
Collins -
Trust the directions! I forgot and left it in the Microwave too long and after 1 minute I had Mt Vesuvius - the iOpener burst and spewed the goodies out. The problem is, the Digitizer can be damaged by a hot air gun, so I had to tough out and remove the glue the hard way. I made it … with lots of patience! Tough lesson.
I also used a hairdryer. I used it on the low setting and I cut a piece of carboard to protect the rest of the screen. The iFixit tool and method is vert tedious and very time consuming in comparison. With the hairdryer method you can literally have the display apart in a few minutes. Using your other hand nearby the area you are heating it should be very hot but not enough to burn your hand. You only have to heat metal part of case near glass edge. If you have a cellular model then you need to be very careful because the black antenna area is plastic. So less heat and work your way up in adding heat just enough to separate around the area but not so much you melt the plastic!
iOpener was the worst part of the kit. Followed directions for :30 in microwave and took 4 trips to the microwave to loosen adhesive on left side of home button. I thought I was figuring it out and it was working well… even set a timer to wait 10 minutes between heating it up. Was on the right side and was on my 12th heat up when it exploded in the microwave. My only tip is that if you set it clear side up, as soon as you see any bubbles or boiling in the liquid, STOP! If you put a pot holder over the iOpener and press slightly to make good surface contact, that seemed to help. I finished heating with a “Corn Sack” that held heat better than the provided iOpener.
Mon iopener n'a pas tenu une réparation. Je ne vous conseille pas ce produit
Bonjour,
Nous sommes désolés que votre réparation ne se soit pas déroulée comme prévu. Il se peut que le produit était défectueux. Veuillez contacter notre service client support@ifixit.com (boutique américaine) ou eustore@ifixit.com (boutique européenne) en décrivant ce qui s’est passé.
Readers looking for temperature advice might check the comments of the previous instruction, as there are more there. I used an immersion bath to heat this to 180F and applied it to the device until the outside temperature of the opener read 150F with an IR thermometer. Removing the screen took very little force with this method.
Thank you for posting some actual temperatures. I have a heat gun with a very fine self-temperature regulation setting capability.
I will set it for 150-180 F, and use that to soften the adhesive.
Get a heat gun.
I followed the directions and heated my iOpener for 30 seconds in a 1000 watt microwave, and it came out at 160 degrees F, as verified by a infrared thermometer. A second heating about 15 minutes later in the micro and it came out at 190 degrees F. Plenty hot enough to soften the adhesive for removing the back on my S8. Based on the comments above I think people just need to use more patience.
I used various time settings. It got very hot. It would soften the glue but not a whole lot. If my screen had been intact and I was replacing something that was not a digitizer, it may have worked. A broken screen makes the process significantly more difficult. I ended up breaking the home button cable. Good bye TouchID…
It appeared 30 seconds were not enough, so I heated it more, by 5 seconds at a time until I got the right temperature about 70 degrees Celsius (measured with infrared pistol) to get the screen heated up to 60 C, the best for softening the glue. But the heat was quickly dissipating by the big aluminum back cover, so the best I got in 2 minutes of applying iOpener was around 45 C, which made the procedure difficult and having risk of breaking the screen. So I eventually abandoned iOpener and user a hot air gun with precise temperature setup. I set it to 90 C, which allowed me to open my iPad quickly and safely.
You need to remember here are different sizes of microwaves. I had the same issue.
Heating on a smaller unit I used 45-60 seconds. That worked but was time comsuming
Yeah, the iOpener didn't work for me either.... ended up using a hair dryer and that worked. The iOpener was too warm to soften the glue in my case.
I tried 600W microwave for 30 sec and it was nicely warm, did nothing on iPad. Added 10 more sec, bit warmer, another 20 sec and it was finally a bit hot to hot in the hand - but still didn't do anything on iPad. I switched to a hair dryer as I used to work with it before, while being a bit sad about not using this brand new iOpener tool. And I found it short on 12.9 iPad anyway, maybe next time.
-
-
-
電子レンジからiOpenerを取り出します。iOpenerの中央は熱くなっているため、両端の平面になっている部分を持ってください。
I did this repair. I used a hair dryer, I think it works better: gets very hot fast.
I did too, you get far more control and no expense on fancy equipment.
Readers looking for temperature advice might check the comments of the previous instruction, as there are more there. I used an immersion bath to heat this to 180F and applied it to the device until the outside temperature of the opener read 150F with an IR thermometer. Removing the screen took very little force with this method. I don’t know how much microwaves vary in heating consistency with these pads, but knowing how inconsistent the temperature of a bowl of plain rice gets in my microwave, I wasn’t interested in even trying to use it for this.
I vote for the hair dryer. The other methods work too but if you aren’t having any luck, switch to the hair dryer. While holding the iPad in my hand, I found that I am aiming the dryer at my finger at the same time and it gauges how hot it is. I stop when my finger can’t take it - maybe five seconds up close. Repeat as needed like I did.
If the maximum temperature for this iOpener is lower than the gadget glue minimum temperature, this device does not make sense.
I think the maximum temperature for this iOpener is below 100⁰C and most gadget glue minimum temperature is higher than 100⁰C. So the iOpener is useless for many opening steps in repair guides. But who knows because temperature range is not specified for this iOpener.Jarl Friis - 返信
heres how you fix it
-
-
-
鍋を十分な量のお湯で満たして、iOpener を完全に沈めます。
-
お湯を沸かして熱くなったら火を止めます。
-
iOpenerを熱湯の中に約2−3分間沈めます。iOpener全体が完全に浸かっているか確認してください。
-
トングなどを浸かって、温まったiOpenerをお湯から取り出します。
-
タオルでiOpener全体を拭き取ります。
-
iOpenerの準備は整いました。iOpenerを再度温める必要がある場合は、お湯を沸騰させて、火を止めてからiOpenerを2-3分間浸してください。
What do I do if I don’t have a iopener?
Use a hair dryer
2 or 3 cups Rice in a sock, heat for about 2 minutes. But, I recommend the iopener.
When boiling in water you can put the iopener in a ziplock to keep it dry.
Even if you don't put in a ziplock bag, I found that the surface is mostly hydrophobic so drying it is very easy. I also didn't have tongs, but the bag is denser than water, so it sank and I attached clothes pins to the ends and was able to remove it with those.
2-3 minutes in near boiling water, then 2-3 minutes on my s10+ and it was super easy to cut the glue off.
I have a question, if I have a pan, and I have water, and a mean to boil the water, won't it be easier and cheaper to just use that.
Have you tried it? Water limits your temperature to 100℃, whereas 'pan on the stove' can easily get up to twice that. If your pan is even slightly warped, you'll have a few hot spots of direct conduction with convection everywhere else, heating things unevenly. Assuming you get the device up to temperature, how will you get it out without scratching it or burning yourself? After you're finished, do you really want to prepare food in the pan you warmed up adhesives and trace manufacturing substances in?
.
Boiling something form fitting to heat your device with is a lot more foolproof, and not being foolish is easier and cheaper. Direct pan heating can work, but you are leaving yourself open to a lot more problems than just taking the safe route.
add a little basil and oregano on the pan peanuts cashews walnuts and bam it pops right off
It's more 3 minutes than 2 minutes in hot water, in 2 minutes it's not getting hot enough I think. I used the combo iOpener + hair dryer for about 2 minutes and I could then insert a first opening pick easily. The first opening pick is the trickiest step, then if you go slowly and with patience around the screen with other opening picks, it works well.
-
-
-
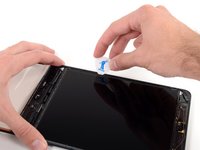
ディスプレイガラスにひびが入った場合は、ダメージが広がらないように、また作業中怪我などしないように、ガラスにテープを貼ります。
-
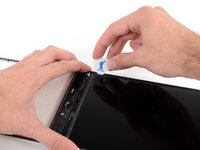
クリアタイプのテープをiPadのディスプレイ上に何重にも合わせて貼ります。ディスプレイ表面全体が覆われるようにしてください。
-
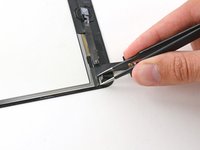
できるだけこのガイドに表記されている手順に従って作業を進めてください。しかしながら、一度ガラスが壊れてしまったら、作業が進むに連れて程度が酷くなる場合があります。この場合、ガラスを取り出すにはメタル製のこじ開けるツールが必要となります。
In case of broken glass, here are some hints:
- I prefer 3M "3350" tape; a metalized polypropylene tape with an acrylic adhesive. It's a very thin, silvery HVAC tape, not your standard duct tape.
- Test your tape to make sure it sticks really well to the glass.
- Use isopropyl alcohol on a paper towel to remove fingerprints and other dirt to help the tape stick to the screen.
- Use the widest tape you can find, and apply it evenly, without trapping bubbles, without crinkles: This greatly improves your chance of success with the suction cup later.
- Cut tape pieces long enough and go over the (rounded) edge; afterwards carefully run a scalpel alongside the edge (between bezel and glass) to trim off any excess.
- Don't overlap edges of the tape: butt-join them instead.
- If needed: repeat in other direction.
- If needed: Cut square piece of tape (size of suction cup) and place it where you want to lift the glass, so that the suction cup doesn't cover any butt-joins.
Good luck, you brave person!
This is the second broken screen I’ve fixed. Overlapped package tape carefully stuck to the glass and trimmed to the edges will contain most of the shards. I found that a hair dryer works for softening the glue. After getting under an edge with the suction cup I carefully followed the opening sequence using a combination of plastic picks and a single edge razor blade to get under the small pieces. It was slow going with lots of reheating with the dryer (about 45 minutes), but the taped glass came off without glass everywhere.
-
-
-
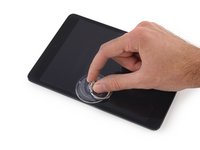
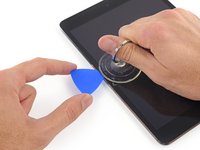
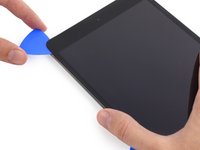
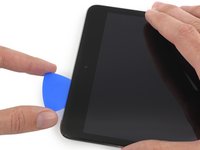
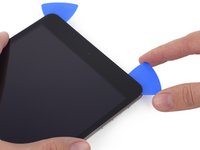
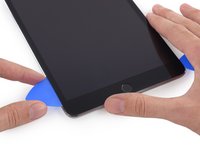
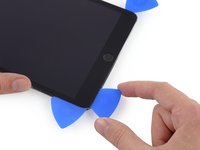
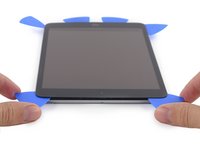
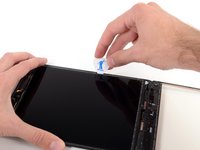
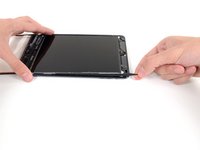
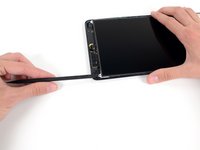
温めた側の真ん中に吸盤ップを取り付けます。
-
カップがしっかりと密封された状態でスクリーン上で完全に平らな状態で装着されているか確認してください。
-
iPadを片手で持ちながら、吸盤カップを背面ケースから正面パネルガラスを引き離すように引っ張り上げます。
This step is totally pointless if you have a shattered screen. The suction cup is rendered useless. Any tips on what to do if you can't get any suction due to a shattered screen?
just pick out the glass shards if it is cracked that bad you are better off scrapping the digitizer
I had a second suction cup - one on the glass and one on the aluminum - and the heated gap opened easily.
-
-
-
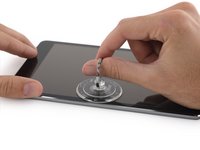
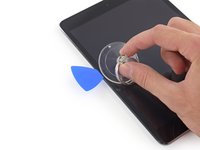
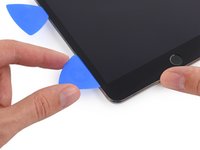
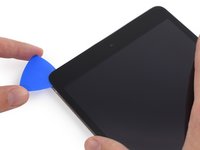
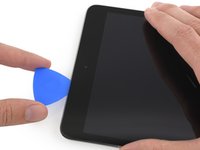
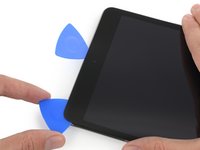
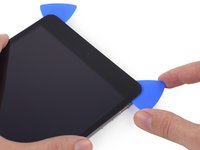
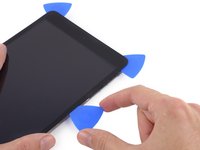
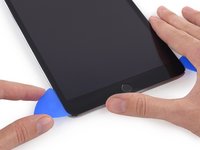
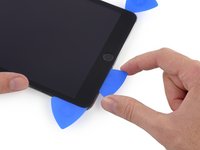
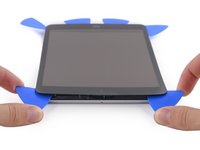
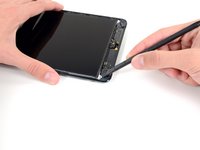
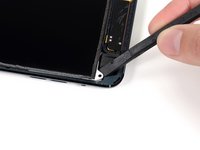
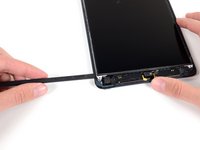
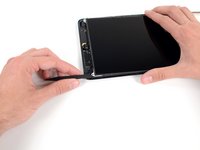
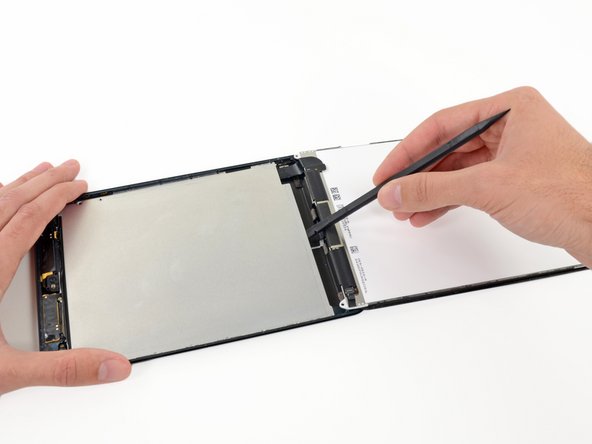
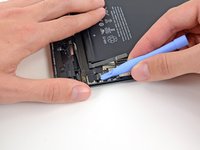
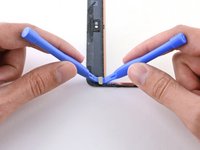
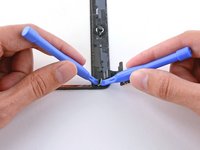
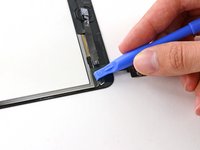
iPadの上部左端まで開口ピックをスライドして接着剤を剥がします。
Gezz this is though! Cracked the glass while replacing it.
:( sad (rip glass lol)
-
-
-
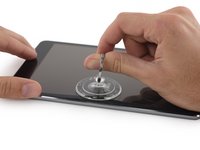
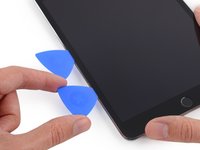
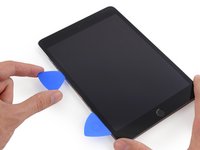
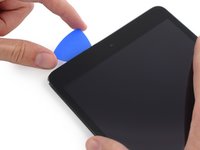
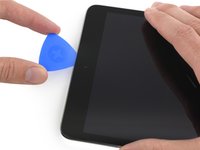
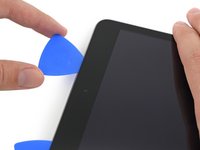
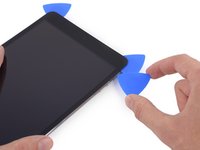
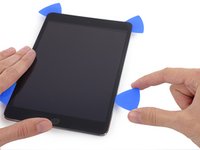
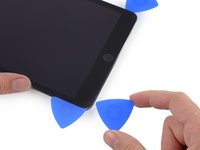
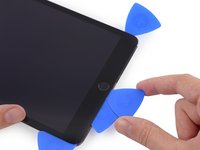
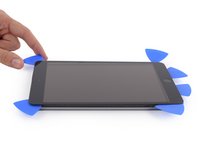
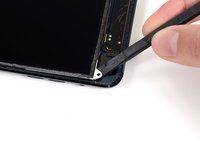
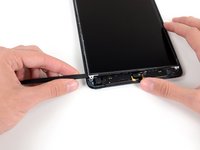
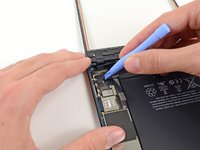
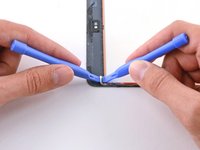
前回カメラ付近で置いたままの開口ピックをiPadの奥深くへ差し込み、カメラから右側端に向かってスライドします。
Shattered my screen pretty bad here, making it so that whenever I continued to move the pick the glass separated and I couldn’t continue moving it. Be VERY gentle moving the pick; almost no force is required.
-
-
-
-
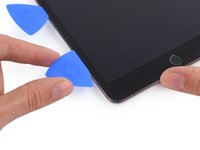
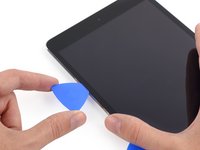
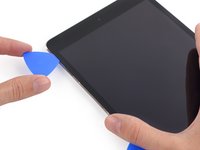
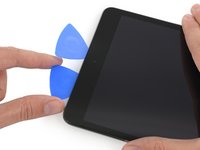
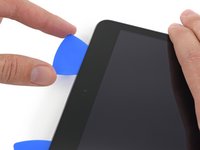
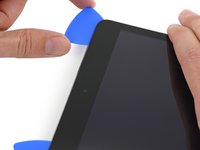
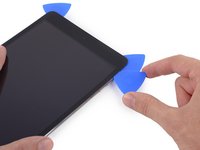
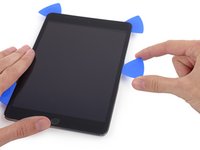
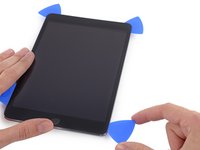
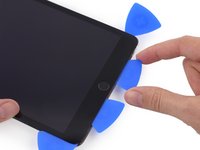
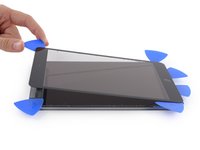
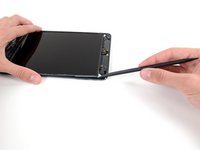
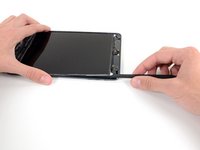
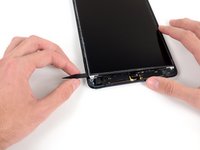
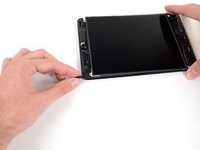
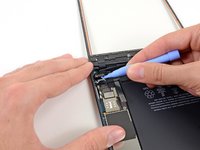
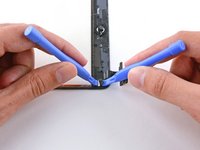
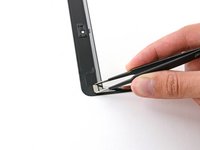
iPad下部の両端から接着剤をゆっくりと丁寧に剥がして持ち上げます。
Really, add a few more pics and a few more picks, see how long and difficult you can make this guide. 26 steps to get the top screen off is ridiculous.
Not ridiculous for those of us who do not run a computer service company. Heck, I even read your comment hoping for more information.
-
-
-
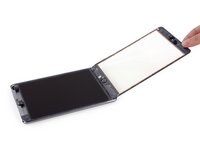
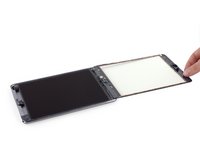
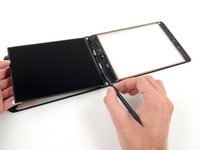
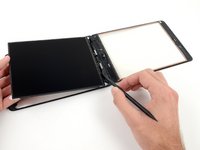
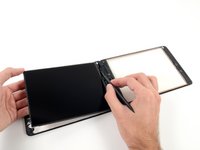
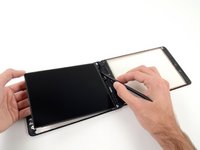
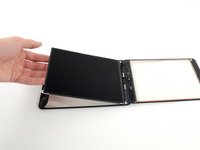
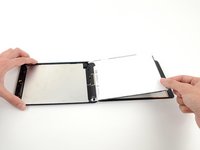
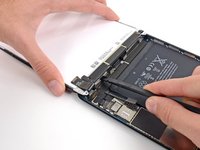
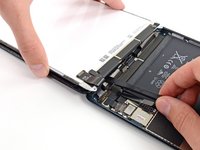
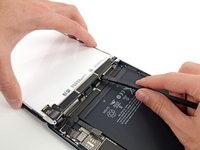
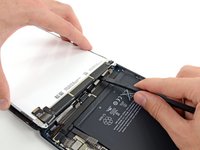
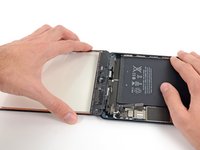
全ての接着剤がはがれたら、フロントガラスを本のページをめくるように開きます。
I recommend wearing latex gloves or be sure not to put too many finger prints on the front or back of this front glass when lifting it or completing the remainder of the steps. I made this mistake and upon installing the new LCD and putting the iPad back together I realized that I left a few finger prints on the inside of the front glass. After re-securing the adhesive strips putting the iPad back together there are now unremovable fingerprints visible when the LCD is turned off. Just a recommendation on the gloves or be sure to wipe both sides of the front glass clean before putting all back together.
-
-
-
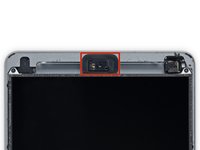
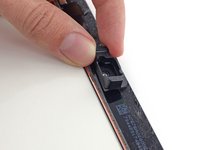
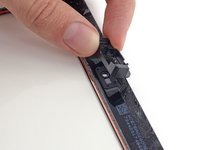
正面カメラのケーシングはフロントパネルに装着されています。カメラのケーシングを剥がして、カメラを保護するためにこれを元の位置に戻します。
-
カメラのケーシングを接着剤から剥がすため、カメラのケーシングの端を揺らしてフロントパネルから取り出します。
-
背面ケースの中に正面カメラのケーシングを戻します。
-
-
-
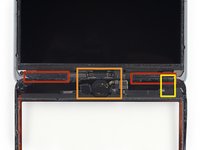
ピンセットを使って、上部右側の液晶ディスプレイに留められたネジを覆っている長方形フォーム製テープを取り外します。
-
下部右側の液晶ディスプレイに留められた長方形のテープを外します。
-
-
-
背面ケースに留められた液晶ディスプレイから3.9 mm #000プラスネジを4本外します。
In my case the 4 screws are not the same. One is 4mm, and 3 of 3.5mm, or better 2 x 3.5mm and one 3.45mm. I put the longest one at the left edge at left of the LCD flat cable.
mitja
Hi Mitja. I just checked the measurements with an electronic digital caliper. I got 3.9 mm for all four screws. Are you sure it was the same model? Thanks.
ipad mini wifi no screws are longer
-
-
-
液晶ディスプレイのフレームと液晶ディスプレイ上部に留められたテープの隙間にスパッジャーの先端を差し込みます。
-
液晶ディスプレイのフレームとテープの間のスペースにスパッジャーを差し込んでスライドをさせ、テープを液晶ディスプレイフレームから剥がしていきます。
I finished a successful replacement of my screen following these instructions. Thanks.
Step 36 (remove tape from LCD perimeter), however, seems unnecessary. I ended up spending a lot of time separating the tape from the LCD frame only to discover it was not necessary for steps 37-44 and actually made things really difficult for step 45-46 (removing the tape near the speakers). Finally, steps 45-46 can be skipped since it is much easier to remove this tape once you flip the LCD over (Step 55).
-
-
-
ピックを液晶ディスプレイと背面ケースの間の隙間、液晶ディスプレイの左側上部に差し込みます。
-
液晶ディスプレイと背面ケースの間の隙間が十分広がるように、ピックをiPadの裏側に向かって引き上げるように曲げていきます。
I found a very simple method for removing the LCD from the metal shield. Slightly lift one of the top corners and insert a 1' piece of fishing line. Insert the line under the other top corner placing the length between the LCD and shield. Once in place, gently pull each end toward the bottom of the LCD breaking the adhesive as you go. This will make things much easier than using the picks and possibly breaking the LCD.
The fishing line trick is amazing… although i had already broken the LCD when i saw that comment. Good Learn!
This step is what destroys my LCDs :(
Dan Harris - 返信
I was able to do this the first time w/out damaging the LCD simply by following the instructions to the letter, slowly and carefully. The only thing I did differently was to follow Northstar’s instructions to remove the two pieces of tape at the bottom of the LCD before beginning.
I found a good way to remove the LCD without breaking it. Once you finish to clean up around the LCD just lift a bit one of the white metal backing plate and insert in the gap a plastified playing card under le LCD and slowly make your way to the center of the LCD. Repeat on the other side and the LCD will lift up intact.
nothing Brocken after
(I did not read the comments before doing it lol)
-
-
-
デバイスの上部右からスパッジャーを液晶ディスプレイフレームとメタル製バッキングプレートの間に差し込み、スライドさせながら接着剤を剥がします。
These steps were hard. I was too scared that I was going to brake the LCD. Luckily I got it off! Don’t know how delicate these things are and how much force they can take.
me to it was hard
-
-
-
液晶ディスプレイを背面ケースから数インチ押し上げます。ディスプレイから接着剤が剥がれていることを確認します。
When I did it I found that the adhesive sticking was mainly on the edges, so if you take a spudger and just break that adhesive carefully it will help. Be gentle lifting the lcd as it’s very breakable.
-
-
-
iPadの背面ケースに留められた液晶ディスプレイシールドプレートより次のネジを外します。
-
2.6 mm #00プラスネジー2本
-
1.7 mm #00プラスネジー13本
-
1.7 mm #00プラスネジー1本(デバイスの種類によって有無があります)
On my 1432 there were mixed in 4 tiny #000 screws holding the shield plate aong the right side. Looks like these can be mixed in without consequence as they are shorter anyway
I have a missing plate and screws
Keah Smith - 返信
-
-
-
iPadから液晶ディスプレイシールドプレートを取り出します。
Once the LCD is clear of the shield, wiggle a long plastic spudger up the center between the shield and the battery to gently bend the shield. That will help in getting it away from the sides and make it easier to come out.
-
-
-
ロジックボードにコネクターシールドを留めている 1.3 mm #00プラスネジを3本外します。
Note: These three screws are smaller than the rest of the screws holding the larger LCD shield although they look similar. If you substitute the larger screws, you will pop a screw bracket which can damage the board on both the mini original and mini 2 retina. I just wrote a blog post about how this happens: http://mendonipadrehab.com/entries/gener...
Hi jessabethany. Thank you for the warning. I read your blog post and found it to be very informative. Thanks for adding the warning to the step. It will most definitely help others avoid any damage to the logic board. Thanks!
-
-
-
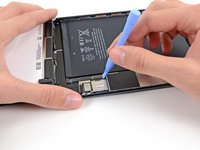
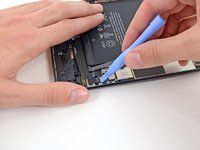
プラスチック製開封用ツールを使って、ロジックボードのソケットからバッテリーコネクターを丁寧に引き上げます。
Make sure you disconnect the battery. If not and ipad is still on you can have problems with the LCD backlight. To fix that problem you have to solder
I may be experiencing the backlight problem you mentioned. What connection needs to be soldered?
Have an issue - heard that if you don't disconnect the battery a fuse is blown. I need help to fix the blown fuse.
There is an extensive thread in Answers about iPad mini backlight problems.Th screen stays black after a digitizer replacement.
After unplugging the battery place a guitar pick in-between the two connections.
While continuing to work on the iPad you may inadvertently cause the two connections to touch.
Yeah, you need to put the pick in between the connections so the battery doesn't touch the logic board connector and blow a fuse and make your backlight not turn on. You really don't want to have to solder the 2 connections together, especially if you don't know how, like me! I will use your comment's advice when working.
I put a piece of cellotape on the contact side of the connector and could happily forget about it while getting on with the rest of the repair.
Rory Filer - 返信
-
-
-
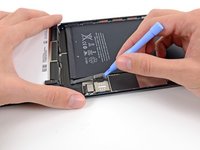
プラスチック製の開口ツールを使って、ロジックボードのソケットから液晶ディスプレイコネクターを外します。
Putting the iPad back together: While plugging the LCD Connector back in, take your time finding the socket on the logic board. Do no use pressure until you are certain it is seated properly. Trust me, if you take your time you will know its seated correctly.
Does it shares the same shape/size of the LCD connector between the ipad mini wifi only WHITE and the other one ipad mini 32gb BLACK?
-
-
-
液晶ディスプレイを片手で押さえながら、スパッジャーの平面側先端を液晶ディスプレイとiPadの右側のテープの間に差し込みます。
-
スパッジャーを外側に向けてスライドします。液晶ディスプレイからテープを剥がすため、少し持ち上げながら動かしてください。
Removing this tape and such to take the LCD off completely is unneccessary when replacing just the glass and digitizer, the digitizer cable is easily removed without further work to the LCD
When this tape damage, how we can take a new?
When this tape are damage, how we can order and take a new one?
Following from Nick H’s comment about LCD removal being unnecessary - I tried that first and got my broken glass OUT of the assembly by threading it thru a limited space beneath the LCD. Later when trying to reseat the digitizer connector I gave up and removed the LCD anyhow. Not that much extra work but a LOT easier to install the digitizer and reseat the connector without having to navigate around the LCD and its cable. Removal of the tape holding the LCD was easy - there are two short lengths of rubber or foam along the bottom edge of the LCD that faces the outside world. Remove those(save them) and then _carefully_ peel up the tape; I saw some metallic looking residue underneath. Later when re-assembling everything, I put the tape back and then those two short lengths of foam.
Rory Filer - 返信
-
-
-
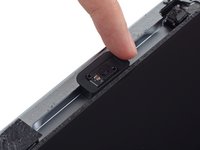
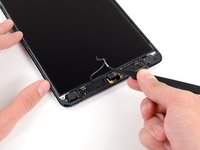
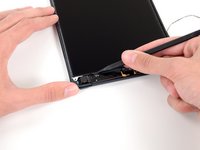
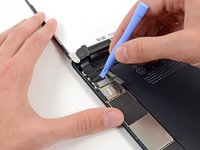
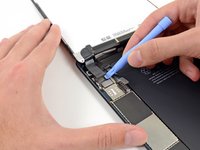
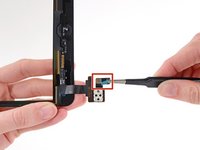
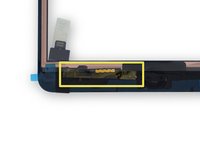
ソケットに加わるストレスを最小化するには、画像にあるように、コネクタの短辺側下をこじ開けてください。
-
ロジックボード上のソケットからデジタイザーコネクタを慎重にこじ開けます。
-
-
-
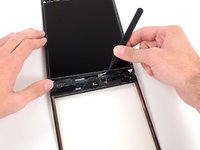
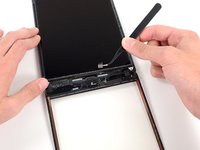
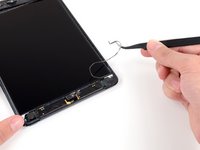
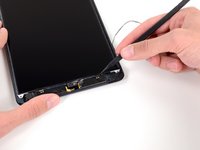
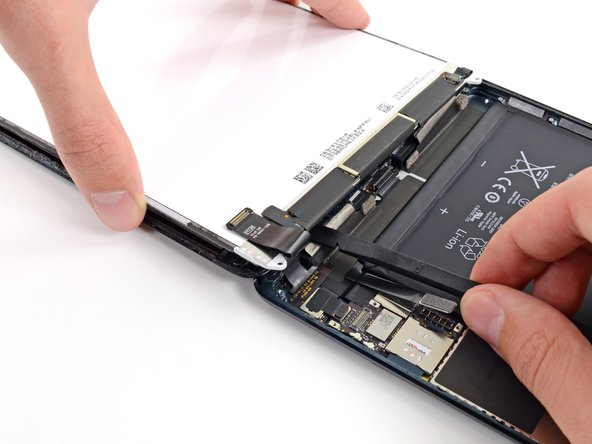
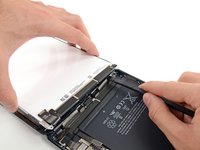
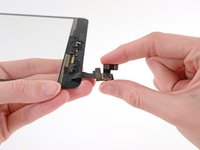
背面ケースからデジタイザーケーブルボードを丁寧に引き上げます。
There is adhesive holding it down, so it may take some time to get it off. It helped me to push with my spudger on the piece with the yellow text instead from the same side.
I put the iOpener under the iPad to weaken the adhesive for this step.
-
-
-
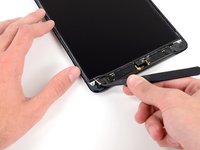
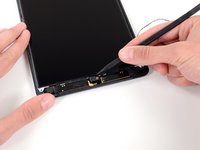
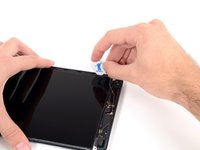
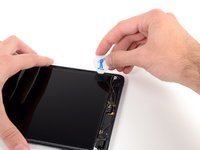
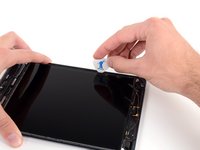
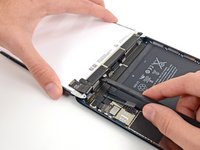
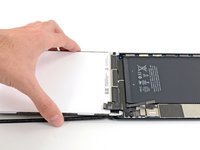
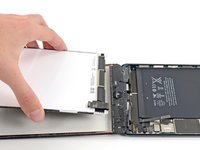
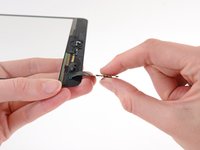
iPadから正面パネルを持ち上げて、取り出します。
== After step 55 ==
Before installing your new digitizer (front panel), make sure to put the necessary bends on the new digitizer's ribbon cable. Look at the old panel that you've removed to see the bends that you'll need to make. Without doing this, once you are at the last step of laying down the digitizer, the cable may bunch-up in between the glass and the iPad's aluminum frame. Thus, it will not allow that corner to sit flush and glue down. If you didn't make the bends, you can use the tweezers at that point to situate the cable. It is just easier to do this beforehand. Do not make the bends as if you were folding paper. You run the risk of damaging the ribbon by doing so. You just want enough pressure to make the cable retain a bend. Again, look at and copy the cable from your old panel.
Good Luck!!!!
If your panel is shattered, you may want to have some canned air to get rid of all those pesky little glass pieces that fly everywhere. I used a Giottos air blaster because that is all I had at my disposal.
Mike -
might be better to use a vacuum for safety reasons. you really dont want glass shards all over the place
If your case corners are damaged from being dropped, seal across the corners with wide packing tape, then grind them out carefully with a small motor tool. Use a corner piece from the broken screen (adhesive side upwards) as the template. Keep removing aluminium until screen piece above fits snug and flat. Remove all traces of metal filings before reassembly.
Good tip! Most times the corners are damaged.
-
-
-
交換用のフロントパネルで、デジタイザケーブルの接着剤のシールを剥がします。
-
デジタイザーケーブルを後ろ向きに折り曲げて、接着剤が固定するようにしっかりと押します。
The old glue was full of tiny shards. I rubbed it all away with many Q-tips and petroleum ether. To protect the LCD I used a sheet of heavy paper. Cleaning took a lot of patience.
Still should have listened to Mike: The digitizer ribbon cable went between the frame and the panel. It was bent too sharply. Touch worked, but the home button did not. When i tried to reopen, the glass cracked. Big disappointment, but ill try again!
Same here, so suspect I have the same problem, didn't see these comments until after I finished!
Took me nearly 2 hours to remove the glass because it just shattered even more every time I used the sucker. Used IsoPropanol to clean.
Checked all was working with the new digitiser and home button by starting iPad before sealing the glass shut, all ok.
Stuck it all down, home button works occasionally, but also siri bleeps on it's own sometimes as if someones pressing the button. Also, if I press either side of the home button I get a reaction as if I've pressed the home button, or sometimes I get the double tap action and sometimes Siri, makes me think that there is something shorting / touching that shouldn't be, unless it's the ribbon.
Will order another kit and give it another go shortly as the glass is sure to break when you re-open.
@Barry Tresadern
I had the same problem with the home button acting crazy. The problem is on the new screen there are metal contacts that are exposed and they are touching the metal frame making it seem the button is being pressed. If you look on the old screen you'll see strips of tape covering these metal contacts. You can either peel them off and put them on the new screen or just use some electrical tape.
Patrick -
With this step, im looking for a replacement screen. I cant seem to see the same connector as the one illustrated here. Is there 2 ribbons mixed there?
James, I think you're referring to the IC chip that most glass panels do not include. If you do not have soldering knowledge (and a lot of confidence and time) then it's crucial that you purchase a panel that has the IC chip attached, otherwise you will need to remove the old one from the broken assembly and re-solder it on to the new one - honestly not worth the time involved unless you know what you're doing.
Katie -
I've been able to replace a shattered screen. Took about an hour and a half. This consisted of mostly cleaning the shards. I wish there were some glue in the kit - I don't know if there is enough left from the previous screen to hold the new one. I'm likely going to use craft glue to make up the difference. Any other suggestions?
Heating the glue with a hair dryer or heat gun helps or you can buy very thin double faced tape.
I thought that it was a successful repair and resealed the iPad and turned it back on after replacing the digitalizer and the LCD screen, yet neither the home button nor the power button are working. After holding the power button, the power will come on but just one "click" the screen does not react. I tried moving the tape around the home button from the broken digitalizer to the new digitalizer, yet neither button works. I need help ASAP, I don't want to damage the iPad screen more by leaving it unopened for extended periods of time. Any suggestions?
the new pannel comes with a yellow tape on those contacts. Do not remove it. (or replace it !)
Yes..do not remove this tape!
Banu -
Yes I learned the hard way as well, be sure you leave the yellow plastic tape over the back of the home button and surrounding circuitry or put tape over this area before install. New screen installed and the home button isn't working :-(
THANK YOU Patboy2008, you saved me a friendship and a lot of heartache. I was racking my brain trying to figure out why the home button was on the fritz. Siri kept interrupting, the screen would go black, then flick on, then apps would randomly open, then it wouldn't even give me enough time to punch in my passcode. It was all about those two SILLY pieces of tape. Sure enough reopened it and noticed that the new screen didn't have the two black pieces of tape the old screen had. So glad I dug it out of the trash and transferred those pieces. It works like a charm now. Oh and this was so much harder to fix than the iPhones. The hardest part is getting the front panel off and if it's broke it'll come off in the tiniest of pieces. I hard shards of glass in my fingers that you were like invisible splinters. Be careful and take your time with this one.
Thanks for comments. Yes, do pay attention the the metal bands in the bottom frame of the front panel. DO cover a trip of electric tape on it. You will find the random moving and touching away.
It pays not to take the protectors off the glass panel adhesive until you have fitted the panel and turned on the ipad to test functionality a few times. (Once the adhesive sticks, it's very difficult to take the panel back off.) Also, I ended up applying two layers of electrical tape over the copper contacts on the panel before the random actions stopped. Now I am closing my third repair on the same machine. Let's hope this one sticks.
In a kit purchased in June 2019, this operation was already done.
-
-
-
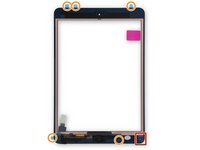
ガラスの内側にある大きな透明なプラスチックのライナーをはがします。
-
フロントパネルアセンブリの周囲にある接着剤を覆っている青いプラスチック製のライナーを全て剥がします。
-
黄色のカプトンテープや黒い電気テープなど、アウトライン部分のコッパーの被覆を剥がさないでください。
-
ガラスパネルに指紋や汚れがないことを確認してから、デバイスに装着してください。
I just received a new front planel and the digitizer connector is wrapped in a black electrical tape. I removed to check for the adhesive between circuit and connector but didn't see any, I re-wrapped in the original black tape which I think should be left alone. Also there was a yellow tape over the back of the home button and circuitry between the digitizer cable and home button. I removed this when I removed the blue plastic on the adhesive but I don't think your suppose to. After repair, home button doesn't work which might be because removing that tape.
-
-
-
プラスチック開封ツールをフロントパネルアセンブリ上部の左側端付近にあるマグネット両側にあてます。
-
丁寧に右側のプラスチック開封ツールをマグネットの下のエッジにあてます。
-
左側のプラスチック開封ツールをマグネットの下に差し込み、同時に押し上げながら右側のプラスチック製開封ツール側に向かって押します。
I found these come off much easier after applying heat to the area for 5 seconds.
On the kit purchased in June 2019, magnets were included in the replacement part.
-
-
In the kit as of July 2019, there is an area of adhesive (separate from the edge adhesive) on the screen where you want to relocate the magnets. It is in the rough shape of the magnet, so you can see how to orient the magnet (curve parallel to the curve of the case corner). When you close up the screen, the magnets fit into the depression above where the tabs of the LCD are (the ones you remove the screws from in step 31). The magnets shouldn’t be too far away from the copper-colored rim of the interior of the screen, or they will not fit into the depression and may crack the screen when you press it to close. Definitely dry fit!
Hi, I’d like to know if this magnets are necessary to maintain the screen attach, if they do something beside the adhesive. Thank you for your help.
-
-
ピンセットの先端を使って、丁寧に上部左側のスマートカバーマグネットを定位置に配置します。
-
スマートカバーマグネットの下部左側の部分でも同じ作業を繰り返します。
Do not forget to remove the protective film from inside of new digitizer, remove black insulating tape from bottom of old digitizer and place on new one, covering any and all exposed copper. Take your time - the repair is not hard but it is time consuming
Thank you for mentioning that! I don’t think I would have noticed until too late.
ted -
BEFORE you close everything up power up your ipad and make sure all the buttons and functions work properly, charging, rotation, home button, sleep button
Step 66, it is important to put the magnets in the same Exact place and orientation or you could break the glass (again) during installation.
The orientation of the magnets may also be important to the devices’s ability to wake/sleep in response to the cover being opened and closed.
ciradrak -
No mention is made of using any adhesive during the installation of the new panel. There are gobs of adhesives for many different purposes. Is there any recommendation for re-establishing an adhesive for the new panel?
Jim Dutton - 返信
Step 35b : watch for LCD white screw tabs as you pull up LCD panel so that they don't bind at the bottom and break off (definite crack)!
Jim Dutton - 返信
Step 46: was easier, at least for me, to insert spudger between frame and digitizer board (left side) rather than trying to get under it from its right side.
Jim Dutton - 返信
I was repairing the broken glass on my iPad. A lot of the broken glass was in small fragments along the edges which made sliding the pick underneath to loosen the glass quite difficult. Things would go well until I hit a small island of broken glass and the pick would stall as the glass wouldn’t budge. It took several re-heating cycles with the microwave heat pad and a lot of patience to break those loose. In retrospect, probably could have ignored them until the bulk of the glass was removed and then _gently & patiently_ chisel them out separately.
Rory Filer - 返信
Still had ghost touch issue with the iPad mini so I ended up purchasing Kapton tape on Amazon and used it to cover the entire bottom part of the iPad mini 2 where the Home button is, not just the gold connectors as previously suggested. Apparently this is a common issue with the iPad minis where the digitizer and home button are grounded to the iPad’s chassis. Thankfully, that resolved the issues of ghost touch and my daughter’s iPad is now working like a charm. Just wished your iFixit digitizers were properly prepped with Kapton tape from the factory. Hope this helps with other iFixit customers suffering from the same issue.
I believe I finally figured out the issue with the iPad mini. I feel like an idiot! It was improper installation. Ghosting on a the iPad mini was caused by creasing the digitizer flex incorrectly. It can NOT be allowed to bend backwards and touch the adhesive for the screen (I checked--mine and was bent backwards and creased due to it sticking to the adhesive). The flex must gently bow forward towards the LCD and not be allowed to crease. Unfortunately the digitizer is compromised and unusable. We’ll need a new digitizer but this time I wont make the same mistake
One of the more difficult/frustrating issues I had during reassembly was the tendency of the digitizer cable to place itself between the frame & the glass. This prevented the glass from seating completely in the frame & I believe would have caused damage to the ribbon cable had I not noticed it. I had to use a flat tool to guide the ribbon cable away from the frame as I lowered the glass into place. I am not in a position to do it, but I hope a reassembly document will be added to these instructions, as it’s not simply a matter of “following the instructions in reverse order.”!!!
Good tip! I replaced a digitizer myself after a shop had done it once already. Aside from new cracks, there were problems with dead spots on the screen, and the lock button would shut down but not sleep the screen. The screen I took off looked like the digitizer cable had been pinched like you noted, and I wonder if that was causing the problems.
ted -
If your ipad has a dented corner, you may need to trim the new glass a bit so that it fits flush. The ipad I worked on had been dented in the corner, which what cracked the screen in the first place. The dent pushed in the metal lip enough that a replacement screen would sit on top of it, so that a little too much pressure on the glass will make it crack again. A diamond-coated file will work to file off some of the glass on the corner. Full sized Leatherman multi-tools often have a diamond coating on the back side of the coarse file — it works great. Just be patient as it takes a while to grind off.
You Could Add One more Step: When assembling the screen it is necessary to tuck the digitizer cable back into the tablet as it wants to fold toward the outer edge and prevent the digitizer glass assembly from laying flat against the framework. You can do that with a Spudger by pushing the cabole back into the tablet as you close or seat the glass digitizer.
At which step during reassembly to remove blue protective film on the adhesive is never mentioned. I did it too early and thought of preserving it with cling film which does not peel off afterwards. Don't do this. I suggest removing this stuff just before turning “the page” back on.
There is no mention anywhere about ingress of dust between the cover glass and the LCD…is this a nonissue??
Just finished the digitizer replacement by buying a new one for $10 rather than pay $120 to get it repaired. Everything works great! A few tips that weren't mentioned:
1) I used a hair dryer on low heat for 30-40 secs and it softened the adhesive enough to pry it open.
2) If you have the wifi iPad (non-cellular), you don't have to worry about the antenna when prying, as it doesn't have one.
3) Be sure to remove the old adhesive by pulling it off the iPad frame so your new digitizer can sit tight and flush. Most new digitizers have adhesive included (very convenient), just peel off the blue cover vinyl as your final step.
4) Try to use something to cover the LCD screen from fingerprints and dust. I had to use a wet wipe to gently wipe down the LCD. I couldn't get every smudge off but it proved not to matter as it was not noticeable upon completion.
Hope this helps! -


デバイスを再度組み立てるには、この説明書の逆の順番で組み立ててください。
デバイスを再度組み立てるには、この説明書の逆の順番で組み立ててください。
94 の人々がこのガイドを完成させました。

2 件のコメント
I always use heat gun . it's the best for it
I didn't find this to be as hard as I had built it up in my mind to be; HOWEVER, saying that I need to say years ago I was the local Nokia service center in my town. But many years ago right after they got rid of analog times. Yeah. A classic installer/repairer mistake when starting something they haven't fixed or installed before is picking up the instructions, flipping through them; maybe even reading a section that is new-then tossing the instructions over the shoulder. "I got this." This usually comes right before something major gets broke. And I can tell you when you try to do it yourself and then mess it up horribly then take it to the repair shop. Well we called that "I can do it myself" syndrome and charged extra to put back together what they brought in in the box. Now knowing all this - I can't stress this enough because I am stupid, stupid, stupid. COVER YOUR SCREEN IN CLEAR BOXING TAPE AND READ ALL THE INSTRUCTION BELOW THROUGH TO THE END BEFORE EVEN ATTEMPTING THIS FIX. Take my advise.
windizy - 返信
I didn't have an iOpener, so I used a wheat type heat bag. If you do this though, make sure you put a layer of plastic between your Mac and the bag, or you'll get condensation in places you don't want it.
Martin Gray - 返信
I started out using the iOpener but switched to my wife's hairdryer. A heat gun or hair dryer proved to be much more convenient and is a time saviour. You can heat more and the glue becomes more fluid make the next steps with the opening picks much easier
Jan Van Puymbroeck - 返信
I know this is obvious, but backup your iPad with iTunes before you start. I'd also turn off your passcode if you have one.
Laurie Higgins - 返信
Ther first time you heat up the iOpener for this repair when its room temperature I had to heat it up for more than 30 seconds. I remember I had to heat it up for around 45 seconds. However, after that when you need to reheat it again during the repair 30 seconds will be enough.
Yousef Ghalib - 返信
I used the wheat bag in a sensor microwave heating up to 65-70 deg C (155 def F).
ian cheong - 返信
Get yourself a cherry pit bean bag the size of your iPad. Heat it, put the iPad on it for 3 to 5 minutes or so, reheat the cherry pit bean bag, again put your iPad on it. Then heat the iOpener and start working. The cherry pit bean bag will have to be reheated several times, but it will soften the adhesive so you have less problems with the iOpener
Tim Feyaerts - 返信
The heating can be done very effectively (and quickly) with 3d printer heated bed. Make sure the bed is clean. Set the temperature to 60c, (130f ) and put the ipad face down for +/- 10 minutes. Repeat as needed throughout the “gentle prying” stages.
polleyphony - 返信
The iOpener did not work at all for me.
I had to use a heat gun and bring the edges of the case up to ~200 degrees (used an infrared thermometer to measure) before the glue would weaken. This obviously superheated the metal frame, so I also had to wear gloves to handle the phone while prying the back off with the included picks.
Mike Jeanette - 返信
Repair instructions worked like a charm. Had to be patient with the iOpener and getting the screen off. I tried repeatedly without success until shifting the suction cup a bit to the left side where perhaps the glue had loosened up a bit more.
Kyle - 返信
The iOpener, in my opinion, is of no help. Many warnings to say “don’t warm it too much”, but the glue doesn’t melt if not warm enough. As a result, a complete waste of time and energy. In addition, too much liquid in it, so it doesn’t lay on the device on a sufficient surface. I took a hairdryer and it worked much much better.
laurentvidu - 返信
I used an immersion bath to heat this to 180F and applied it to the device until the outside temperature of the opener read 150F with an IR thermometer. Removing the screen took very little force with this method.
breadandbits - 返信
My experience. I was replacing the screen which had been cracked and a little shattered in some places. The iopener is pretty much useless, so was the suction cup. The suction cup would probably be more useful if I was doing something besides the screen. Also you probably want the clean the screen before using it so it can get good suction. I used a hair dryer on high for a couple of minutes at a time (someone on this tread suggested that). I used my exacto knife and a razor blade to get into the adhesive. First the exacto to get the initial cut, then the razor blade to go a little deeper. Could have probably just used the razor blade, but the exacto has a little more finesse. I got the razor blade in and a little under the glass then I used the picks to wedge in. I didn’t want to risk anything using the razor blade too much. Used tape to keep the shattered glass together.
trebor65 - 返信
My experience pt2
Fortunately the shattering was mostly on the edges and most of it had adhesive on the back so it stuck together. Just take your time and work your way around following the guide to get the screen off. Have some goof off or goo be gone to clean the frame when putting the new glass on or putting the existing one back. (someone suggested that also, very good idea). Be careful of the LCD (you should know that). The cable on my LCD was pretty tight, so I propped it up while taking the cable cover off and when I put it back on I did the same thing. I just put a bottle on the battery and leaned the back of the LCD on that while attaching the cables and putting the screws back on the cover. Also be careful with the home button and the bracket on the back of it. I had enough old adhesive on left on the bracket that it stuck back to the new glass fine. So far only 12 hours in, so we will see how that holds up when the kids get at it.
trebor65 - 返信
Another alternative if you do not have the iopener is to use a bed time hotwater bottle. Do not over fill it though. Just put enough hot water in to support the phone while you work around the adhesive.
I use both the hot water bottle and iopener together on Samsung's. It makes life easier
gazza667 - 返信
I followed the directions and heated my iOpener for 30 seconds in a 1000 watt microwave, and it came out at 160 degrees F, as verified by a infrared thermometer. This allowed me to separate the last bit of the back of my Samsung S8, which was already coming off due to a swollen battery (hence the reason for the repair).
Dennis - 返信
Hallo,habe den Akku erfolgreich getauscht.Doch seitdem gibt es bei Telefonaten eine Rückkopplung für den anrufenden.Bei mir ist alles normal.Woran liegt das?Mfg
Manu R - 返信
If you follow these instructions, you will crack your screen like I did. Heating the iOpener for 30 seconds, using it to melt glue, then waiting 10 minutes to reheat is useless. The iOpener can be used to maybe warm the glue on whatever side you aren’t working on. You need a hairdryer and/or a heat gun to melt the glue and separate the glass from the iPad.
Anyone want to buy an old iPad with broken glass and a dead battery?
mpulliam - 返信
Not everybody has a microwave. You should provide a target temperature for the iOpener and instructions for a conventional oven, or pot of warm water, or whatever. Although I will probably use a heat gun …
Esmond Pitt - 返信
Three times heating opener and no luck. Tried pressing down gently on opener with a towel, and the opener broke. Wondering if I now replace table mats, fancy table cloth, etc. or will this stuff wash out.
Not impressed so far. Maybe the hair dryer next.
doug - 返信
I support the comments about the iOpener. Everyone has a hair drier, FHS, so get a cheap IR thermometer (£18) and blow heat until the area is 60+ deg C. Still takes w while, and getting the screen off is v scary, but just add more heat if you feel resistance.
The rest of the kit is good, esp the magnetic screwdrivers.
Richard O'Brien - 返信
No, everyone does not have a hairdryer. Some of us don’t even have hair. Thank goodness I already had an IR thermometer, though.
nin10doh -
#### WARNUNG WENN MINIMALSTER SPRUNG IM DISPLAY IST FUNKTIONERT DAS NICHT!!! ######
Hatte einen winzigen, minimalen Sprung im Display. Ich dachte es könnte gehen, weil der Sprung “abgeschlossen” war. Er hat in einer Ecke ein winzige Glasteil rausgeschnitten. NEIN! Geht nicht. Habe alles mit viel Geduld dem iOpener und einem Föhn erhitzt. Es ist trotzdem sofort über das komplette Display zersprungen…
T z - 返信
I’ve started with iOpener but changed very quickly to a heatgun. That was more efficient.
Mizzoo, s.r.o. - 返信
I could not get the iOpener hot enough to melt the glue on my ipad 6. I heated for 45 seconds once and it was boiling and it still never worked. Thank goodness contributors mentioned using a hair dryer. Using an 1700w hair dryer on high did the trick to get the screen off. Still took some time and the case got pretty hot but be patient. It took twice as long and a lot more patience to get the battery out.
Randal Haufler - 返信
I have an Ipad with touch screen issue, if i replace this part it should be Ok?
janderson martin - 返信
WARNING - DO NOT MICROWAVE ON A METAL MICROWAVE RACK
The metal microwave rack can heat up and melt through the iOpener cover letting the contents leak out.
Not a big issue for me as I have a heat gun and used that instead.
Run Up A Tree - 返信
I opened my iPad with the iOpener. Be patient! It may take quite a bit longer to it the iOpener in the microwave than it says in the guide. My microwave can only do 800W and I had to put the iOpener in several times (maybe a total of 90-120 seconds). I recommend that you have the transparent side up an watch the bag carefully. As long a the bag doesn't bloat up and the liquid doesn't start bubbling you should be fine. But I recommend to take the iO out from time to time to check it. (More comments in Step 6.)
marcelflueeler - 返信
I gave upon the I opener and used a hairdryer. (Fixed an iPad 6)
Tom Weber - 返信
iPad mini gen5. I used the iOpener. My microwave is 1200w with carousel. 30 sec got the iOpener to 155ºF. For the 2nd heating, after 10 minutes sitting, the temp was still around 125º so I only cooked it for 15 sec. Not enough increase so +5 sec more which me to 165-170ºF. This should be considered ballpark info because who knows the real output of the various microwaves and the quality of the IR tool used to determine temp.
To successfully open my iPad mini I applied the iOpener twice to the left edge and twice to bottom. & once to R edge. Using the suction cup was difficult for me (I'm in my 70's so my hands don't work too well anymore). I had trouble holding the guitar pick and slipping them in (at an downward angle). In the end, sliding my thumbnail along the edge opened it very slightly and allowed the pick to get into the gap. I marked the ends of all my picks with a sharpie pen for the recommended 2mm insertion to avoid going in too deep. To get the screen open it took me approx 1 hour.
jharrison - 返信
Can’t you just use a hair curler instead?
Aspect22 - 返信
A hairdryer or heat gun works, if heating is kept around 100 deg C (212 deg F - boiling point of water). But… heating this way is cumbersome. Using a hotplate, set to 100 deg C, measured carefully with a fairly inexpensive IR gun, is simpler and easier, if you can afford the hotplate (I used an old pancake griddle with a thermostat knob). It works great for phones, setting them face down for 2 minutes, then picking them up with insulated gloves - cheap, wool gloves work fine. This may require repeated reheating to continue the display removal, but its much simpler.
Because its almost impossible to repeatedly lay an iPad/tablet on the hot plate, I propose an alternative.
Initially lay the larger iPad/tablet, face down, for 2 min, to heat all of the adhesive surrounding the display. Lift and begin the picking process describe in your removal steps. Then lay an iOpener on the hotplate for 2 min (already set to the exact, desired temp) to bring it to working temp for the remaining operations.
Dan Smith - 返信
For iPads in particular, it makes sense to construct a simple, aluminum window frame, laid on a hotplate (see my comment above) that only touches the edges of the display, heating only the adhesive underneath. This prevents general heating of the entire device. Four strips of aluminum, placed together as a frame, would be the simplest and allow variations for all devices - envision it as a pinwheel of strips, radiating outward. Use it for any size device.
Dan Smith - 返信
BTW, always read all comments at each step. New, and possibly useful, suggestions appear on occasion that can be crucial.
Dan Smith - 返信
My iOpener got damaged at the first heating (30 s @ 800 W). The bag got a little melted hole where the liquid came out and a little melted area. I used a combination oven (normal heat and microwave) in microwave only mode. It has a metal grill where the iOpener was placed on. I suppose the metal grill concentrates the microwaves at some points and there the bag melted?
K. Fe - 返信