メインコンテンツにスキップ
リペアコミュニティに参加 - アカウントの作成

Zeki Droid Tablet Front Screen Replacement

必要な工具と部品

    1. Zeki Droid Tablet Front Screen Replacement, Back Casing: 手順 1、 1の画像 1
      • Remove the back casing by slowly popping each tab out with a plastic opening tool.

      FixBotに聞いてみる

      コメントを追加

    2. Zeki Droid Tablet Front Screen Replacement: 手順 2、 1の画像 1
      この手順で使用する道具:
      Tweezers
      $4.99
      • Remove the tapes one by one from the connecting wires with tweezers.

      FixBotに聞いてみる

      コメントを追加

    3. Zeki Droid Tablet Front Screen Replacement: 手順 3、 1の画像 1
      • Remove the black clips from both sides of the casing with a plastic opening tool.

      • The clips should pop off separate from the speakers.

      FixBotに聞いてみる

      コメントを追加

    4. Zeki Droid Tablet Front Screen Replacement: 手順 4、 1の画像 1
      • Remove the speakers from the back casing.

      • Do not tug on the speakers because they are connected to fragile wires.

      FixBotに聞いてみる

      コメントを追加

    5. Zeki Droid Tablet Front Screen Replacement: 手順 5、 1の画像 1
      • Pull the speakers away from the back casing carefullly.

      FixBotに聞いてみる

      コメントを追加

    1. Zeki Droid Tablet Front Screen Replacement, Front Screen: 手順 6、 1の画像 1
      • Detach the motherboard from the framing by removing the four screws using a Phillips #000 screwdriver.

      FixBotに聞いてみる

      コメントを追加

    2. Zeki Droid Tablet Front Screen Replacement: 手順 7、 1の画像 1
      この手順で使用する道具:
      Tweezers
      $4.99
      • Lift the camera and flash components from their fittings using tweezers.

      FixBotに聞いてみる

      コメントを追加

    3. Zeki Droid Tablet Front Screen Replacement: 手順 8、 1の画像 1
      • Lift the metal framing to reach the components at the front of the device.

      • Do not pull the framing completely off. There is a ZIF connecter holding it in place.

      FixBotに聞いてみる

      コメントを追加

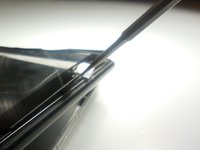
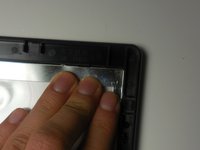
    4. Zeki Droid Tablet Front Screen Replacement: 手順 9、 2の画像 1 Zeki Droid Tablet Front Screen Replacement: 手順 9、 2の画像 2
      • Push the screen forward to remove.

      FixBotに聞いてみる

      コメントを追加

終わりに

To reassemble your device, follow these instructions in reverse order.

キャンセル: このガイドを終了できませんでした。

作成者

7人の作成者と共同で作成されました。

Kyla

メンバー登録日: 03/11/15

156 ポイント

2のガイドは作成済み

チーム

Colorado Springs, Team 2-6, Panko Spring 2015 Colorado Springs, Team 2-6, Panko Spring 2015人のメンバー

UCCS-PANKO-S15S2G6

3 メンバー

10のガイドは作成済み

0件のガイドコメント

コメントを追加

統計データ:

過去 24時間: 1

過去 7 日: 7

過去 30 日: 26

今までの合計 567